

This lesson is made with PSPX9
But is good with other versions.
© by SvC-Design

Materialen Download :
Here
******************************************************************
Materials:
aditascreations_mask_04.jpg
Monaiekje mask 29.jpg
TCH-Alpha-Chatons.pspimage
TCH-Chat-008.pspimage
TCH-Chatons-Tendresse-Lignes.pspimage
******************************************************************
Plugin:
Plugin - Filters Unlimited 2.0 - Filters Factory Gallery S - Pathways to Helion
Plugin - Filters Unlimited 2.0 - Tramages - Pool Shadow
Plugin - Filters Unlimited 2.0 - Tramages - The Stump 2
plugin - [AP Lines] - Lines SilverLining – Dotty Grid
******************************************************************
color palette
:
******************************************************************
methode
When using other tubes and colors, the mixing mode and / or layer coverage may differ
******************************************************************
General Preparations:
First install your filters for your PSP!
Masks: Save to your mask folder in PSP, unless noted otherwise
Texture & Pattern: Save to your Texture Folder in PSP
Selections: Save to your folder Selections in PSP
Open your tubes in PSP
******************************************************************
We will start - Have fun!
Remember to save your work on a regular basis
******************************************************************
1.
Open all your tubes in your PSP, duplicate the layers, and close the originals
2.
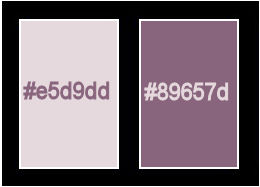
Place the color # e5d9dd in the foreground, and the color # 89657d in the background
3.
Configure your gradient: Radial Style, Angle 0, Repetitions 9, Inverted checked

4.
Open TCH-Alpha-Chatons.pspimage
Window – Duplicate
Minimize the original – we work on the copy
5.
Fill the Layer with the gradient
6.
Adjust - blur - gaussian blur
Raduis : 30
7.
Plugin - Filters Unlimited 2.0 - Filters Factory Gallery S - Pathways to Helion

8.
Adjust - blur - gaussian blur
Raduis : 5
9.
Layers - New Raster Layer
10.
Fill the layer with the color # 89657d
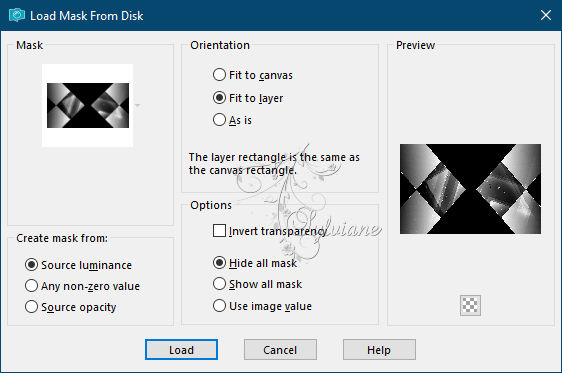
11.
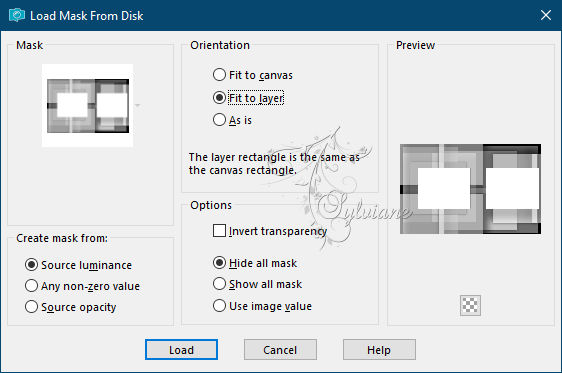
Layers – Load/save mask – Load mask from disk - Monaiekje mask 29.jpg
12.
Layers - Duplicate
13.
Edit – repeat duplicate layer
14.
Layers - Merge - Merge Group
15.
Effects - Edge Effects - Enhance
16.
Layers - New Raster Layer
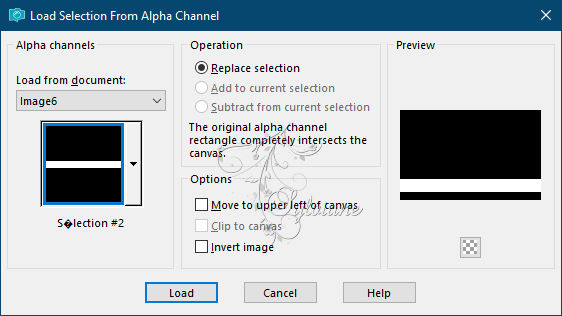
17.
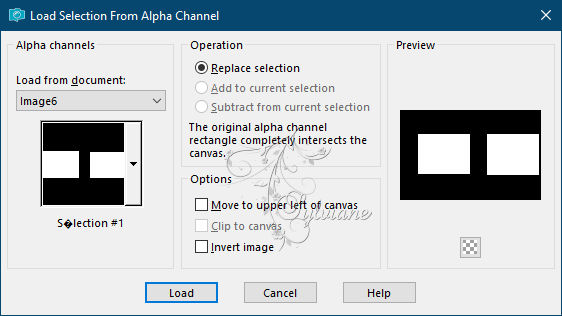
Selections - Load / Save - Load selection from Alpha Channel -
Selection # 1
18.
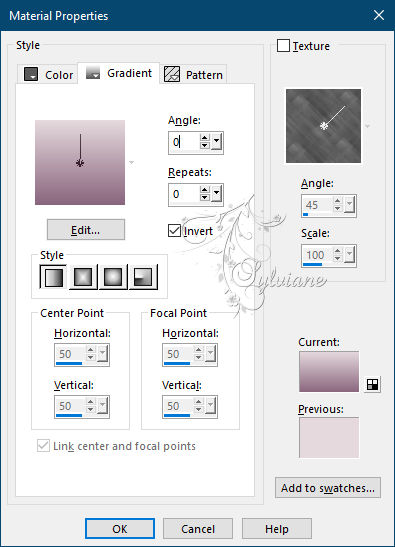
Place the color # e5d9dd in the foreground, and the color # 89657d in the background
19.
Configure your gradient: Linear Style, Angle 45, Repetitions 0, Invert checked

20.
Fill the selection with the gradient
21.
Keep the selection
22.
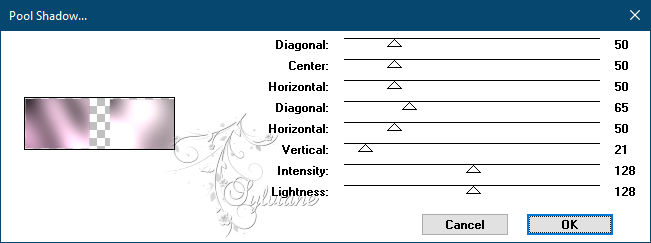
Plugin - Filters Unlimited 2.0 - Tramages - Pool Shadow
23.
Keep the selection
24.
Plugin - Filters Unlimited 2.0 - Tramages - The Stump 2
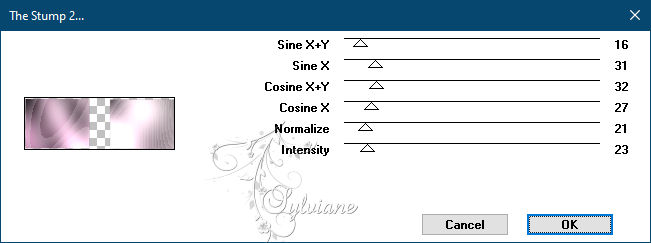
25.
Keep the selection
26.
Adjust – softness – soften more
27.
Selection - Select None
28.
Activate Group - Raster 2
29.
Effects, 3D Effects, Drop Shadow
-15/-15/70/0 color: #705a66
30.
Activate Raster 2
31.
Layers - New Raster Layer
32.
Fill the layer with the color # e5d9dd
33.
Layers – Load/save mask – Load mask from disk - aditascreations_mask_04.jpg
34.
Layers - Merge - Merge Group
35.
Effects - Image Effects - Seamless Tiling

36.
Blendmode: Screen
37.
Image - Mirror - Vertical Mirror
38.
Place the color # e5d9dd in the foreground, and the color # 89657d in the background
39.
Configure your gradient: Linear Style, Angle 0, Repetitions 0, Inverted checked
40.
Layers - New Raster Layer
41.
Selections - Load / Save - Load selection from Alpha Channel -
Selection # 2
42.
Fill the selection with the gradient
43.
Selection - Select None
44.
Effects - Edge Effects - Enhance
45.
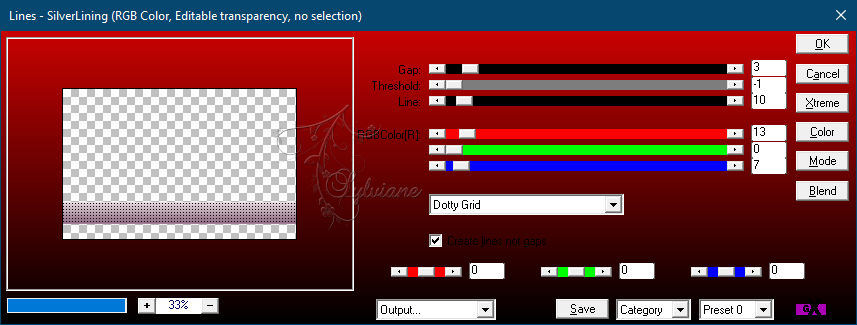
plugin - [AP Lines] - Lines SilverLining – Dotty Grid
46.
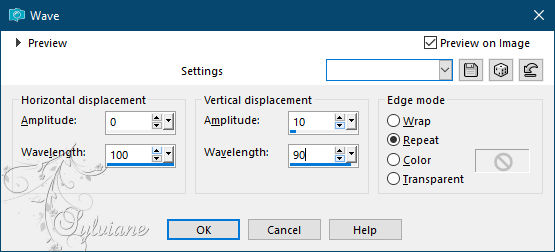
Effects - Distortion Effects - Waves
47.
Blendmode: Overlay
48.
Open TCH-Chatons-Tendresse-Lignes.pspimage
Edit – Copy
Edit - Paste as new layer
49.
Layers - New Raster Layer
50.
Selections - Load / Save - Load selection from Alpha Channel -
Selection # 3

51.
Fill the selection with the color # 89657d
52.
Selection - Select None
53.
Effects - Edge Effects - Enhance
54.
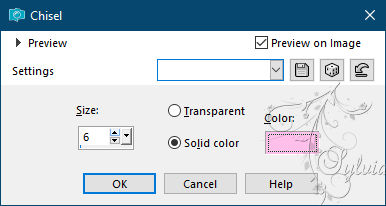
Effects – 3D effects – chisel - color:#fdbfea
55.
Effects, 3D Effects, Drop Shadow
-15/-15/70/0 color: #705a66
56.
Open TCH-Chat-008.pspimage
Edit – Copy
Edit - Paste as new layer
57.
Image - Resize – 120%
58.
Adjust – one step noise removal
59.
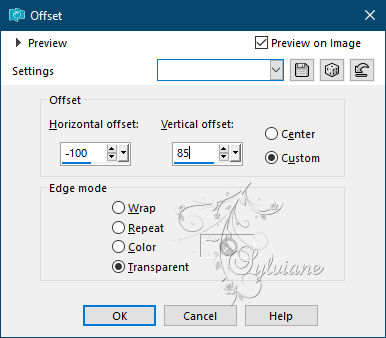
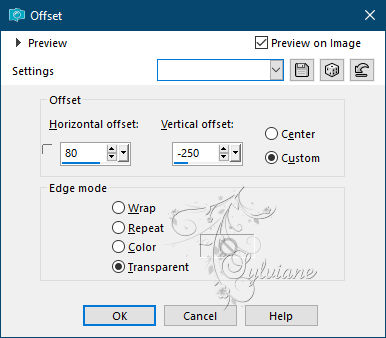
Effects - Image Effects - Offset
60.
Activate Raster 5
61.
Tools, Magic wand, with the following configurations:

62.
Select the top frame
63.
Selection - modify - contract -1 pixel
64.
Go back to the Kittens Layer
65.
Selections – Promote selections to layer
67.
Selection - Select None
68.
Place yourself on the kittens layer (Raster 6)
69.
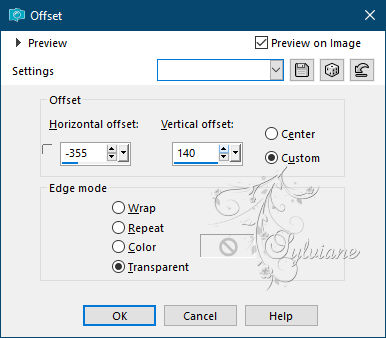
Effects - Image Effects - Offset
70.
Go to layer 3 Frames
71.
Tools, Magic wand, with the same configurations
72.
Select the lower frame

73.
Selection - modify - contract -1 pixel
74.
Go back to the Kittens Layer
75.
Selections – Promote selections to layer
76.
Selection - Select None
77.
Place yourself on the kittens layer (Raster 6)
78.
Effects - Image Effects – Offset
79.
Go to layer 3 Frames
78.
Tools, Magic wand, with the same configurations
79.
select the middle frame

80.
Selection - modify - contract -1 pixel
81.
Go back to the Kittens Layer
82.
Selections – Promote selections to layer
83.
Selection - Select None
84.
Delete raster 6
85.
Open TCH-Chat-008.pspimage
Edit – Copy
Edit - Paste as new layer
86.
Image - Resize – 94%
87.
Place the tube at the bottom right of your workspace
88.
Layers - Duplicate
89.
activate the layer below
90.
Adjust - blur - gaussian blur
Radius: 15
91.
blendmode: Screen
92.
Image - Add Borders -1 pixel - color #ffcafa
93.
Image - Add Borders -10 pixels - color # 3f2f3a
94.
Image - Add Borders – 30 pixels - color # 89657d
95.
Image - Add Borders -1 pixel - color #ffcafa
96.
put your watermark on it
Layer – merge – merge all (flatten)
Save as JPEG
Back
Copyright Translation © 2021 by SvC-Design