

This lesson is made with PSPX9
But is good with other versions.
© by SvC-Design
Materialen Download :
Here
******************************************************************
Materials:
deco_01_naisem.pspimage
deco_02_naisem.pspimage
swamps.PspGradient
misted.pspimage
nome_martine.pspimage
seta.pspimage
******************************************************************
Plugin:
Effects - plugins - Mehdi Sorting tiles
Effects - plugins - VM ElizaBlaze - zoom blur
Effects - plugin - Mura Meister - pole transform
Effects - plugin - AAA Frames - foto Frame
******************************************************************
color palette
:
no
******************************************************************
methode
When using other tubes and colors, the mixing mode and / or layer coverage may differ
******************************************************************
General Preparations:
First install your filters for your PSP!
Masks: Save to your mask folder in PSP, unless noted otherwise
Texture & Pattern: Save to your Texture Folder in PSP
Selections: Save to your folder Selections in PSP
Open your tubes in PSP
******************************************************************
We will start - Have fun!
Remember to save your work on a regular basis
******************************************************************
1 .
Open a new transparent image of 900 x 600px
2 .
You will need this gradient (swamps.PspGradient)
Angle :0
Repeat :0
Invert : not checked
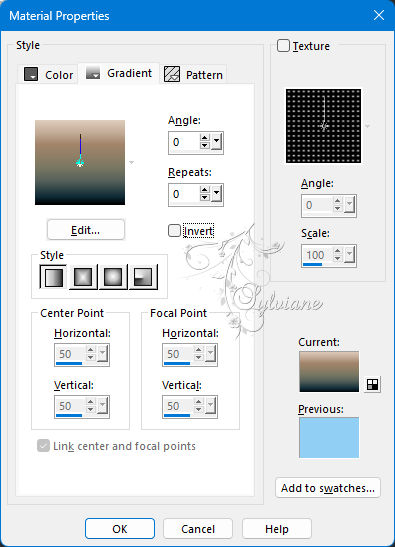
Fill with the gradient
3.
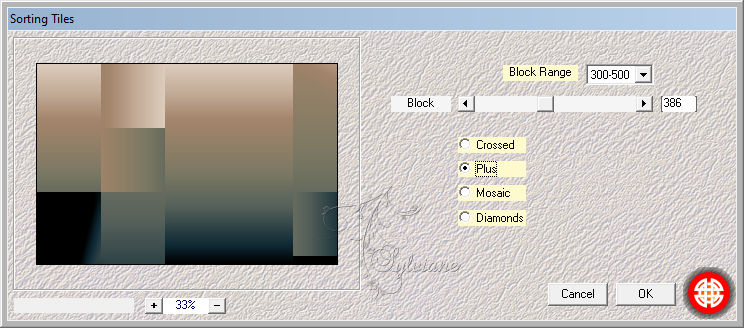
Effects - plugins - Mehdi Sorting tiles
4.
Effects - plugins -Unlimited 2.0 -VM ElizaBlaze - zoom blur

5.
Effects - Edge Effects - Enhance More
6 .
Layers - duplicate
7.
Effects - plugin - Mura Meister - pole transform
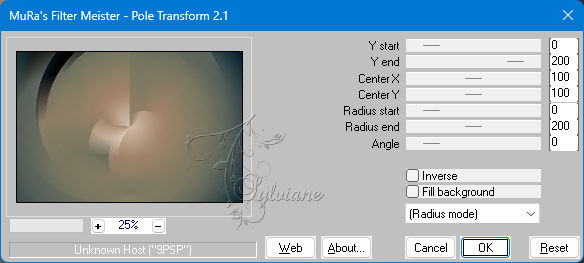
Blend mode : Hard Light or what you like best
8.
Open deco_01_naisem.pspimage
Edit - copy
Edit - paste as a new layer
Activate the selection tool (press K on your keyboard)
and fill in following parameters :
Pos X : -36 - Pos Y : -82
Press M
9.
Open misted.pspimage
Edit - copy
Edit - paste as a new layer
Adjust as desired
10.
Image - add borders - Symmetric - 10px - dark color
Image - add borders - Symmetric - 57px - light color
11.
Effects - plugin - AAA Frames - foto Frame
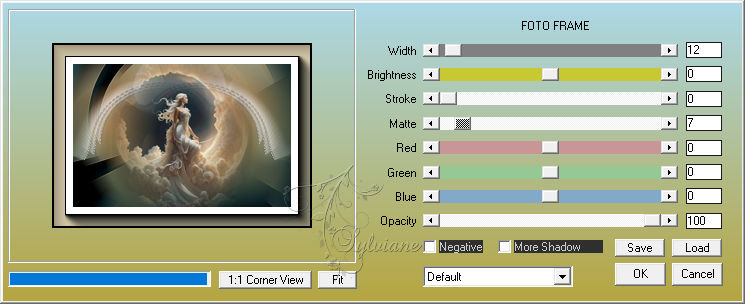
12.
Activate your pen tool
Set it like this: choose from Line styles exactly like this
*Current stylized line

Create an arrow and print
In horizontal and vertical
If you can't do it
Open seta.pspimage
Edit - copy
Edit - paste as a new layer
13.
Open deco_02_naisem.pspimage
Edit - copy
Edit - paste as a new layer
14.
Effects - Image Effects - Seamless Tiling - side by side
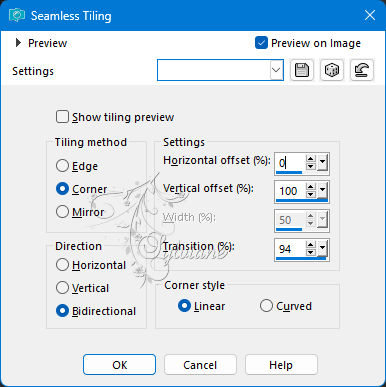
Blend mode - Orvelay
15.
Open nome_martine.pspimage
Edit - copy
Edit - paste as a new layer
Activate the selection tool (press K on your keyboard)
and fill in following parameters :
Pos X : -11 - Pos Y : 322
Press M
Blend mode Orvelay
16.
Layers - merge - merge visible layers
17 .
Put your watermark on it
Layers - merge - all layers merge
18.
Save as jpeg
Back
Copyright Translation 2024 by SvC-Design
------------------------------------------------------------------------------
Thanks to all who created