

This lesson is made with PSPX9
But is good with other versions.
© by SvC-Design

Materialen Download :
Here
******************************************************************
Materials:
0_f7d7f_c172c035_orig.jpg
100201074922397205354529.jpg
dandeliondeco.png
Fond -Dandelion.jpg
WDDandelion.png
******************************************************************
Plugin:
Effects – plugin - Flaming Pear - Flexify.
Effects – plugin - AP01 - Lines Silverlining - Dotty Grid
Effects – plugin - Carolaine & Sensibility - CS LDots.
******************************************************************
color palette
:
******************************************************************
methode
When using other tubes and colors, the mixing mode and / or layer coverage may differ
******************************************************************
General Preparations:
First install your filters for your PSP!
Masks: Save to your mask folder in PSP, unless noted otherwise
Texture & Pattern: Save to your Texture Folder in PSP
Selections: Save to your folder Selections in PSP
Open your tubes in PSP
******************************************************************
We will start - Have fun!
Remember to save your work on a regular basis
******************************************************************
Open Fond -Dandelion.jpg
Window - duplicate
Minimize the original - we are working on the copy
Layer – promote background layer
Adjust - blur - radial blur
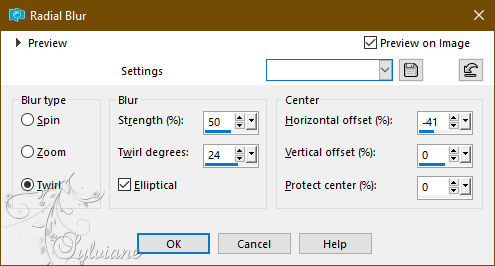
2.
Effects – plugin - Flaming Pear - Flexify.
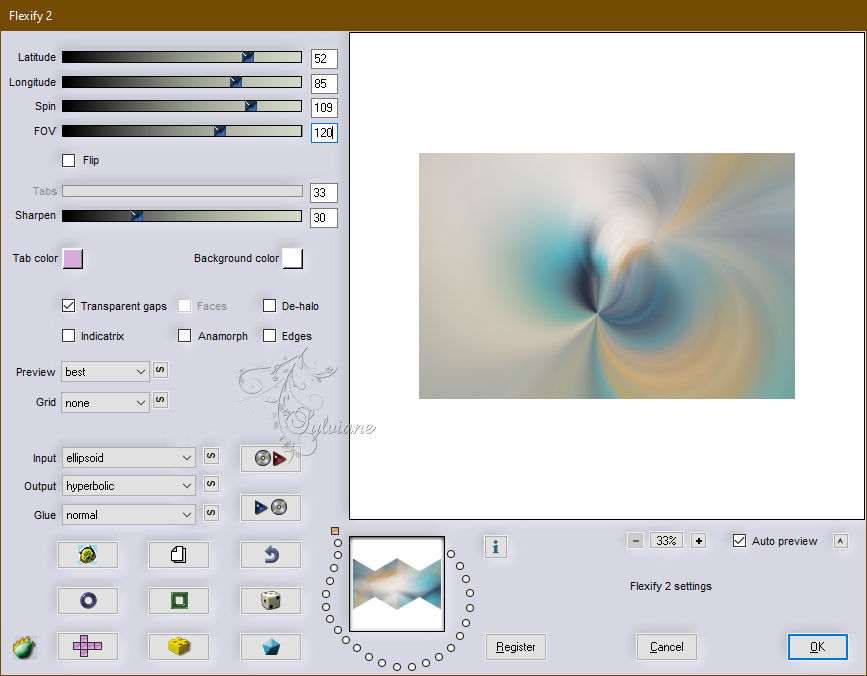
Adjust – scharpness – scharpen
3.
Layers - New raster layer.
Fill with color 2
Layers – arrange – move down
Activate Raster 1
4.
Layers – Duplicate
Effects - Texture Effects – wave - color:#000000
blendmode: Soft light.
Opacity: 42%.
Selections - Select all.
5.
Layers - New raster layer.
Open 100201074922397205354529.jpg
Edit - Copy.
Edit - Paste into selection.
Blendmode: Soft light.
Opacity: 24%.
Effects - Edge Effects - Enhance
6.
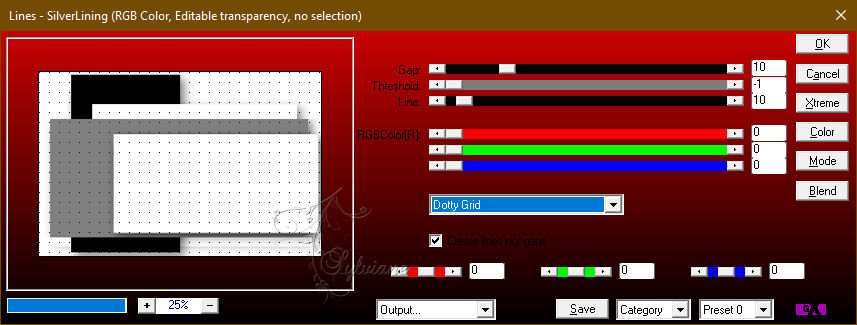
Effects – plugin - AP01 - Lines Silverlining - Dotty Grid.
7.
Layers - New raster layer.
Fill with color 2.
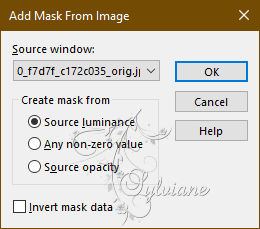
Layers - New Mask Layer - From Image - 0_f7d7f_c172c035_orig.jpg
Layers – Duplicate
Layers - Merge - Merge Group
opacity: 79%.
8.
Open misted "Dandelion" or your own tube.
Edit - Copy.
Edit - Paste as new layer.
Image - Resize this layer to 80%.
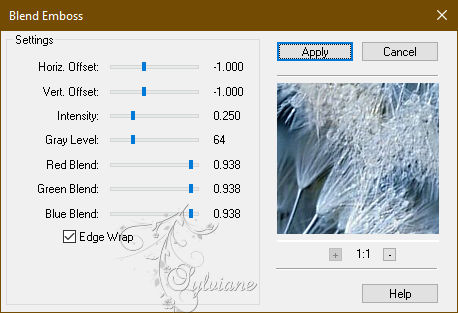
Effects – plugin - FM Tiles Tool - Blend Emboss.
9.
Open WDDandelion.png
Edit - Copy.
Edit - Paste as new layer.
Activate selection tool (Press K on your keyboard)
And enter the following parameters:
Pos X : 25 – Pos Y : 64
Press M.
10.
Open uw second tube
Edit - Copy.
Edit - Paste as new layer.
Image - Resize this layer to 73%.
Move this layer to the right of the document.
11.
Open dandeliondeco.png
Edit - Copy.
Edit - Paste as new layer.
Activate selection tool (Press K on your keyboard)
And enter the following parameters:
Pos X :79 – Pos Y : 21
Press M.
Edit – copy special- copy merged
12.
Image - Add Borders – Symmetric -1 pixel - color 1
Image - Add Borders – Symmetric - 5-pixel - color 3
Image - Add Borders – Symmetric - 3-pixel - color 1
Image - Add Borders – Symmetric -10-pixels - color 3
Image - Add Borders – Symmetric - 5-pixel - color 1
Image - Add Borders – Symmetric - 3 pixels - color 3
Image - Add Borders – Symmetric - 40 pixels - color 1
13.
Magic wand tool - Select the last border.
Edit - Paste into selection.
Adjust - blur - gaussian blur
Radio: 30
14.
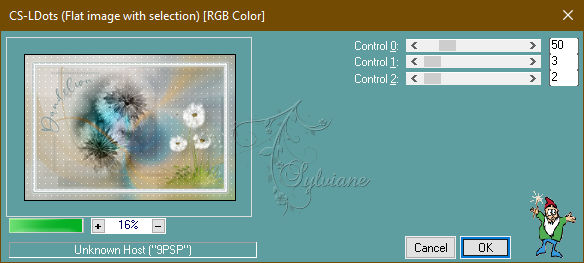
Effects – plugin - Carolaine & Sensibility - CS LDots.
Adjust – scharpness – scharpen
15.
Selections - Invert.
Effects - 3D Effects - Drop Shadow
2 /2 /40/ 30 - color #000000
Selection - Select None
16.
put your watermark on it
Image - Add Borders – Symmetric -1 pixel - color 1
Image - Resize to 950 pixels wide.
Save as JPEG
Back
Copyright Translation 2024 by SvC-Design
------------------------------------------------------------------------------
Thanks to all who created