
This lesson is made with PSPX9
But is good with other versions.
© by SvC-Design
Materialen Download :
Here
******************************************************************
Materials:
Déco Mandy.png
Wordart7367f_L.png
aditascreations_mask_37.jpg
aditascreations_mask_46.jpg
aditascreations_mask_49.jpg
Violine Sélection #7.PspSelection
lunadeco092.png
tubtatie_48f62024.png
******************************************************************
Plugin:
Plugin - Eye Candy 5 Impact - Glass.
Plugin - FunHouse - Angulate
Plugin - Unlimited 2.0 - Paper Textures - Hemp Paper 1
Plugin - AAA Frames - Foto Frame
******************************************************************
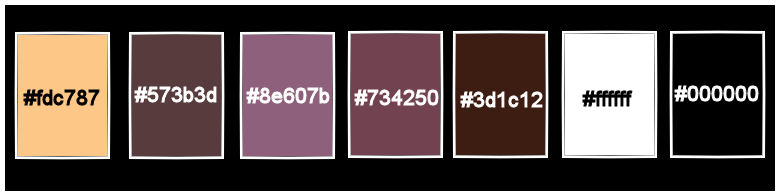
color palette
:
******************************************************************
methode
When using other tubes and colors, the mixing mode and / or layer coverage may differ
******************************************************************
General Preparations:
First install your filters for your PSP!
Masks: Save to your mask folder in PSP, unless noted otherwise
Texture & Pattern: Save to your Texture Folder in PSP
Selections: Save to your folder Selections in PSP
Open your tubes in PSP
******************************************************************
We will start - Have fun!
Remember to save your work on a regular basis
******************************************************************
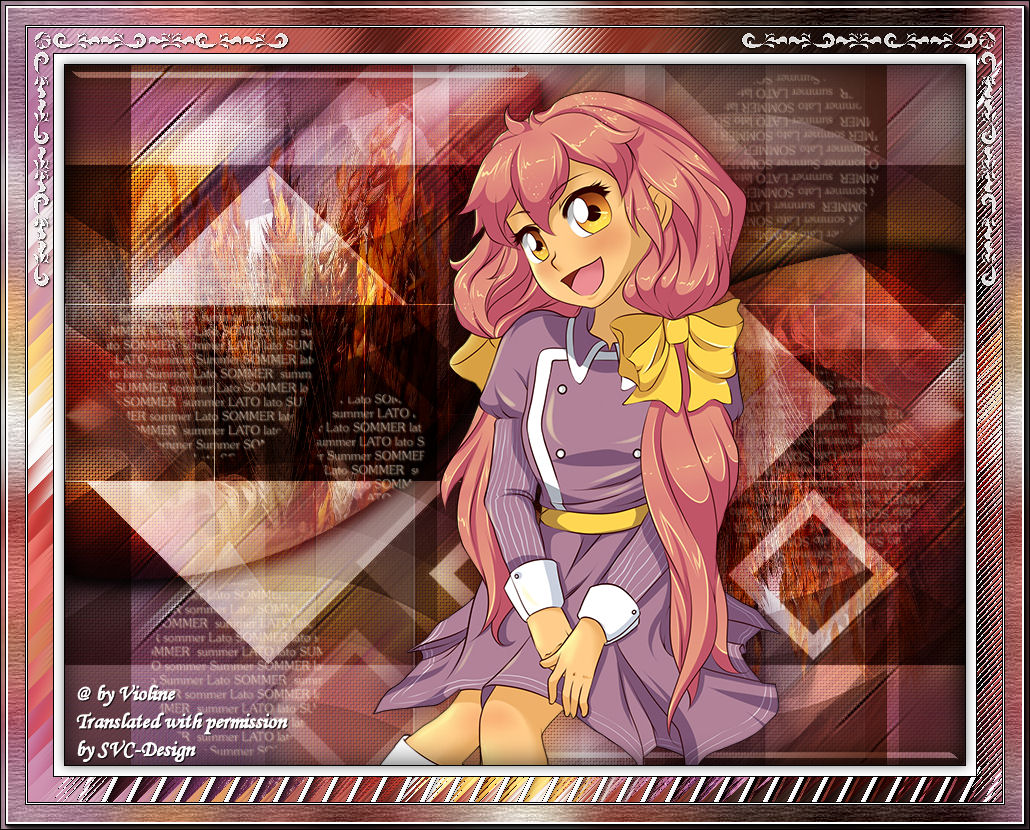
1.
Open a new transparent image of 900x700 pixels
2.
Selections - select all.
Open tubtatie_48f62024.png
remove the watermark
Edit - copy.
Edit - paste into selection
3.
Selections - select none
4.
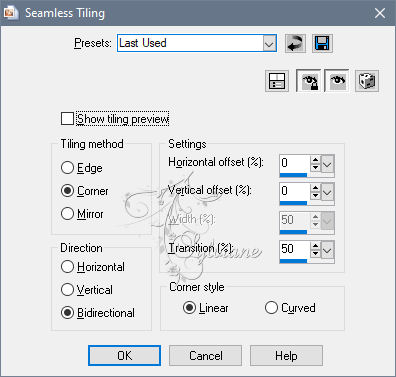
Effects - Image Effects - Seamless Tiling
5.
Layers - merge - merge all
6.
Adjust - Blur - Motion Blur
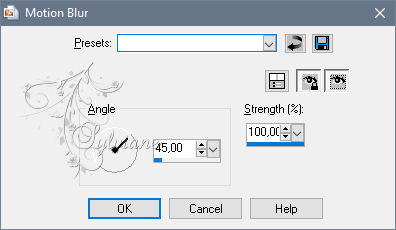
Repeat this 3 more times
7.
Adjust – scharpness – scharpen more
Repeat this 3 more times
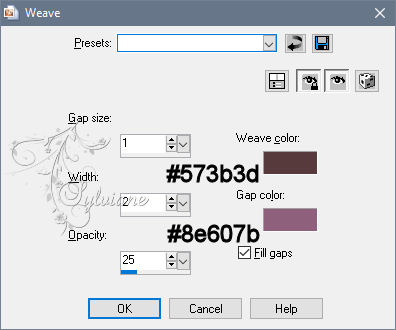
8.
Effects - Texture Effects - Weave
9.
Layers - new raster layer.
Fill the layer with #FFFFFF
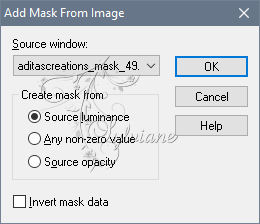
10.
Layers - New Mask Layer - From Image - aditascreations_mask_49
11.
Layers - merge - merge group
12.
Effects - Image Effects - Seamless Tiling
13.
Adjust – scharpness – scharpen more
14.
Effects - 3D Effects - Drop Shadow 4/4/60/30 # 734250
15.
Layers - new raster layer.
Fill the layer with # 3D1C12.
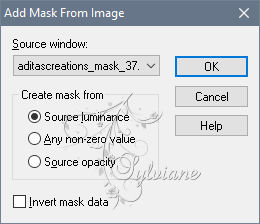
16.
Layers - New Mask Layer - From Image - aditascreations_mask_37
17.
Layers - merge - merge group
18.
Open aditascreations_mask_46
edit - copy
Edit - paste as a new layer
Immediately looks good
19.
Set the blend mode of this layer to soft light
20.
Layers - Duplicate
21.
Image - free rotate
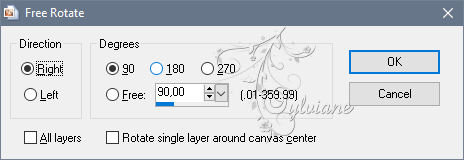
22.
Set the opacity of this layer to 30
23.
Layers - merge - merge all
24.
Open tubtatie_48f62024
edit - copy
Edit - paste as a new layer
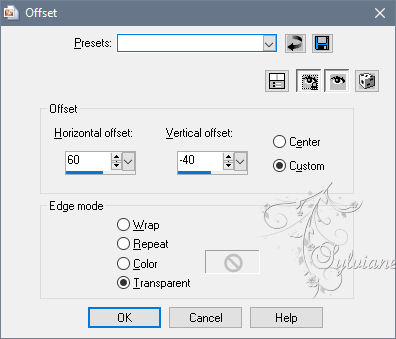
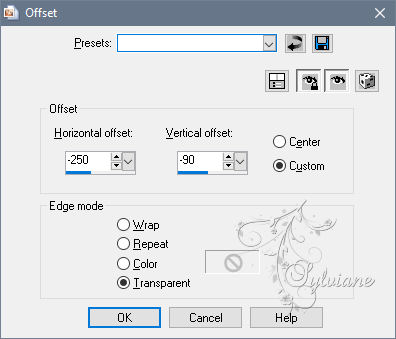
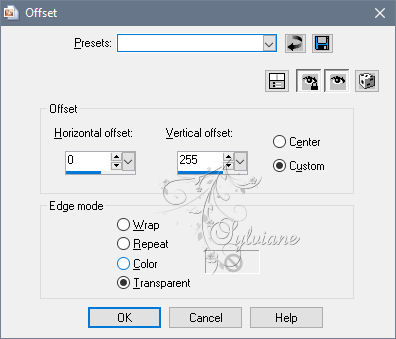
25.
Effects - Image Effects - Offset
26.
Layers - Duplicate
Click the layer below it in your layer palette.
Adjust - Blur - Gaussian Blur - Range at 20.
27.
Set the blend mode of this layer to multiply
28.
Click in your layer palette on the bottom layer
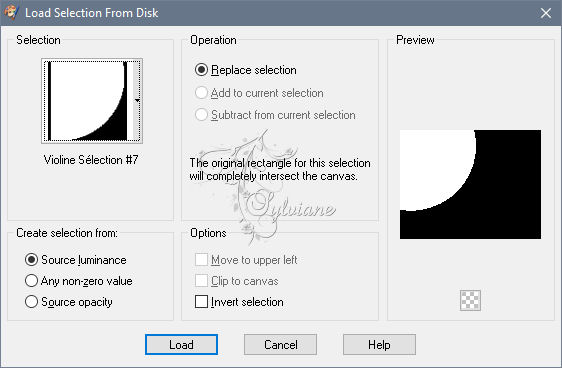
29.
Selections - load / save selections - load selections from disk - Violine Sélection # 7
30.
Selections - Promote selection to layer
31.
Open tube lunadeco092
edit - copy.
Edit - paste into selection
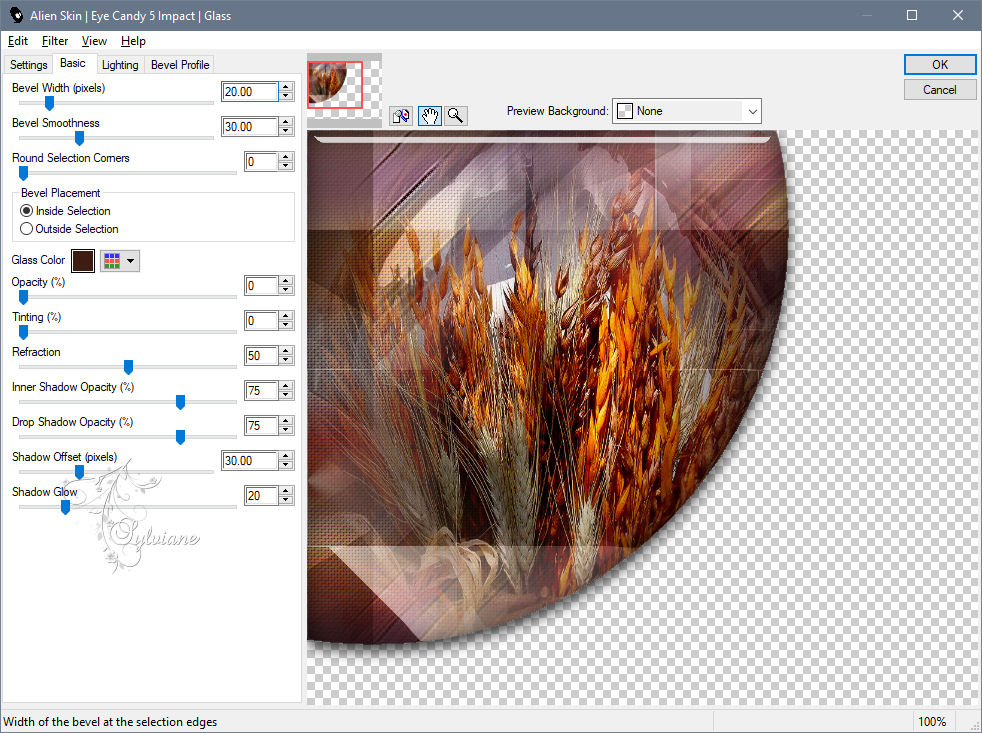
32.
Plugin - Eye Candy 5 Impact - Glass
33.
Selections - select none
34.
Layers - Duplicate.
Image - Mirror – mirror Horizontal
Image - Mirror - Vertical Mirror
35.
Layers - merge - merge down
36.
Set the blend mode of this layer to overlay
37.
Open tube Wordart7367f_L
edit - copy
Edit - paste as a new layer
38.
Image - Negative
Effects - Image Effects - Offset
39.
Effects - 3D Effects - Drop Shadow 1/1/100/2 # FDC787
40.
Layers - Duplicate
Image - Mirror – mirror Horizontal
Image - Mirror - Vertical Mirror
41.
Set the opacity of this layer to 60
42.
Layers - merge - merge all
43.
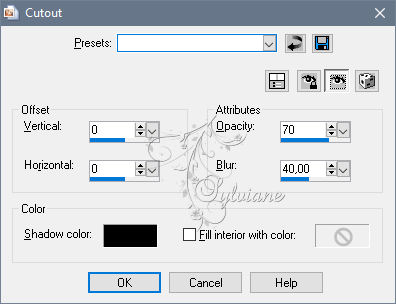
Selections - select all
Effects - 3D Effects - Cutout
44.
Selections - select none
45.
Image - add borders - 1 pixels # 000000
46.
Selections - select all
47.
Image - add borders - 10 pixels #FFFFFF
48.
Effects - 3D Effects - Drop Shadow 0/0/55/15 # 000000
49.
Selections - select none.
Image - add borders - 1 pixels # 000000
50.
Selections - select all
51.
Image - add borders - 25 pixels #FFFFFF
52.
Effects - Image Effects - Seamless Tiling
53.
Selections - invert
54.
Adjust - Blur - Gaussian Blur - Range at 20
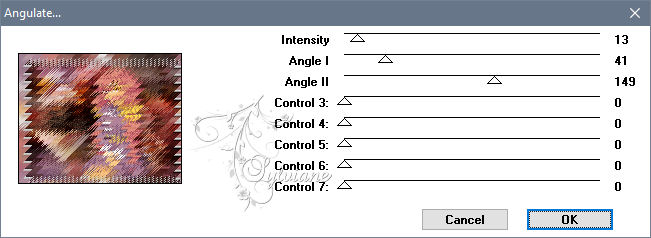
55.
Plugin - FunHouse - Angulate
56.
Selections - Promote selection to layer
57.
Set the blend mode of this layer to overlay
58.
Selections - select none
59.
Image - add borders - 1 pixels # 000000
60.
Image - add borders - 1 pixels #FFFFFF
61.
Image - add borders - 1 pixels # 000000
62.
Selections - select all
63.
Image - add borders - 25 pixels #FFFFFF
64.
Effects - Image Effects - Seamless Tiling
65.
Selections - invert
66.
Adjust - Blur - Gaussian Blur - Range at 20
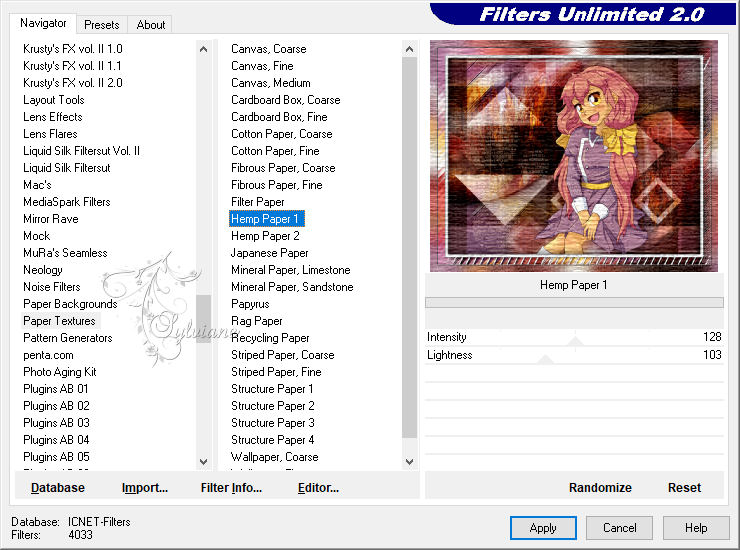
67.
Plugin - Unlimited 2.0 - Paper Textures - Hemp Paper 1
68.
Plugin - AAA Frames - Foto Frame
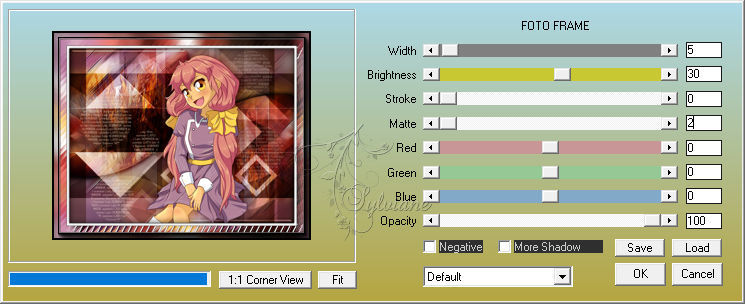
69.
Selections - select none
Open tube Deco Mandy
edit - copy.
Edit - paste as a new layer
70.
Effects - Image Effects - Offset
71.
Layers - merge - merge all
Image - resize - 950 pixels wide - resize all layers checked
72.
Put your watermark on your work
save as jpg
Back
Copyright Translation © 2020 by SvC-Design