

This lesson is made with PSPX9
But is good with other versions.
© by SvC-Design

Materialen Download :
Here
******************************************************************
Materials:
426-luzcristina.pspimage
Selection_SIMPSP_Inacia.PspSelection
simpsp_inacia.png
******************************************************************
Plugin:
Plugins - Flux DSB - Blast
Plugins - Simple - Diamonds
Plugins - FM Tile Tools - Blend Emboss
Plugins - Flaming Pear - Flexify 2
Plugin - Mura's Meister - Copies
Plugins - ICNet Software - Filters Unlimited 2.0 - Buttons & Frames - Glass Frame 3
******************************************************************
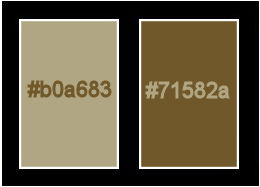
color palette
:
******************************************************************
methode
When using other tubes and colors, the mixing mode and / or layer coverage may differ
******************************************************************
General Preparations:
First install your filters for your PSP!
Masks: Save to your mask folder in PSP, unless noted otherwise
Texture & Pattern: Save to your Texture Folder in PSP
Selections: Save to your folder Selections in PSP
Open your tubes in PSP
******************************************************************
We will start - Have fun!
Remember to save your work on a regular basis
******************************************************************
1.
Choose two colors of Misted de Flores, which are not predominant.
I chose the colors:
Foreground: #b0a683
Background: #71582a
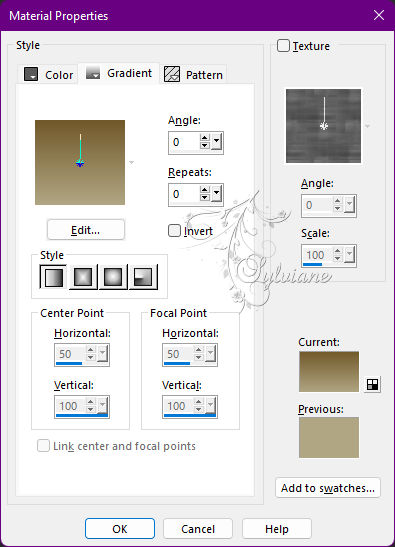
Form a Gradient Style: Linear > Angle: 0 > Repeats: 0
2.
Open a new transparent image of 1000 X 600 px
Paint with the Linear gradient.
3.
Layers - New Raster Layer.
Activate the Selection Tool - Custom Selection tool

Selections - Invert.
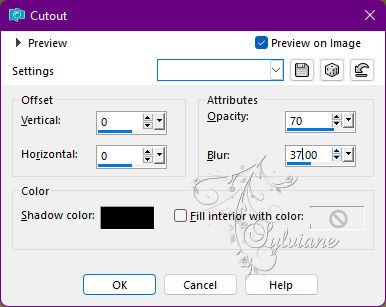
Effects - 3D Effects - Cutout
4.
Selections - Select None.
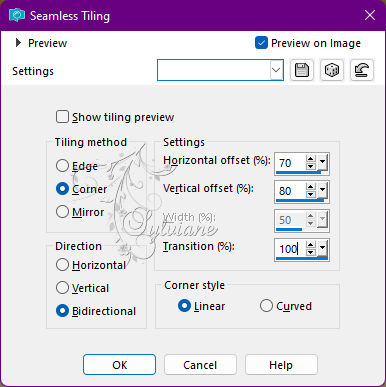
Effects - Image Effects - Seamless Tiling
5.
Layers - Duplicate.
Image - Mirror – mirror Horizontal
Image - Mirror - Vertical Mirror
Layers - Merge - Merge Down.
6.
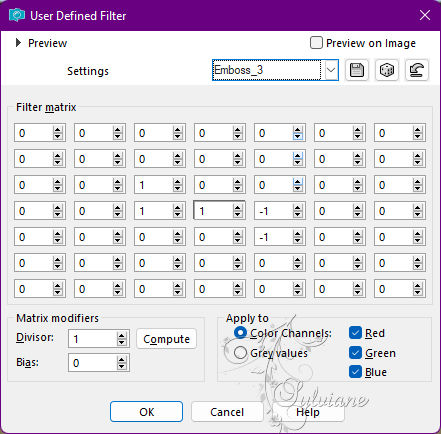
Effects - User Defined - Filter: Emboss_3
7.
Layers - New Raster Layer.
Selections - Select All.
Open 426-luzcristina.pspimage
Edit - Copy.
Activate the job.
Edit - Paste Into Selection.
Selections - Select None.
Effects - Image Effects - Seamless Tiling: Default
8.
Adjust - Blur - Motion Blur
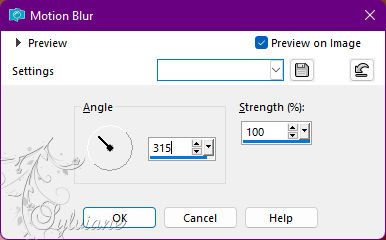
Edit - Repeat Motion Blur
9.
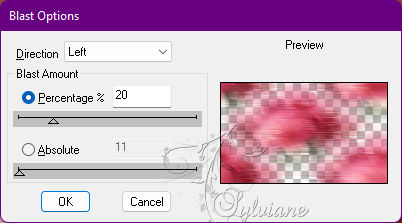
Plugins - Flux DSB - Blast
Direction: Left
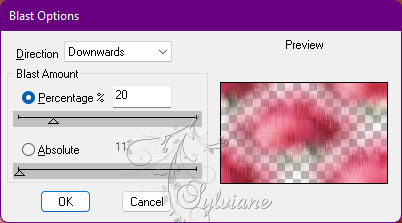
Plugins - DSB Flux - Blast
Direction: Downwards
10.
Plugins - Simple - Diamonds.
Plugins - FM Tile Tools - Blend Emboss: Default
Edit - Copy
11.
Layers - New Raster Layer.
Selections - Load/Save Selection - Load Select From Disk: Selection_SIMPSP_Inacia
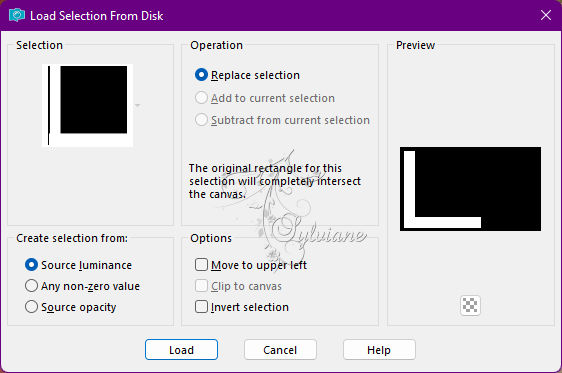
Edit - Paste Into Selection.
Effects - Texture Effects - Weave
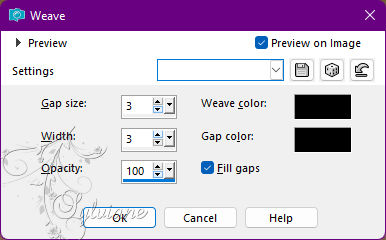
Effects - 3D Effects - Drop Shadow
0/0/100/30 color:#000000
12.
Selections - Select None.
Effects - Image Effects - Seamless Tiling
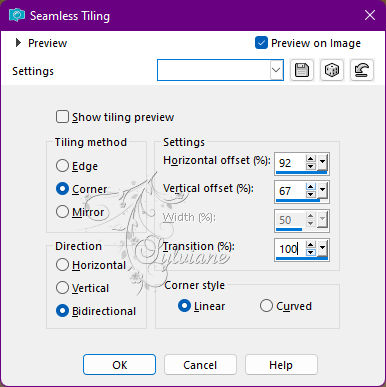
13.
Layers - Duplicate.
Close the visibility of the Copy of Raster 4 layer
Activate the Raster 4 layer.
14.
Plugins - Flaming Pear - Flexify 2

15.
Image - Mirror – mirror Horizontal
Image - Mirror - Vertical Mirror
Effects - Image Effects - Offset

16.
Layers - Duplicate.
Image - Mirror - Mirror Horizontal.
Image - Mirror - Mirror Vertical.
Layers - Merge - Merge Down.
Adjust - Sharpness - Sharpen More.
17.
Open visibility and activate the Copy of Raster 4 layer.
Effects - Geometric Effects - Circle
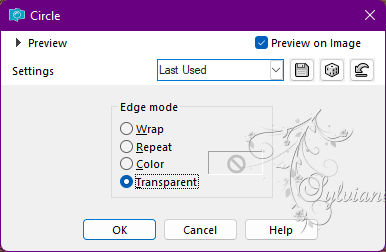
18.
Open 426-luzcristina.pspimage
Edit - Copy
Edit - Paste as New Layer.
If necessary, adjust in the center of the circle with the Pick Tool tool.
Layers - Merge - Merge Down.
Image - Resize - 50% > All Layers unchecked
19-
Plugin - Mura's Meister - Copies
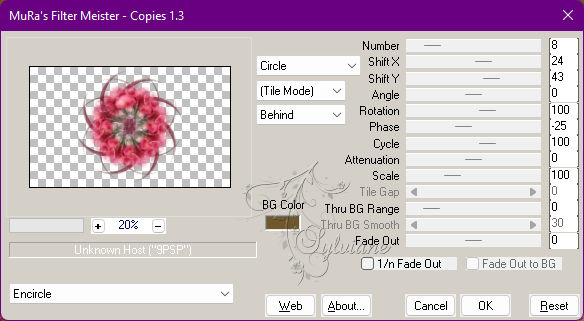
20.
Effects - 3D Effects - Drop Shadow -
0/0/100/30 Color: #000000 (Black)
Effects - Edge Effects - Enhance
21.
Open 426-luzcristina.pspimage
Edit - Copy
Edit - Paste as New Layer.
Adjust with the pick tool tool of your choice.
Adjust - Sharpness - Sharpen More.
22.
Layers > Properties > General > Blend Mode,
as shown in the image below or of your choice
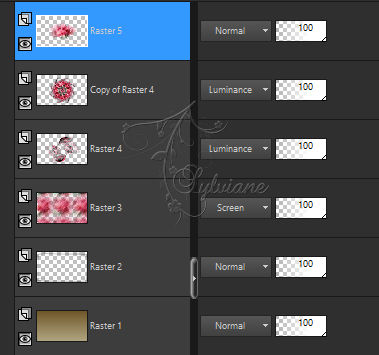
Layers - Merge - Merge All
23.
Image – Add Borders –symmetric - 1 px - color: #000000 (Black)
Image – Add Borders –symmetric - 2 px - color: #71582a (dark color of use)
Image – Add Borders –symmetric - 2 px - color: #b0a683 (light color of use)
Image – Add Borders –symmetric - 2 px - color: #71582a (dark color of use)
Image – Add Borders –symmetric - 1 px - color: #000000 (Black)
24.
Selections - Select All.
Image – Add Borders –symmetric - 50 px - with any color.
Selections - Invert.
Paint with linear gradient

25.
Plugins - ICNet Software - Filters Unlimited 2.0 - Buttons & Frames - Glass Frame 3

26.
Selections - Invert
Effects - 3D Effects - Drop Shadow -
0/0/100/30 - Color: #000000 (Black)
Selections - Select None
27.
Image – Add Borders –symmetric - 1 px - Color: #000000 (Black)
28.
Open simpsp_inacia.png
Edit - Copy
Edit - Paste as New Layer.
Position at your choice.
Change the Blend Mode of your choice.
Layers - Merge - Merge All
29.
Apply your watermark or signature
Layer – merge – merge all (flatten)
Save as JPEG
Back
Copyright Translation © 2022 by SvC-Design