
This lesson is made with PSPX9
But is good with other versions.
© by SvC-Design
Materialen Download :
Here
******************************************************************
Materials:
decor1_leni.png
Edwardian Script ITC.ttf - Shortcut
titulo_leni.png
******************************************************************
Plugin:
Plugin - Déformations - Mosaique de verre
Plugin - Carolaine & Sensibility - CS-HLines.
Plugin - Flaming Pear - Flexify 2.
Plugin - Mura's Meister - perspective tiling
Plugin - Alien Skin - Eye Candy 5 > Impact - Perspective Shadow
Plugin - AAA Frames - foto Frame
******************************************************************
color palette
:
******************************************************************
methode
When using other tubes and colors, the mixing mode and / or layer coverage may differ
******************************************************************
General Preparations:
First install your filters for your PSP!
Masks: Save to your mask folder in PSP, unless noted otherwise
Texture & Pattern: Save to your Texture Folder in PSP
Selections: Save to your folder Selections in PSP
Open your tubes in PSP
******************************************************************
We will start - Have fun!
Remember to save your work on a regular basis
******************************************************************
1 .
Open the material on the PSP, duplicate and close the original.
Choose 2 colors to work with.
Foreground #574e52
Background #bf7425
2 .
Open a new transparent image of 900x450 pixels
Paint with background color
Selections - Select All.
3.
Open main Tube
Edit - Copy
Edit - Paste into selection
Selections - Select None.
4.
Effects - Image Effects - Seamless Tiling - Default.
5.
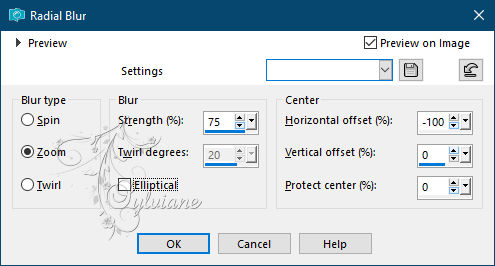
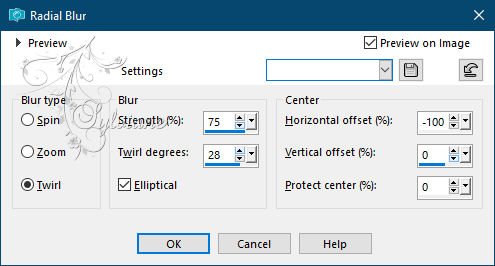
Adjust - Blur - Radial Blur
6.
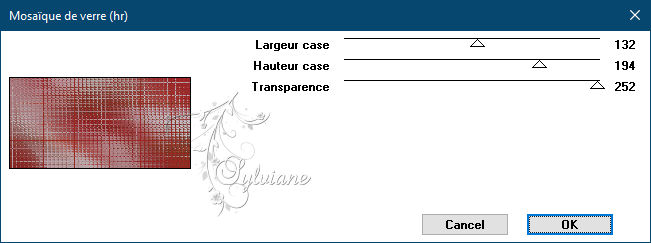
Plugin - Déformations - Mosaique de verre
7.
Layers - Duplicate.
Image - Resize: 60%, all layers cleared.
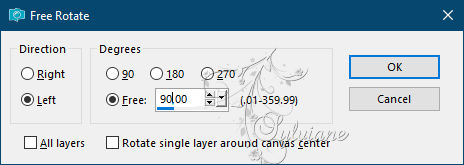
Image - Free Rotate: Left, 90, all layers cleared
8 .
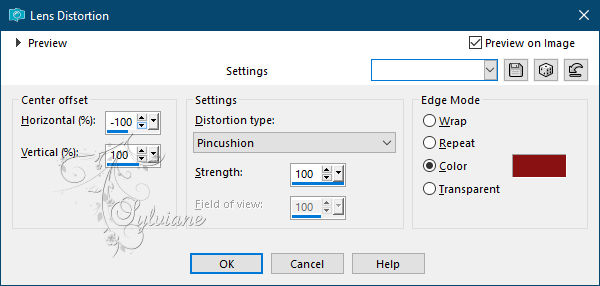
Effects - Distortion Effects - Lens Distortion
With black color in color or foreground color
9.
Effects - Image Effects - Seamless Tiling - Default.
10.
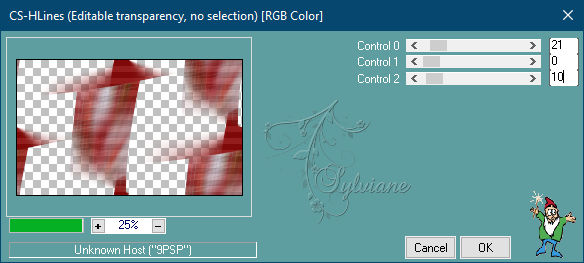
Plugin - Carolaine & Sensibility - CS-HLines
11.
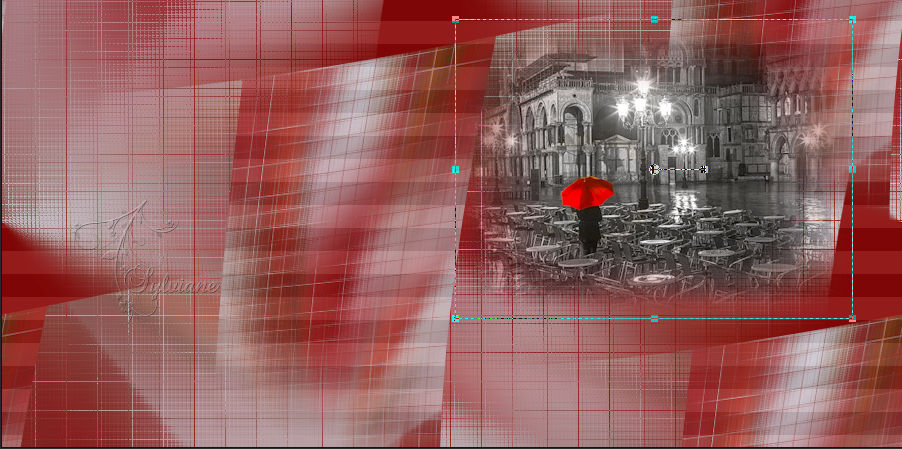
Open Misted Landscape.
Edit - Copy
Edit - Paste as new layer
Position as in the print below
12 .
Layers - Duplicate.
Effects - Image Effects - Seamless Tiling - Default.
Layers - Arrange - Move Down.
Blend Mode: Luminance
Opacity: 70%.
13.
Turn on the Copy of Raster 1 layer.
Layers - Duplicate.
Plugin - Flaming Pear - Flexify
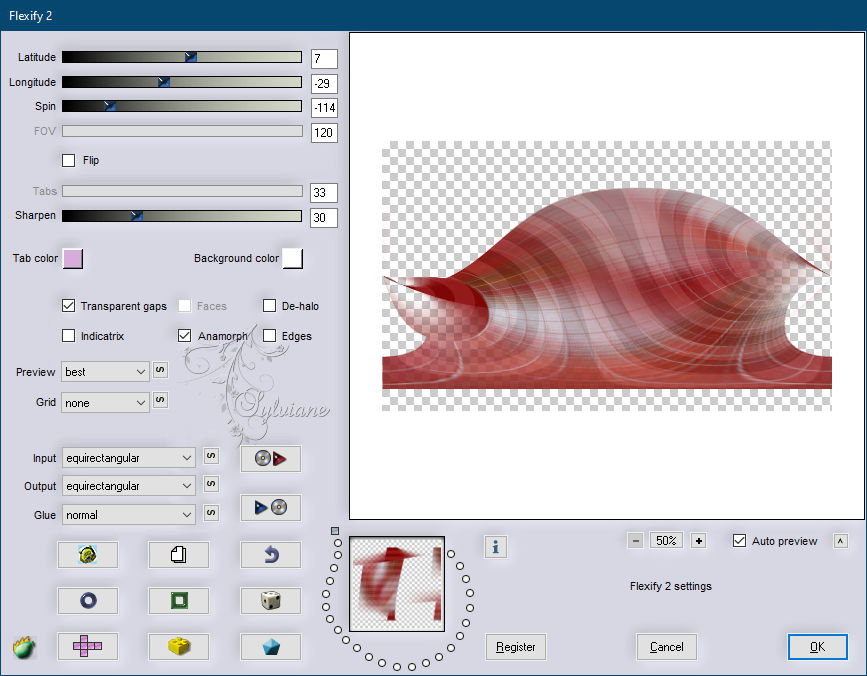
Layers - Arrange - Move Down.
14.
Activate Layer Raster 1.
Layers - Duplicate.
Layers - Arrange - Bring to Top.
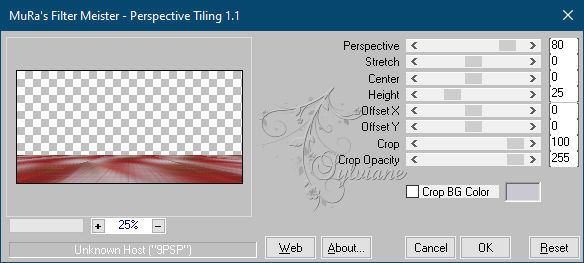
Plugin - Mura's Meister - perspective tiling
15.
Layers - New Raster Layer.
Activate Selection - Custom selection
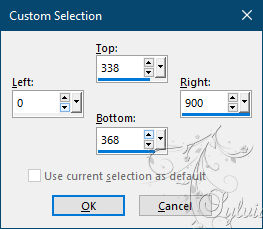
Paint this selection with the color of the foreground.
Selections - Select None.
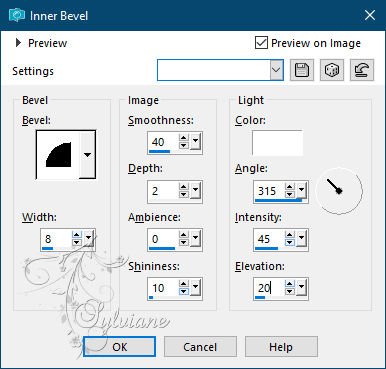
17.
Effects - 3D Effects - Inner Bevel
18.
Plugin - Alien Skin - Eye Candy 5 > Impact - Perspective Shadow
In Settings select Reflect in Front, Above and Close

19.
Layers - Merge - Merge Down.
Layers - Duplicate.
Image - Mirror - Vertical Mirror
Move this layer to stay above Raster 1.
*If you are using light shades as I used in the second example,
select as in the print below and press the Delete key on the keyboard.
Selections - Select None.
20.
Activate the layer from the top of all.
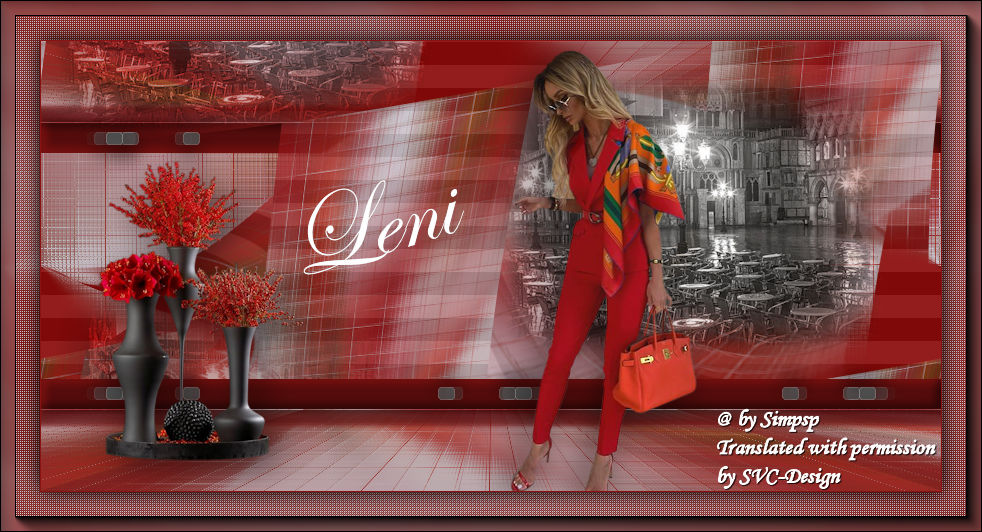
Open decor1_leni.png
Edit - Copy
Edit - Paste as new layer
21.
Open the Main Tube.
Edit - Copy
Edit - Paste as new layer
place it like in the example
Effects - 3D Effects - Drop Shadow: as you prefer.
22.
Open titulo_leni.png
Edit - Copy
Edit - Paste as new layer
Activate selection tool (Press K on your keyboard)
And enter the following parameters:
Pos X :262 – Pos Y : 139
Press M.
Blend Mode: Soft Light.
* You can use the Edwardian Source ITC Script.ttf (in material)
to write with the color of your work and apply Drop Shadow to taste.
23.
Open a deco tube
Edit - Copy
Edit - Paste as new layer
place it like in the example
Effects - 3D Effects - Drop Shadow: as you prefer.
24 .
Image - Add Borders - 1px – color: foreground
Edit - Copy.
Selections - Select All.
25 .
Image - Add Borders - 40px - with any color.
Selections - Invert.
Edit - Paste Into Selection.
Adjust - Blur - Radial Blur
26.
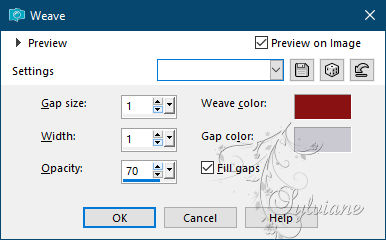
Effects - Texture Effects - Weave.
with foreground and background colors
27.
Selections - invert.
Effects - 3D Effects - Drop Shadow: 0, 0, 100, 30 color:#000000
Selections - Invert.
28.
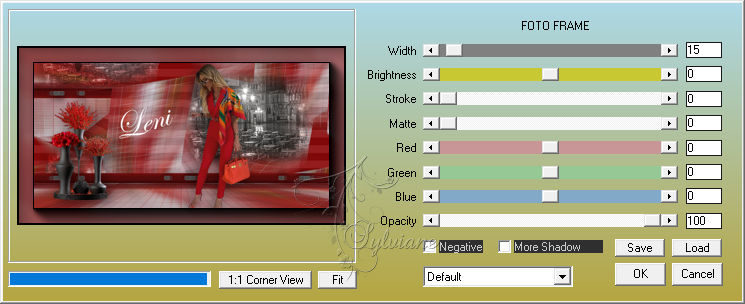
Plugin - AAA Frames - foto Frame
29.
Selections - Select None.
30.
If you wish, resize your work.
Apply your watermark or signature.
Save as JPEG
Back
Copyright Translation © 2021 by SvC-Design