
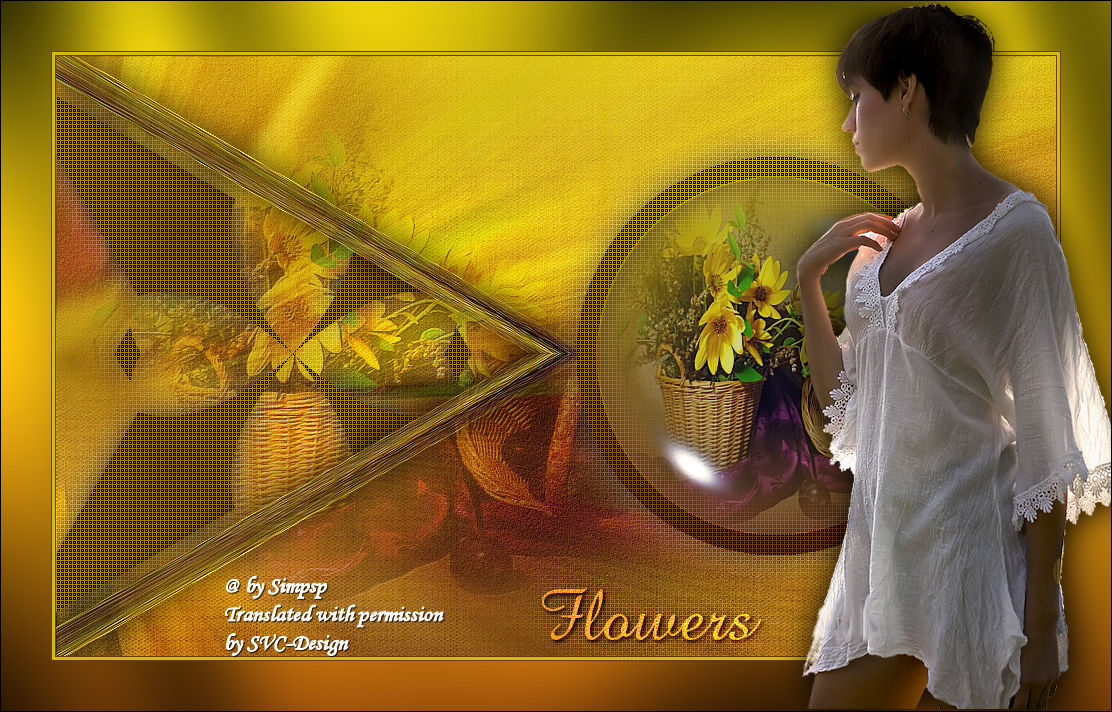
This lesson is made with PSPX9
But is good with other versions.
© by SvC-Design

Materialen Download :
Here
******************************************************************
Materials:
bgw.jgd
divers 22.pspimage
Preset_BallsAndBubbles_Flowers_Inacia.PspScript
tube918_mulher_mara_pontes.pspimage
wa_flowers_inacia.png
******************************************************************
Plugin:
Plugins - FM Tile Tools - Blend Emboss
Plugins - Filter Factory Gallery H - Reverb
Plugins - ICNet Software > Filter Unlimited 2.0 - Bkg Designer sf10III - SW Hollow Dot
Plugin - Greg's Factory Output Vol.II - Pool Shadow
******************************************************************
color palette
:
******************************************************************
methode
When using other tubes and colors, the mixing mode and / or layer coverage may differ
******************************************************************
General Preparations:
First install your filters for your PSP!
Masks: Save to your mask folder in PSP, unless noted otherwise
Texture & Pattern: Save to your Texture Folder in PSP
Selections: Save to your folder Selections in PSP
Open your tubes in PSP
******************************************************************
We will start - Have fun!
Remember to save your work on a regular basis
******************************************************************
1.
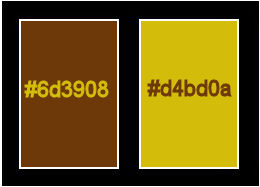
Choose two misted colors from Flowers.
I I chose the colors:
Foreground: #6d3908 (dark color).
Background: #d4bd0a (light color).
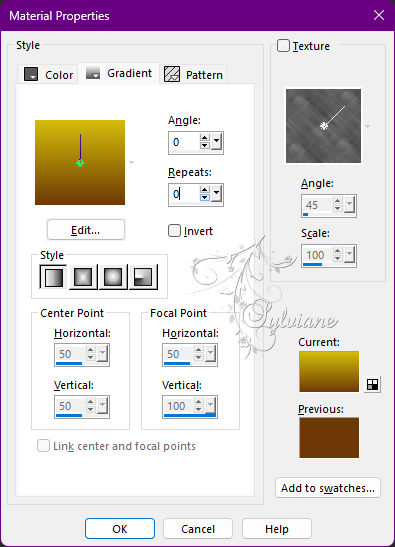
Form a Gradient Style: Linear > Angle: 0 > Repeats: 0.
2.
Open a transparent image of 1000 x 600 px.
Paint with the Linear gradient.
Layers - New Raster Layer.
Selections - Select All.
3.
Activate Misted from Flowers.
Edit - Copy.
Activate the work.
Edit - Paste Into Selection.
Selections - Select None.
4.
Effects - Image Effects - Seamless Tiling - Default.
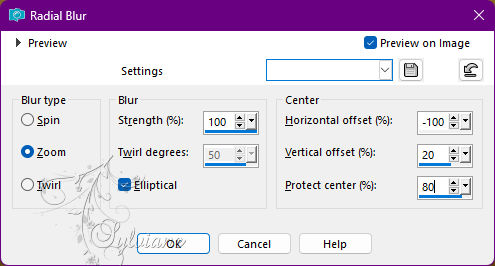
Adjust - Blur - Radial Blur:
5.
Adjust - Sharpness - Sharpen More.
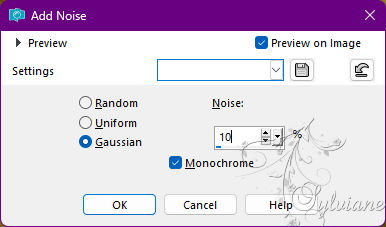
Adjust - Add/Remove Noise - Add Noise:
6.
Plugins - FM Tile Tools - Blend Emboss: Default
7.
Duplicate this layer2 times.
Close the visibility of the Copy layer (2) of Raster 2.
Activate acopy of raster layer 2.
8.
Plugins - Filter Factory Gallery H - Reverb:
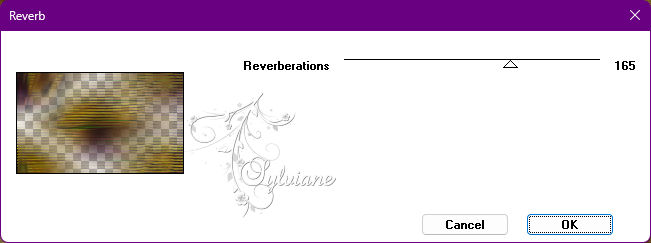
Blend Mode: Screen
9.
Open visibility and activate the Copy layer(2) of Raster 2.
Effects - Geometric Effects - Perspective - Horizontal:
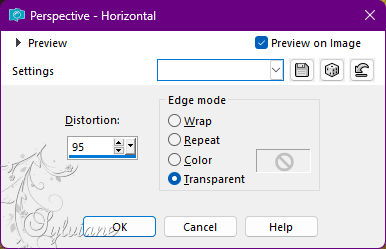
Image - Mirror - Mirror Horizontal.
Repeat: Geometric - Effects Effects - Perpective - Horizontal:
10.
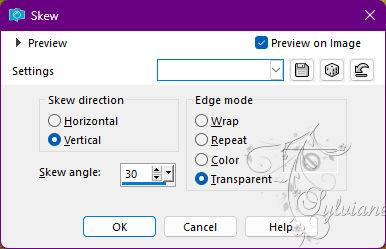
Effects - Geometric Effects - Skew:
11.
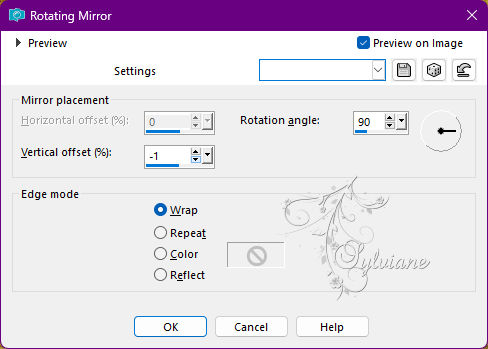
Effects - Reflections Effects - Rotating Mirror:
12.
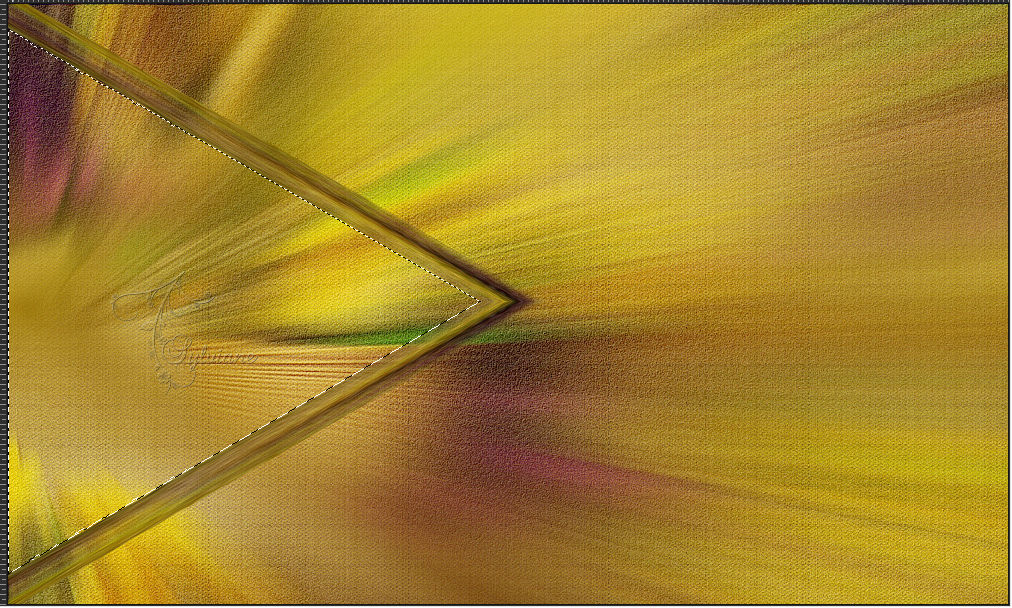
With the Magic Wand tool configured with in the image below:
select the center of the effect:
13.
Layers - New Raster Layer, layer.
Paint with the Linear gradient in use:
14.
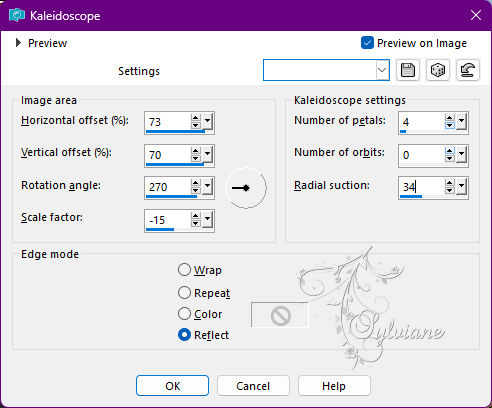
Effects - Reflections Effects - Kaleidoscope:
Selections - Select None.
Effects - 3D Effects - Drop Shadow:
0/0/100/50 color:#000000
15-
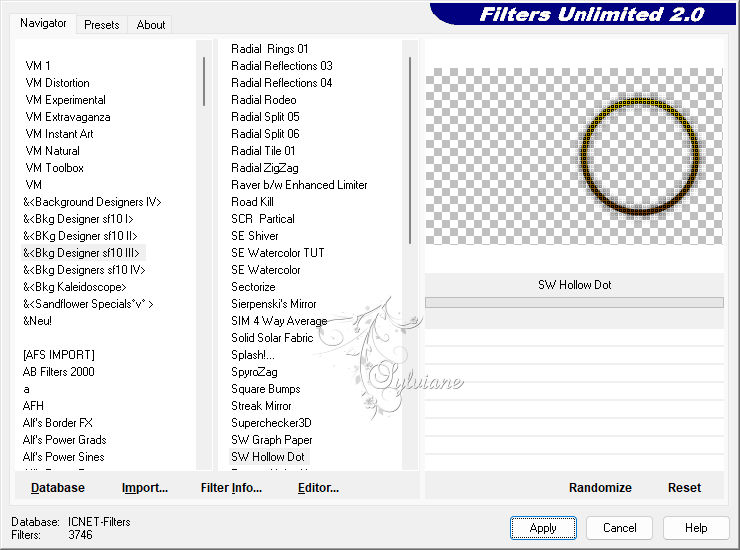
Plugins - ICNet Software > Filter Unlimited 2.0 - Bkg Designer sf10III - SW Hollow Dot: Default.

Layers - Arrange - Move Down.
Activate the layer of the top. (Copy (2) of Raster 2)
Effects - 3D Effects - Drop Shadow:
0/0/100/50 color:#000000
Effects - Edge Effects - Enhance.
16.
Layers - New Raster Layer, layer.
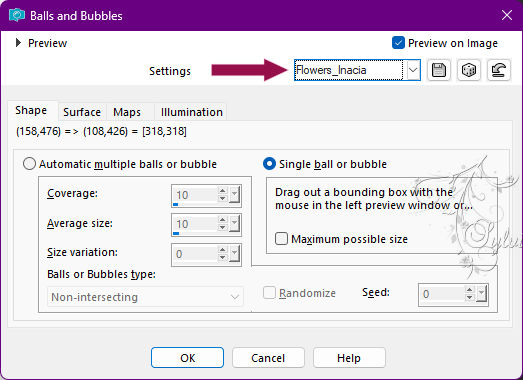
Effects - Artistic Effects - Balls and Bubbles: Flowers_Inacia.
17.
Effects - Image Effects - Offset:

18.
With the Magic Wand tool, select out of effect:
19.
Selections - Invert.
Layers - New Raster Layer.
Paint with the Linear gradient in use:
20.
Activate Misted from Flowers.
Edit - Copy.
Edit - Paste - Into Selection.
Adjust - Shapness - Sharpen More.
Layers - Arrange - Move Down.
21.
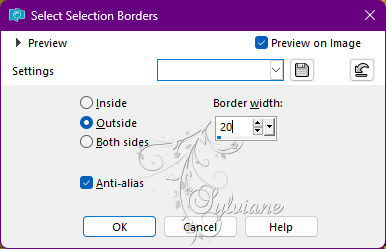
Without removing the selection, activate the top layer. (Raster 4)
Selections - Modify - Select Selection Borders:
Layers - New Raster Layer.
Paint with the Linear gradient in use:
22.
Selections - Select None,
Effects - 3D - Drop Shadow:
0/0/100/50 color:#000000
Plugins - ICNet Software - Filter Unlimited 2.0 - Bkg Designer sf10III - SW Hollow Dot - Default.
Layers - Arrange - Move Down.
23.
Enable the Copy of Raster layer Two of them.
Activate the Misted of Flowers.
Edit - Copy.
Activate the work.
Edit - Paste as New Layer.
Note: If the Misted de Flores is too small or too large,
adjust with the PICK tool, in this case apply a Sharpen More
Objects - Align - Left.
Plugin - FM Tile Tools - Blend Emboss: Default
Blend Mode: Hard Light
Opacity: 50%.
24.
Activate Layer Raster 2.
Blend Mode: Overlay
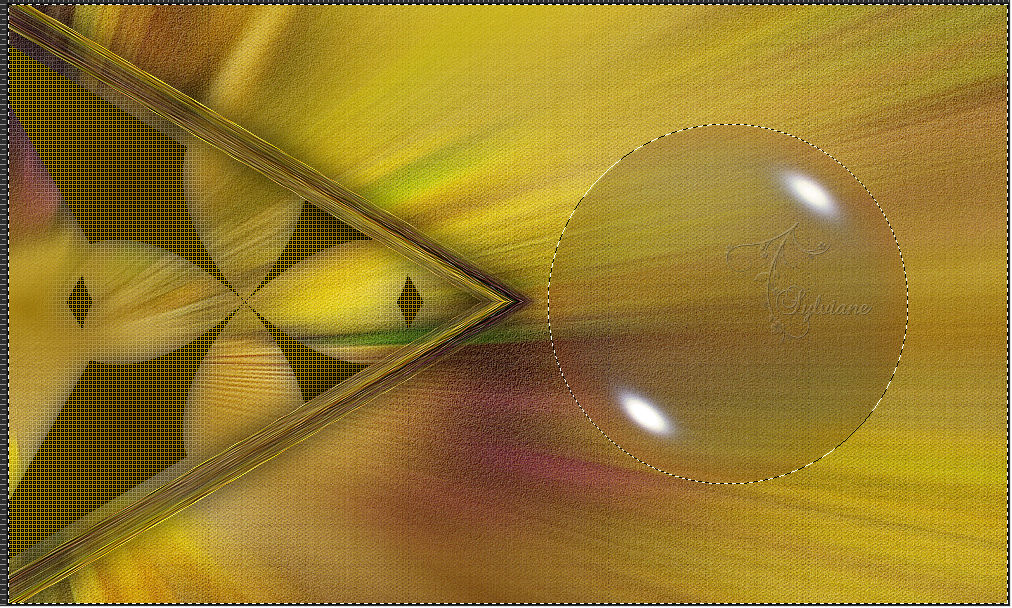
Check layers and Blends:
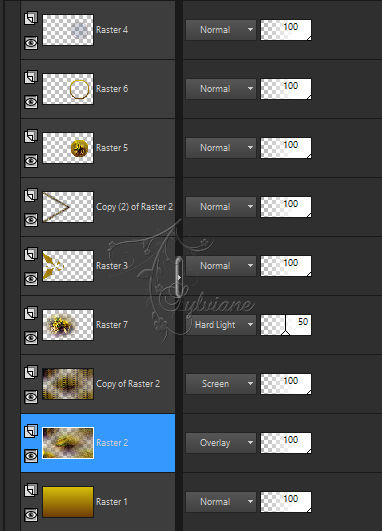
Note: Stay at the willingness to change blends, depending on the colors of your work.
25.
Image – Add Borders –symmetric - 1 px – color:#6d3908 (color dark).
Image – Add Borders –symmetric - 3 px -color: #d4bd0a (color clear).
Image – Add Borders –symmetric - 1 px -color: #6d3908 (color dark).
Selections - Select All.
26.
Image – Add Borders –symmetric - 50 px - with any color.
Selections - Invert.
Paint with the Linear gradient in use:
27.
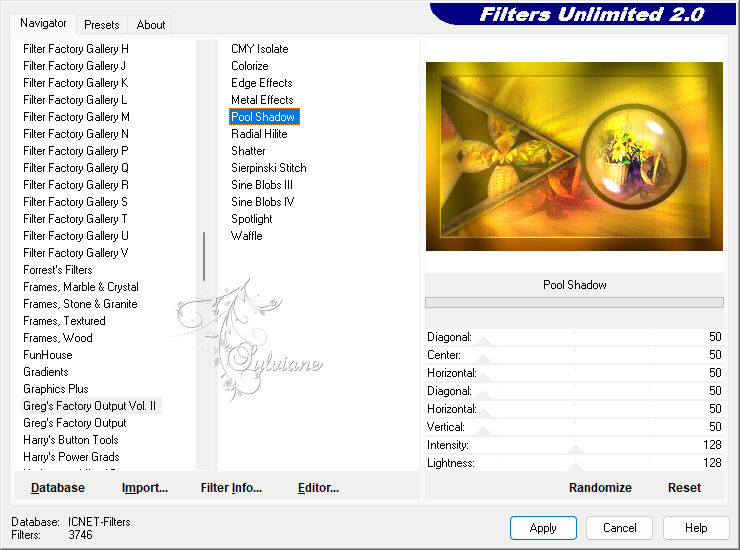
Plugin - Greg's Factory Output Vol.II - Pool Shadow - Default.
Selections - Select None
28.
Open The Main Tube
Edit - Copy.
Edit - Paste as New Layer at work.
Position, Reduce, Sharpen and Effectsof Your Choice.
29.
Open wa_flowers_inacia.png
Edit - copy
Edit - Paste as New Layer at work.
Position and apply effects to taste.
Note:I Applied Blend Mode:Overlay
30.
Image – Add Borders –symmetric - 1px - color: #000000 (black).
31.
Apply your watermark or signature
Layer – merge – merge all (flatten)
Save as JPEG
Back
Copyright Translation 2022 by SvC-Design