

This lesson is made with PSPX9
But is good with other versions.
© by SvC-Design
Materialen Download :
Here
******************************************************************
Materials:
alfa-earth.pspimage
butterflies.png
deco-earth.png
earth.png
kleuren247.png
Ri@earth1-backlight.f1s
Ri@earth2-backlight.f1s
tekst-833 - Earth - Ri@.pspimage
tekst-earth-Ri@.png
******************************************************************
Plugin:
Effects – plugin - Graphic Plus – Cross Shadow
Effects – plugin - Mehdi – Sorting Tiles
Effects – plugin - Simple – Blintz
Effects – plugin - AP [Lines] – Lines Silverlining – dotty grid
Effects – plugin - Unlimited 2.0 - &<Bkg Designer sf10 II>
MURUs Wave
Effects – plugin - Toadies – what are you?
Effects – plugin - Xero – clarity
Effects – plugin - Aliën Skin – Impact – Backlight
******************************************************************
color palette
:

******************************************************************
methode
When using other tubes and colors, the mixing mode and / or layer coverage may differ
******************************************************************
General Preparations:
First install your filters for your PSP!
Masks: Save to your mask folder in PSP, unless noted otherwise
Texture & Pattern: Save to your Texture Folder in PSP
Selections: Save to your folder Selections in PSP
Open your tubes in PSP
******************************************************************
We will start - Have fun!
Remember to save your work on a regular basis
******************************************************************
1.
Foreground color # e2d3da
Background color # ad9ac0
Extra color # ffffff
Gradient - Linear - Angle 45 - repeats 2 - no check for invert

2.
Open alpha-earth.
Window - duplicate.
Close the original.
We are working on the duplicate
3.
Fill the image with the gradient.
4.
Adjust - blur - gaussian blur - range 20.
5.
Copy the tube you chose for this lesson.
Edit - copy.
Return to your image.
Edit - paste as a new layer.
6.
Adjust - blur - radial blur.

Effects - Edge Effects - Enhance More
7.
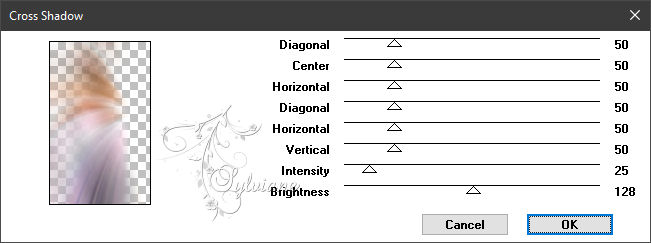
Effects – plugin - Graphic Plus – Cross Shadow.
8.
Effects - Image Effects - Seamless Tiling – default
9.
Layers - Merge - Merge visible layers
10.
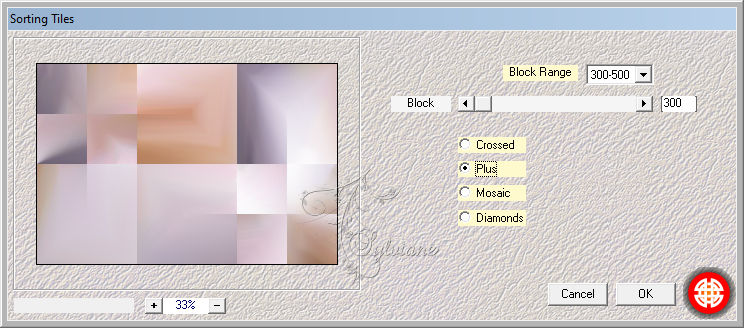
Effects – plugin - Mehdi – Sorting Tiles
11.
Effects - Edge – Enhance
Effects - Image Effects - Seamless Tiling – default
12.
Effects – plugin - Simple – Blintz– default
13.
Layers – Duplicate
Image - Mirror - Vertical Mirror
Opacity: 75%
Layers – merge – merge down
14.
Selections - Load / Save - Load selection from Alpha Channel – selectie 1

Selections – Promote selections to layer
Selection - Select None
15.
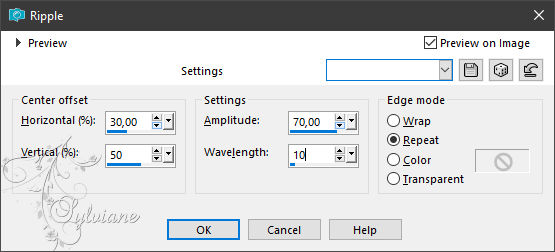
Effects - Distortion Effects – Ripple
Effects - Image Effects - Seamless Tiling – default
Blend Mode: Overlay
Opacity: 30%
Layers – merge – merge down
16.
Selections - Load / Save - Load selection from Alpha Channel – selectie 2

Selections – Promote selections to layer
Selection - Select None
Layers – Duplicate
Image - Mirror - Vertical Mirror
Layers – merge – merge down
17.
Effects – plugin - AP [Lines] – Lines Silverlining – dotty grid
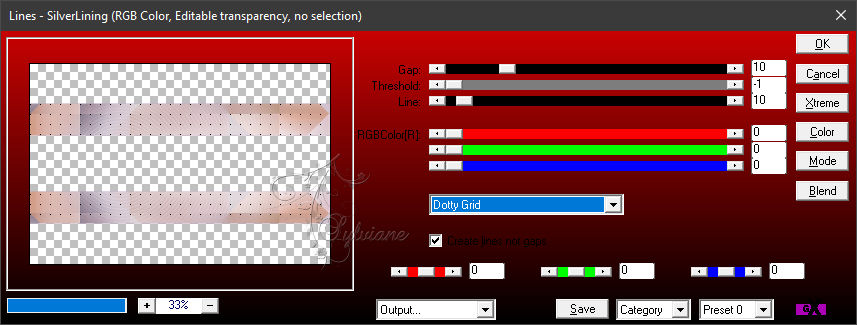
Effects - 3 D effects - Drop shadow
0/0/20/30 – color:#000000
18.
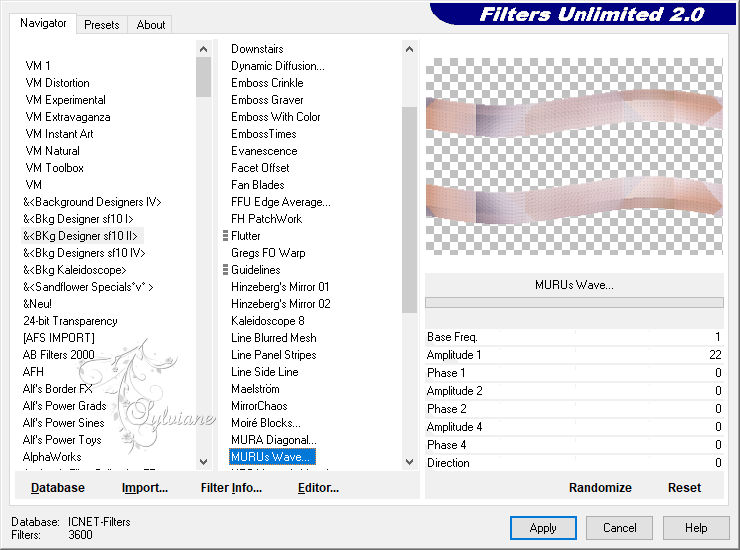
Effects – plugin - Unlimited 2.0 - &<Bkg Designer sf10 II>
MURUs Wave - Amplitude 1
19.
Open tube earth
Edit – Copy
Edit - Paste as new layer
20.
Effects - Image Effects – Offset
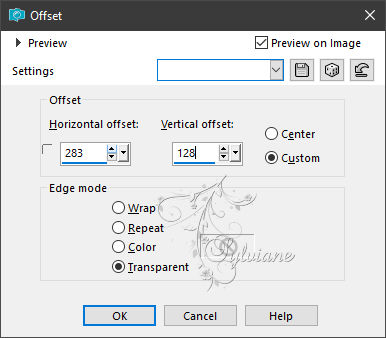
Opacity: 50%
21.
Activate the bottom layer
Selections - Load / Save - Load selection from Alpha Channel – selectie 3

Selections – Promote selections to layer
Layers – arrange – bring to top
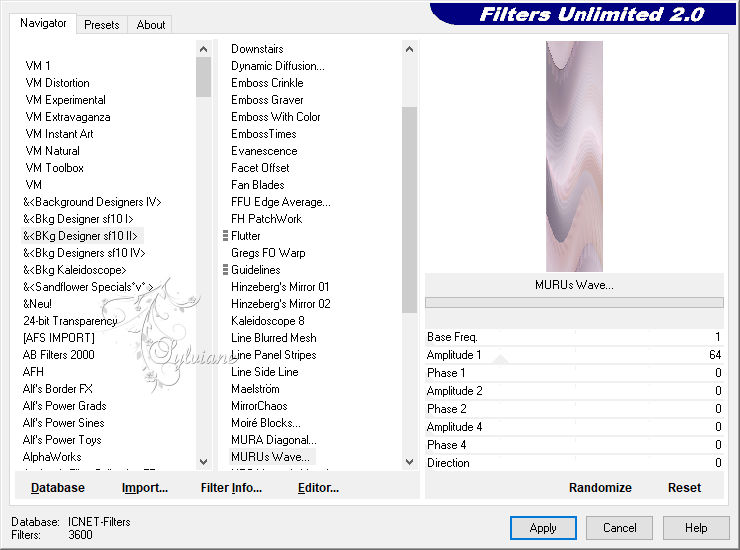
Effects – plugin - - Unlimited 2.0 - &<Bkg Designer sf10 II>
MURUs Wave – default
Selection - Select None
22.
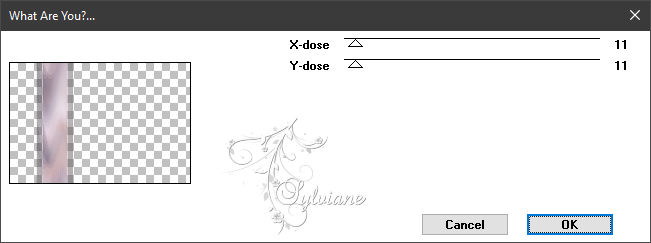
Effects – plugin - Toadies – what are you?
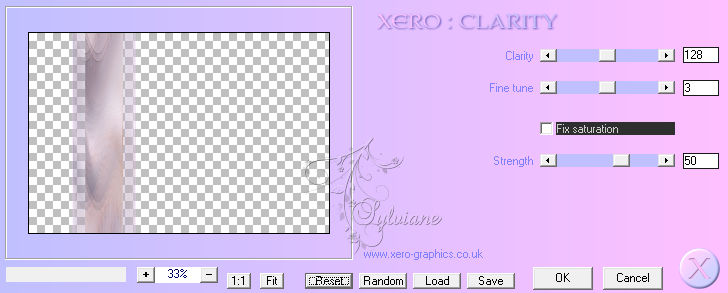
Effects – plugin - Xero – clarity – default
23.
Layers - New Raster Layer
Selections - Load / Save - Load selection from Alpha Channel – selectie 4
Flood fill the selection with the colour white
Selection - Select None
24.
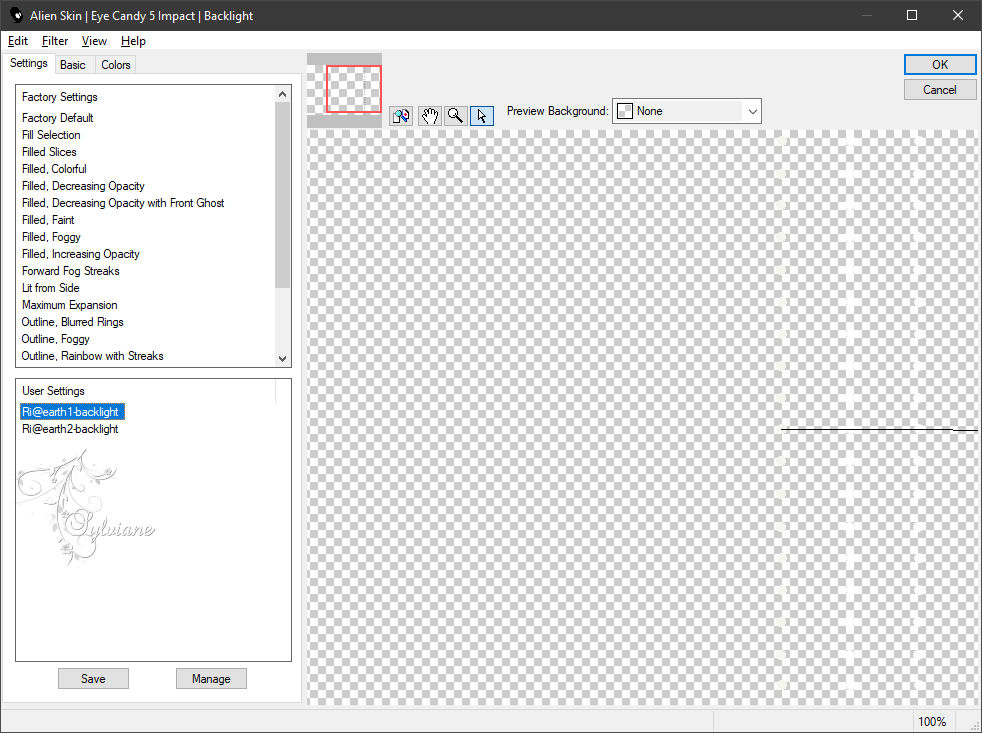
Effects – plugin - Aliën Skin – Impact – Backlight - In settings, open Ri@earth1-backlight
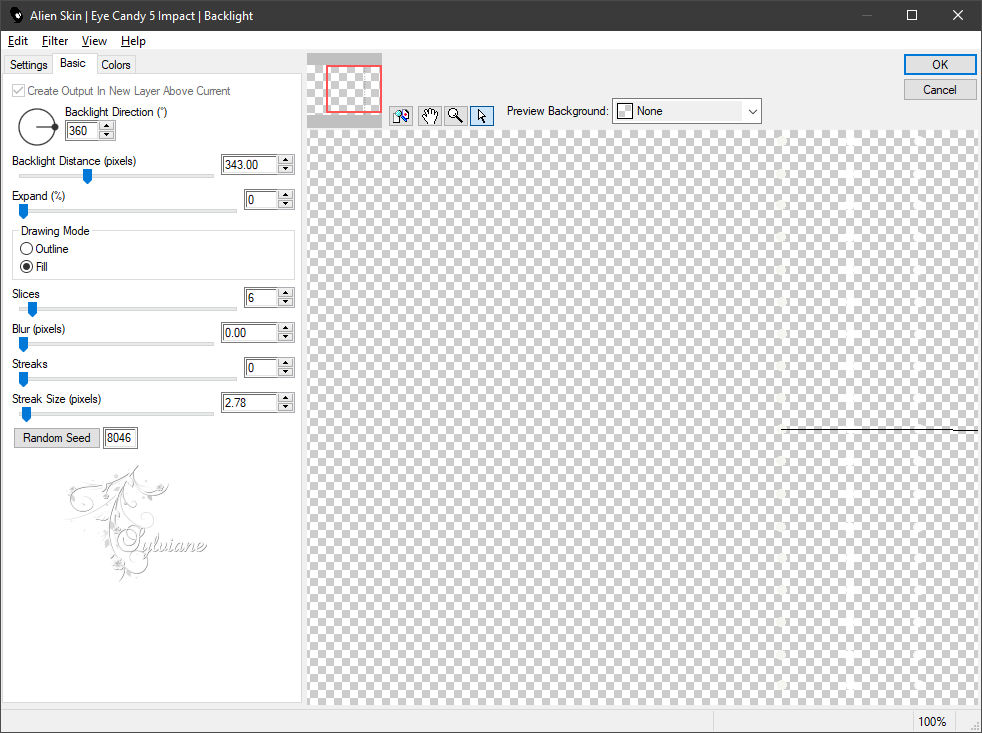
Effects – plugin - Aliën Skin – Impact – Backlight - In settings, open Ri@earth2-backlight
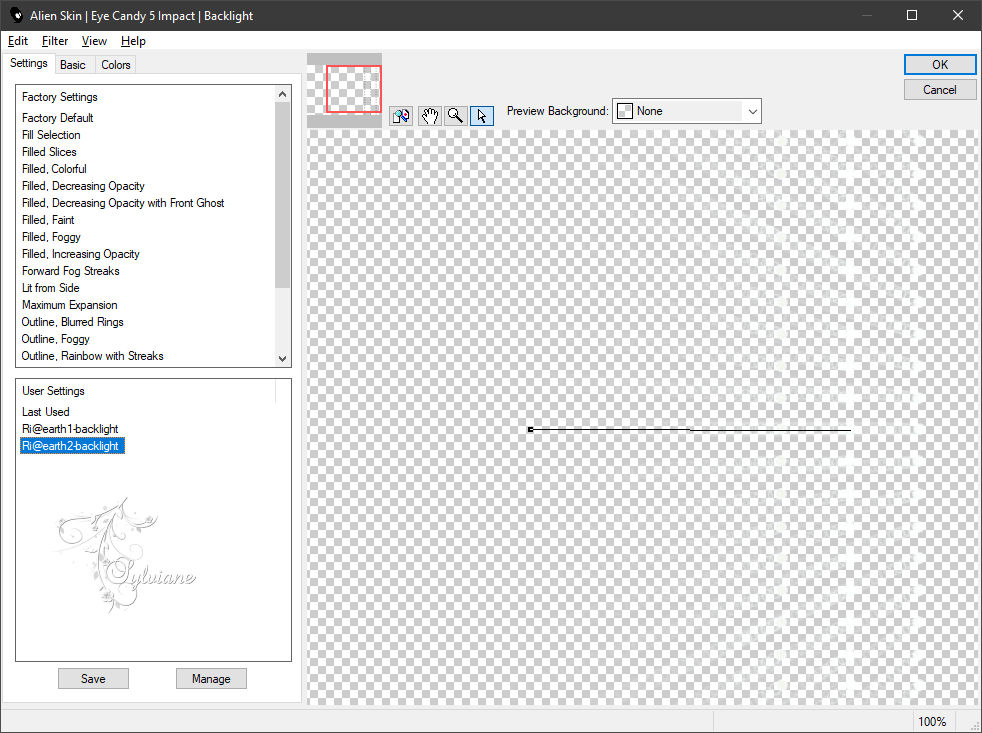
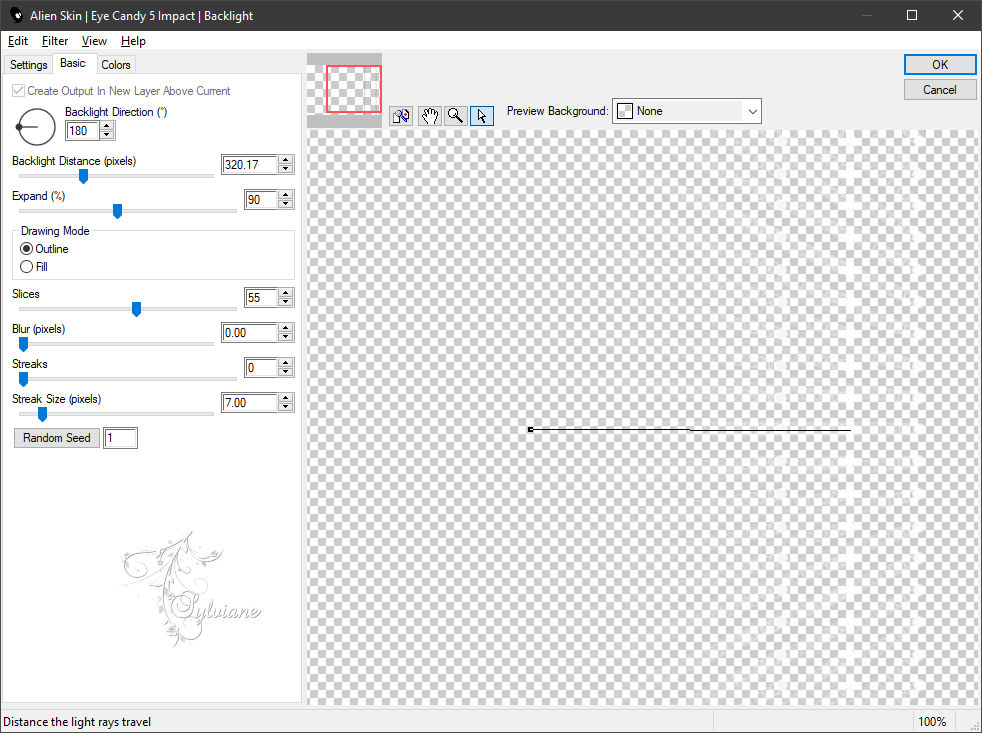
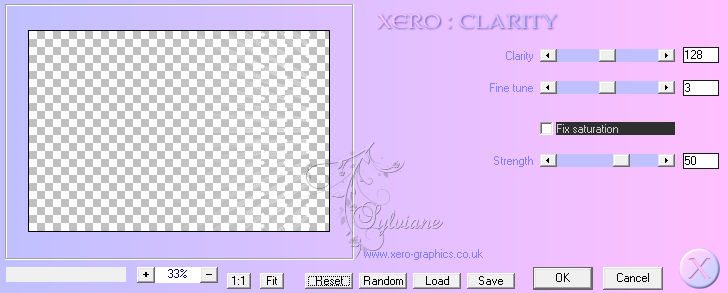
Effects – plugin - Xero – clarity – default
Opacity: 90%
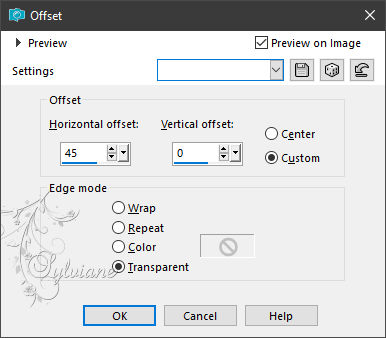
Effects - Image Effects – Offset
25.
Open deco-earth.png
Edit – Copy
Edit - Paste as new layer
Effects - Image Effects – Offset
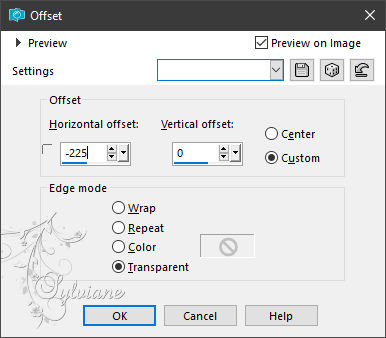
26.
Open butterflies.png
Edit – Copy
Edit - Paste as new layer
Effects - Image Effects – Offset
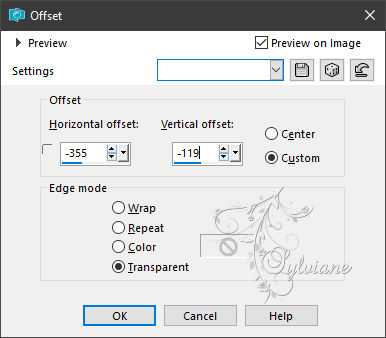
27.
Open tekst-833 - Earth - Ri@.pspimage
Edit – Copy
Edit - Paste as new layer
Effects - Image Effects – Offset
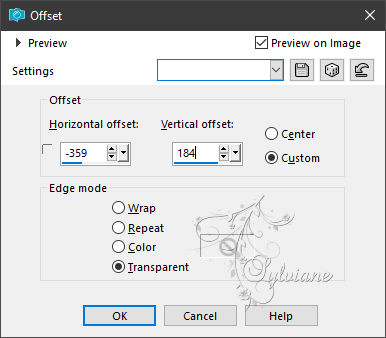
Opacity: 66%
28.
open tube or buy tube
Edit – Copy
Edit - Paste as new layer
Position the tube as you like it.
Layers - Duplicate
Adjust - blur - gaussian blur
range 35.
Blend mode - multiply.
Layers - arrange - move down.
Layers - merge - merge all layers.
29.
Image - Add Borders – Symmetric -2 pixels - background colour.
Image - Add Borders – Symmetric -15 pixels - colour white.
Image - Add Borders – Symmetric -2 pixels - background colour.
Image - Add Borders – Symmetric -2 pixels - colour white.
Image - Add Borders – Symmetric -2 pixels - background colour.
Image - Add Borders – Symmetric -2 pixels - colour white.
Image - Add Borders – Symmetric -2 pixels - background colour.
Image - Add Borders – Symmetric -2 pixels - colour white.
Image - Add Borders – Symmetric -2 pixels - background colour.
30.
Selections - select all.
Image - Add Borders – Symmetric -45 pixels - foreground colour.
Effects - 3D Effects - drop shadow.
0/0/80/25 - background colour
Selection - Select None
31.
Open the tube text-earth-Ri@.
Edit - copy.
Back to your image.
Edit - paste as a new layer.
Place the tube at the top left on the borders.
32.
Place your name/watermark.
Layers - merge - merge all layers.
Image - add borders - 1 pixel background colour.
Image - resize - 600 pixels - longest sides.
Save as JPEG
Back
Copyright Translation 2023 by SvC-Design
------------------------------------------------------------------------------
Thanks to all who created