
This lesson is made with PSPX9
But is good with other versions.
© by SvC-Design

Materialen Download :
Here
******************************************************************
Materials:
108_enfant_p2_animabelle.png
Deco_Marguerite_Animabelle.pspimage
Fond1_Tuto_Marguerite.jpg
Fond2_Tuto_Marguerite.jpg
Marguerites_Misted_Animabelle.png
masque1.jpg
******************************************************************
Plugin:
Plugins - <I.C.NET Software> - Filters Unlimited 2.0 - VM Extravaganza - Shouting!
Effects - Plugins - Andromeda - Perspective
Plugins - Graphics Plus - Cross Shadow
Plugins - AAA Frames - Photo Frame
******************************************************************
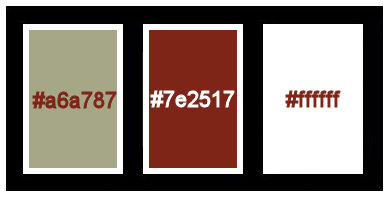
color palette
:
******************************************************************
methode
When using other tubes and colors, the mixing mode and / or layer coverage may differ
******************************************************************
General Preparations:
First install your filters for your PSP!
Masks: Save to your mask folder in PSP, unless noted otherwise
Texture & Pattern: Save to your Texture Folder in PSP
Selections: Save to your folder Selections in PSP
Open your tubes in PSP
******************************************************************
We will start - Have fun!
Remember to save your work on a regular basis
******************************************************************
1.
Open a new transparent image of 900 x 600 pixels
Fill the image with color 1
Layers - New raster layer.
Fill this layer with color 3
Layers - New Mask Layer - From Image - masque1.jpg

Layers - Merge - Merge Group.
Adjust – scharpness – scharpen more
2.
Layers - New raster layer.
Selections - Select all
Open Fond1_Tuto_Marguerite.jpg
Edit - Copy.
Go back to your work.
Edit - Paste into selection.
Adjust - Sharpness - Sharpen.
Opacity to 60%.
Selections - Select none.
Layers - Merge - Merge visible layers
3.
Layers - New raster layer.
Fill this layer with color 2
Plugins - <I.C.NET Software> - Filters Unlimited 2.0 - VM Extravaganza - Shouting!
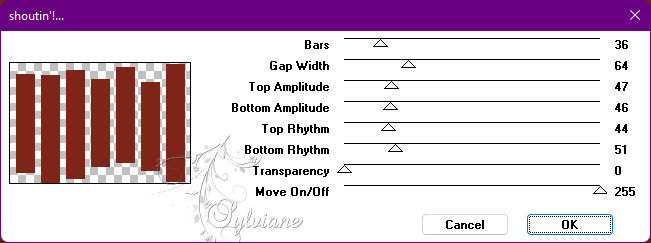
Image - Resize : 85%, Resize all layers unchecked
4.
Selections - Select all.
Selections - Floating.
Selections –defloat
Selections - Modify - Contract - 3 pixels
Press the Delete key on the keyboard once.
Layers - New raster layer
Open Fond2_Tuto_Marguerite.jpg
Edit - Copy.
Go back to your work.
Edit - Paste into selection.
Adjust - Sharpness - Sharpen.
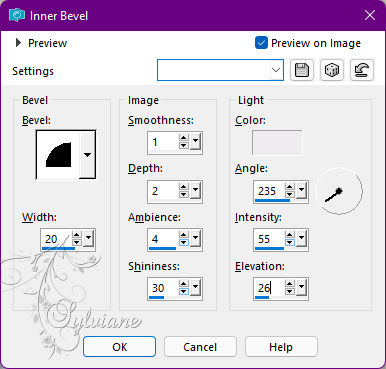
Effects - 3D Effects - Inner Bevel
Selections - Select none.
Layers - merge - merge down
5.
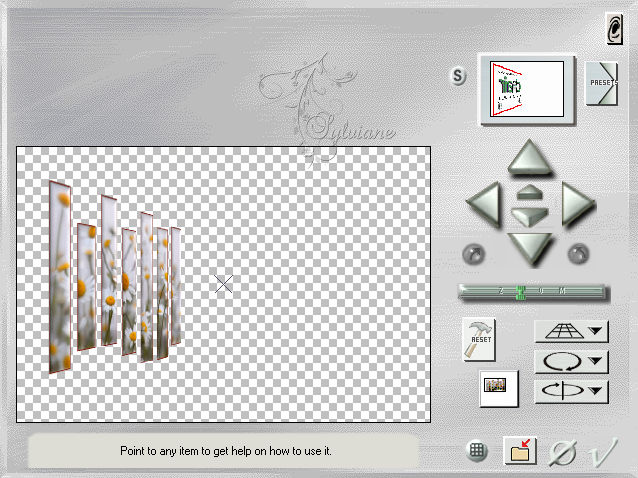
Effects - Plugins - Andromeda - Perspective :
First click on the "Reset" button and then on the "Presets" button:

In the next window set the settings as shown in the example and when you are done click on the V-small at the bottom right:

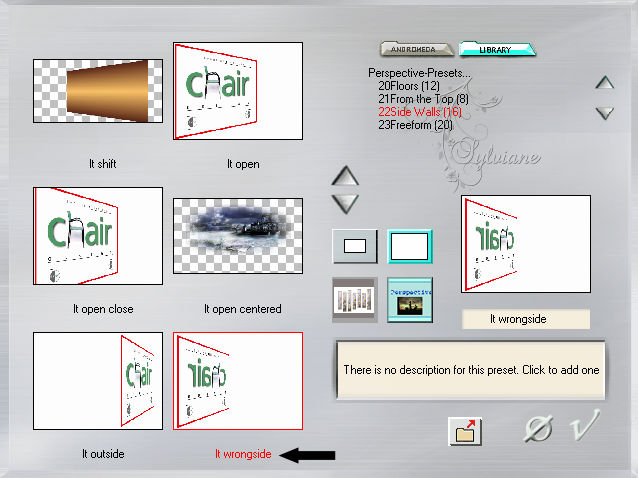
In the next window, just click on the V icon at the bottom right to apply the filter:
Effects - 3D Effects - Drop Shadow :
-3/7/40/15 – color:#000000
Layers - Duplicate.
Image - Mirror - Flip Horizontal.
Layers - merge - merge down.
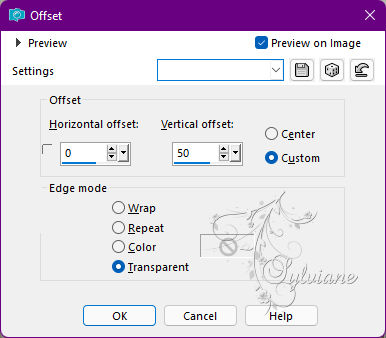
Effects - Image Effects - Offset :
6.
Activate the bottom layer in the Layers palette (= Merged)
Open Marguerites_Misted_Animabelle.png
Remove the watermark.
Edit - Copy.
Go back to your work.
Edit - Paste as new layer.
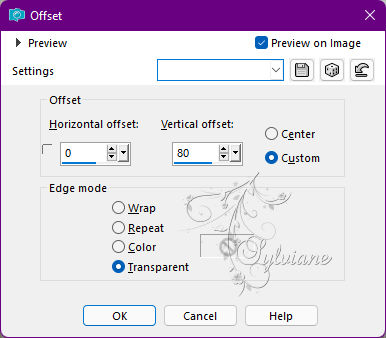
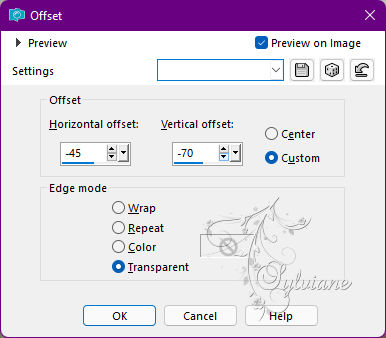
Effects - Image Effects - Offset :
Opacity of this layer to 80%
7.
Activate raster 1
Open 108_enfant_p2_animabelle.png
Remove the watermark.
Edit - Copy.
Go back to your work.
Edit - Paste as new layer.
Effects - Image Effects - Offset :
Selections - Select all.
Layers - New raster layer.
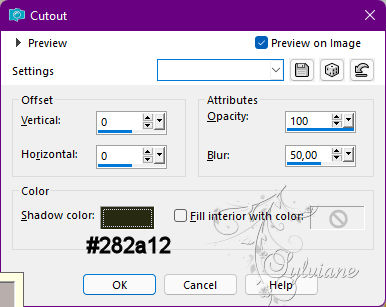
Effects - 3D Effects - Cutout : Color = 4th color
Selections - Select none
8.
Image - Add borders - Symmetric - 2 pixels – color:2
Selections - Select all.
Image - Add borders - Symmetric 60 px - color 3
Selections - Invert.
Layers - New raster layer.
Open Fond2_Tuto_Marguerite.jpg
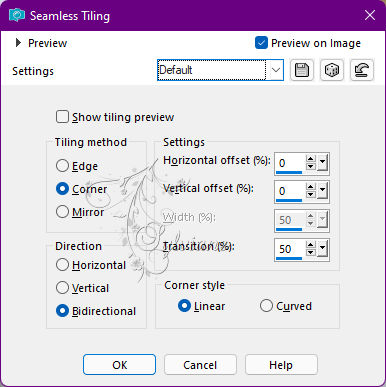
Effects - Image Effects - Seamless Tiling
Edit – Copy
9.
Go back to your work.
Edit - Paste into selection.
Opacity of this layer to 30%.
Layers - merge - merge down.
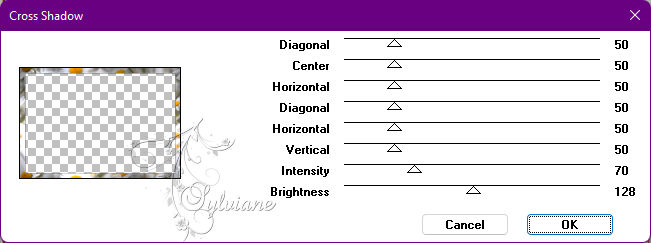
Plugins - Graphics Plus - Cross Shadow
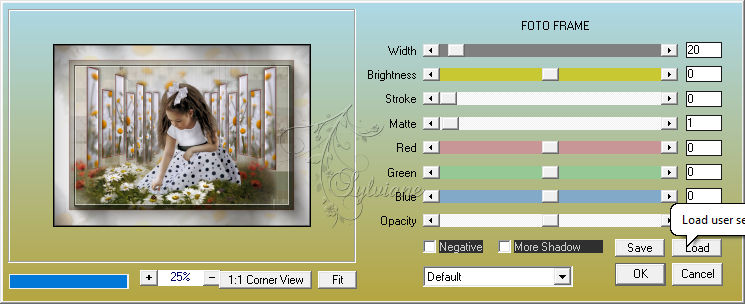
Plugins - AAA Frames - Photo Frame
Adjust - Sharpness - Sharpen.
Selections - Select none
10.
Open Deco_Marguerite_Animabelle.pspimage
Edit - Copy.
Go back to your work.
Edit - Paste as new layer.
The element is just right.
Layers - New raster layer.
Place your watermark on it
Layer – merge – merge all (flatten)
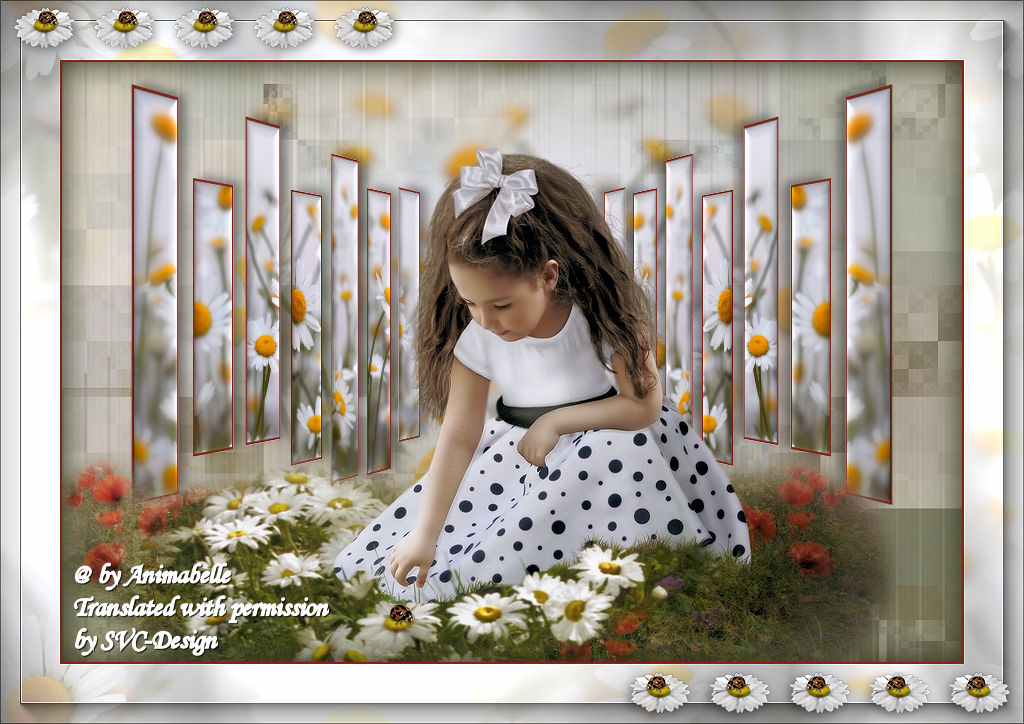
Save as JPEG
Back
Copyright Translation © 2022 by SvC-Design