
This lesson is made with PSPX9
But is good with other versions.
© by SvC-Design

Materialen Download :
Here
******************************************************************
Materials:
CalqueAlpha-ModernWoman.pspimage
Decocadremodernwoman.png
Element1-ModernWoman.pspimage
Element2-ModernWoman.png
masque©BG-ModernWoman.jpg
modernwoman©BG.pspimage
selection-MW.PspSelection
selection-MW1.PspSelection
WD-ModernWoman.pspimage
******************************************************************
Plugin:
Effects – plugin - Medhi - Weaver.
Effects – plugin - Italian Editors Effects - Disturbo zoom.
Effects – plugin - BKG Designers sf10 IV - Crumple
Effects – plugin - Medhi - Sorting Tiles
Effects -plugin - Vanderlee - Unplugged X - Defocus
Effects - plugin - Toadies - What are you?
Effects -plugin - Alien Skin Eyes Candy 5: Impact- Perspective Shadow.
Effects – plugin - Graphic Plus – cross schadow
Effects -plugin - Carolaine and Sensibility - CS LDots
******************************************************************
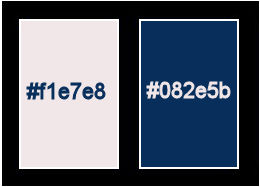
color palette
:
******************************************************************
methode
When using other tubes and colors, the mixing mode and / or layer coverage may differ
******************************************************************
General Preparations:
First install your filters for your PSP!
Masks: Save to your mask folder in PSP, unless noted otherwise
Texture & Pattern: Save to your Texture Folder in PSP
Selections: Save to your folder Selections in PSP
Open your tubes in PSP
******************************************************************
We will start - Have fun!
Remember to save your work on a regular basis
******************************************************************
foreground color : #f1e7e8
Background color: #802e5b
1.
Open CalqueAlpha-ModernWoman.pspimage
Window - duplicate
Minimize the original - we are working on the copy
Create a linear gradient with this setting
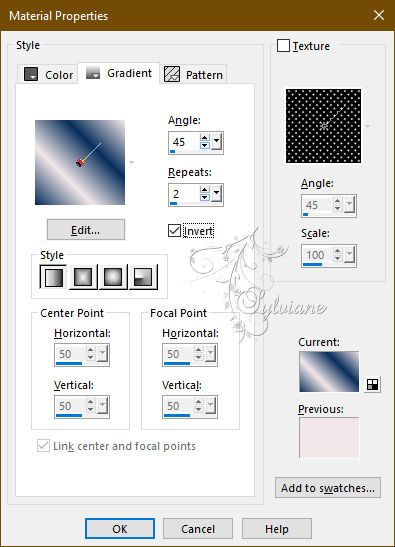
Fill with gradient
2.
Selections - Select everything.
Layers - New raster layer.
Open modernwoman©BG.pspimage
Edit - Copy.
Edit - Paste into selection.
Selection - Select None
3.
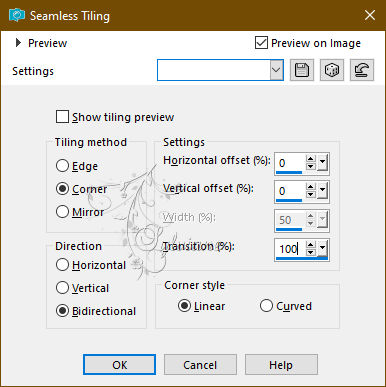
Effects - Image Effects - Seamless Tiling - Default
4.
Effects – plugin - Medhi - Weaver.
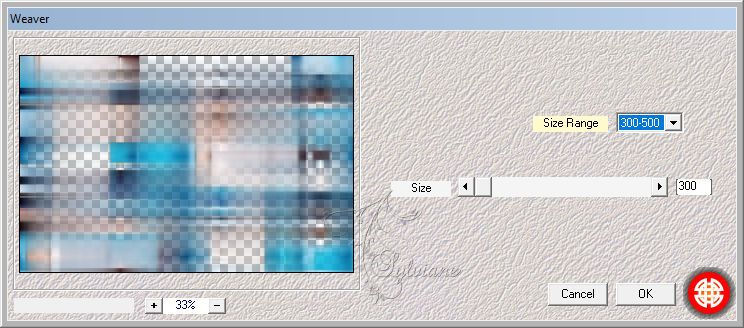
5.
Effects – plugin - Italian Editors Effects - Disturbo zoom.
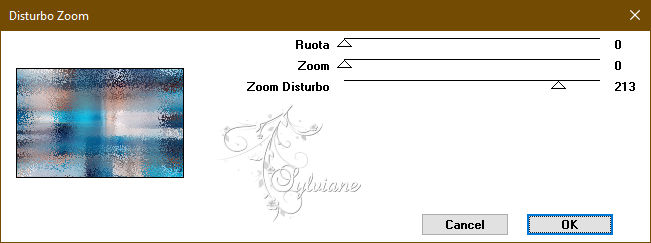
6.
Effects – plugin - BKG Designers sf10 IV - Crumple.
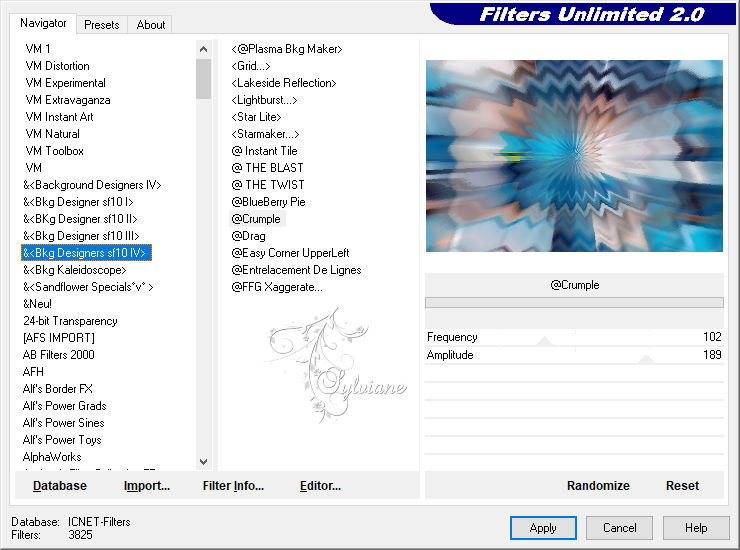
Blendmode : hard light.
7.
Activate raster 1
Layers - Duplicate
Effects – plugin - Medhi - Sorting Tiles.
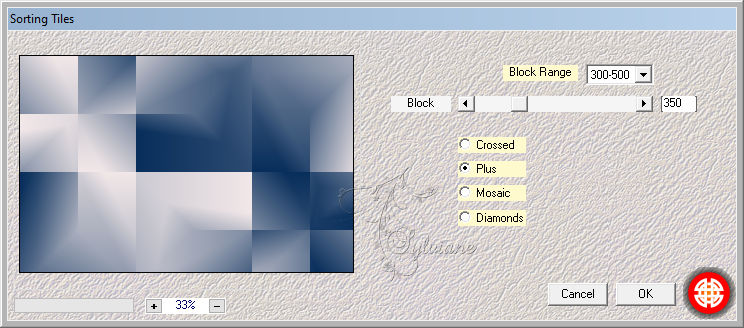
8.
Effects -plugin - Vanderlee - Unplugged X - Defocus.
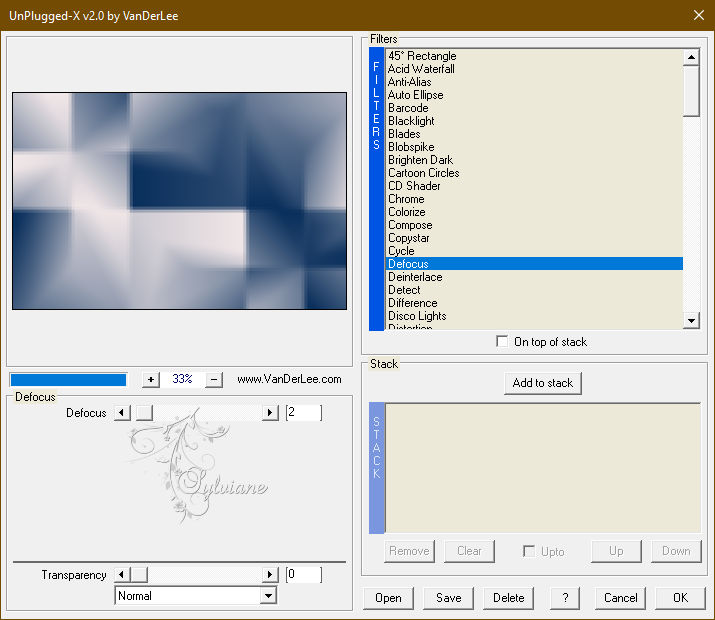
Adjust – scharpness – scharpen
9.
Activate the Raster 2.
Open Element1-ModernWoman.pspimage
Edit - Copy.
Edit - Paste as new layer.
Blendmode : Soft light.
Opacity: 67%.
Adjust – scharpness – scharpen
10.
Layers - New raster layer.
Fill in the background color
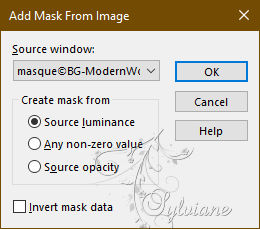
Layers - New Mask Layer - From Image - masque©BG-ModernWoman.jpg
Layers - Duplicate the mask.
Layers - Merge - Merge Group
Layers – arrange – move down (2x)
11.
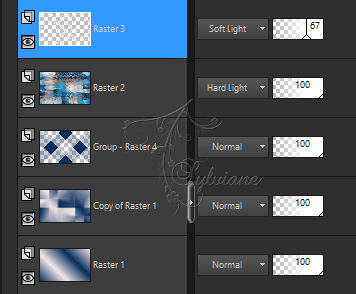
We are here:
12.
Layers - New raster layer.
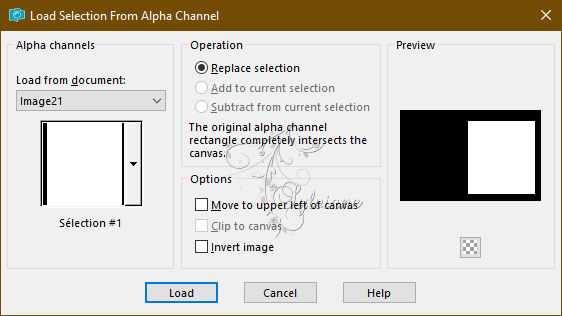
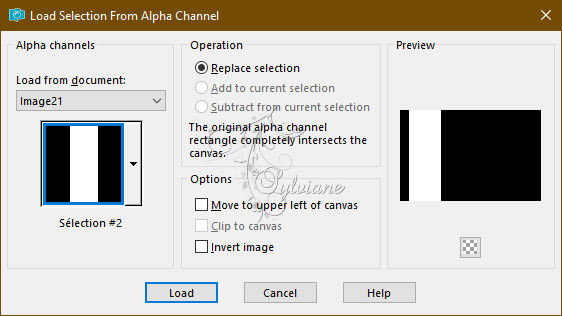
Selections - Load / Save - Load selection from Alpha Channel – selection 1
13.
Open modernwoman©BG.pspimage
Edit - Copy.
Edit - Paste as new layer.
Position it at the centre of the selection.
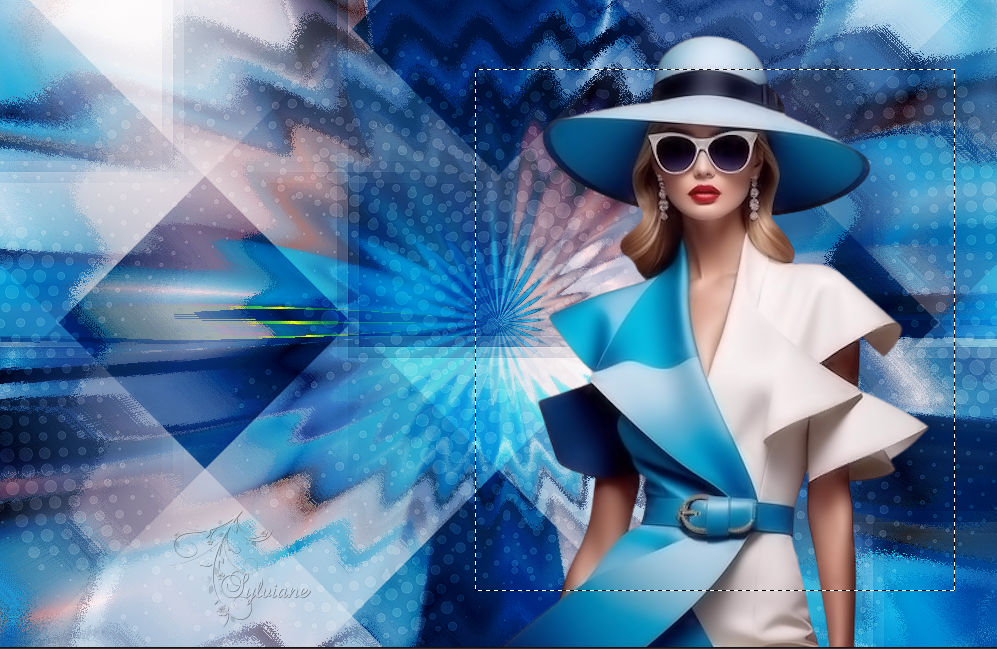
Image - Resize this layer to 90%.
Leave the layer or it is positioned.
14.
Selections - Invert
Press on delete
Selections - Invert
Layers - New raster layer.
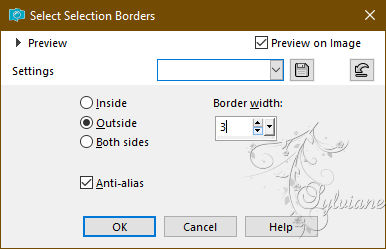
Selections - Modify - Select the borders of the selection.
fill the border with color 1
Selection - Select None
15.
Layers - New raster layer.
Selections - Load / Save - Load selection from Alpha Channel – selection 2
Paint pot tool - Lower its opacity to 50%.
fill the with color 1
Selection - Select None
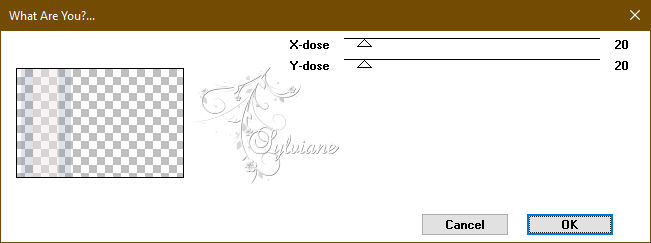
16.
Effects - plugin - Toadies - What are you? - "Default" settings.
Open WD-ModernWoman.pspimage
Edit - Copy.
Edit - Paste as new layer.
Position as on the model.
17.
Open Element2-ModernWoman.png
Edit - Copy.
Edit - Paste as new layer.
Position it around the frame with the tube female.
18.
Close the layers from raster 1 to raster 3.
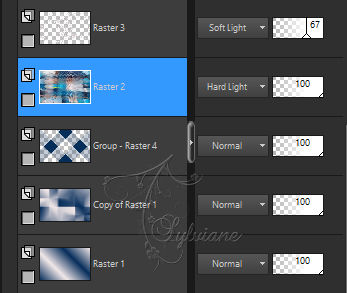
Layers - Merge - Merge visible layers
19.
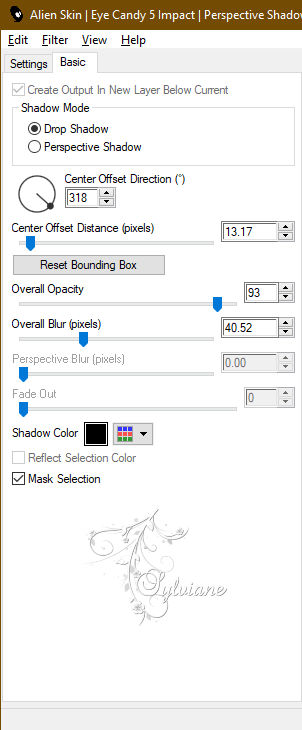
Stay on the fused layer.
Effects -plugin - Alien Skin Eyes Candy 5: Impact- Perspective Shadow.

Open the closed layers.
20.
Edit - Copy Special - Merged Copy
edit - paste as a new image. We're working on this one.
Image - Resize -20%
Check mark resize all layers
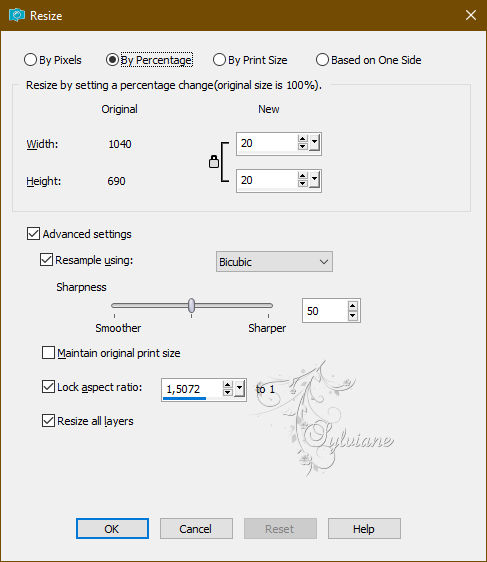
Image - Add Borders – Symmetric -20-pixel – color: Affffffff.
21.
Open Decocadremodernwoman.png
Edit - Copy.
Edit - Paste as new layer
Layer – merge – merge all (flatten)
22.
Edit - Copy.
Go back to your first image.
Edit - Paste as new layer
Place as on the model.
Capas – fusionar – fusionar todo (aplanar)
Edit - Copy.
23.
Image - Add Borders – Symmetric -10 pixels – color:#ffffff
Image - Add Borders – Symmetric -5-pixel – color: background
Image - Add Borders – Symmetric -40 pixel – color: foreground
Magic wand tool - Tolerance to zero - Select the border.
24.
Edit - Paste into selection
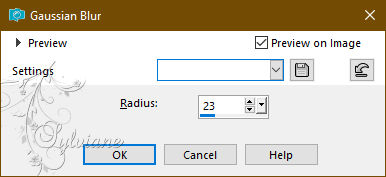
Adjust - blur - gaussian blur
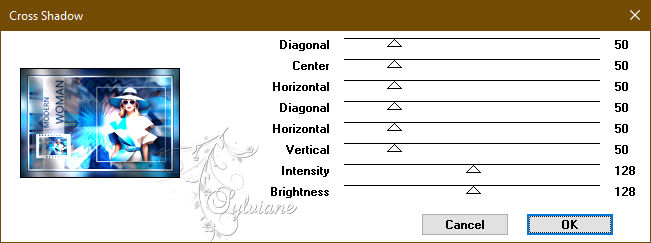
Effects – plugin - Graphic Plus – cross schadow - default
25.
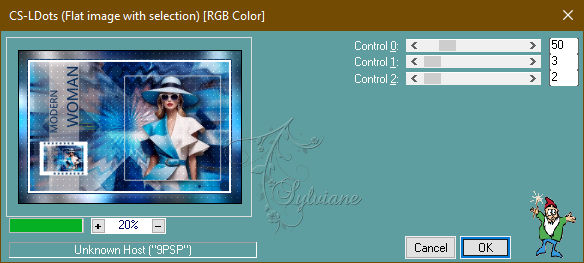
Effects -plugin - Carolaine and Sensibility - CS LDots.
Adjust – scharpness – scharpen more
Selections - Invert
Effects - 3 D effects - Drop shadow
2/ 2 /50 /20 - color:#000000
Repeat the drop shadow with negative values.
- 2/ -2 /50 /20 - color:#000000
26.
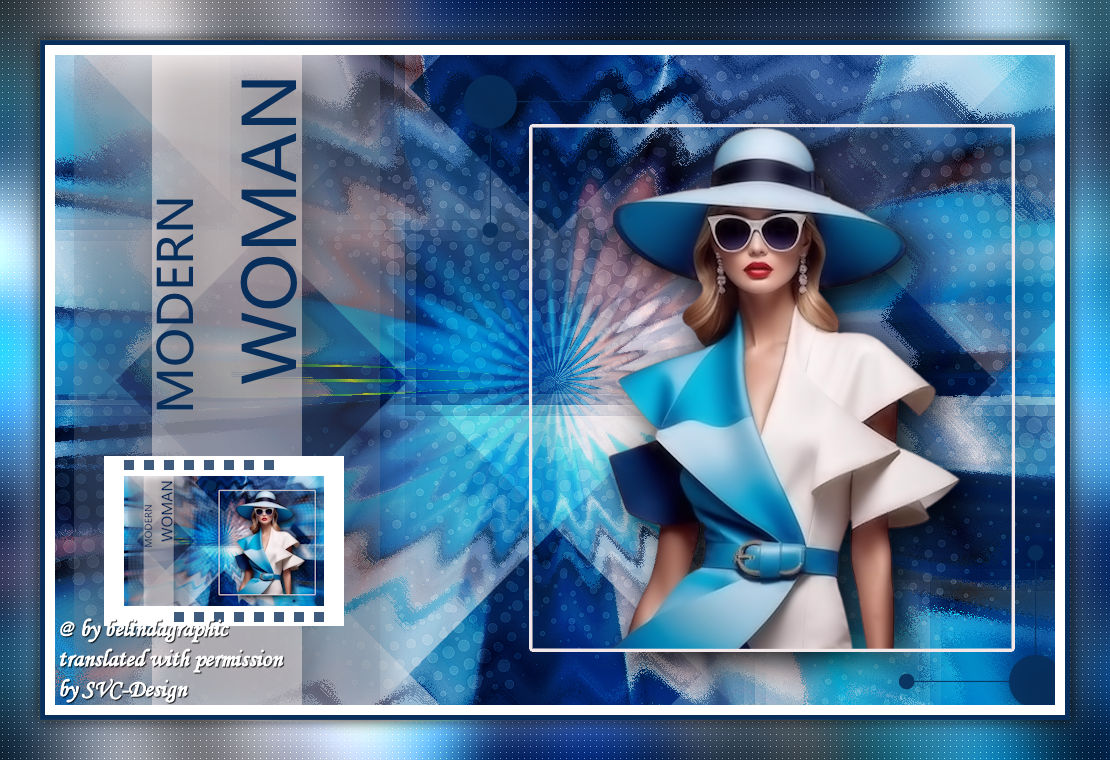
put your watermark on it
Layer – merge – merge all (flatten)
Image - Resize to 950 pixels wide.
Save as JPEG
Back
Copyright Translation 2024 by SvC-Design
------------------------------------------------------------------------------
Thanks to all who created