
This lesson is made with PSPX9
But is good with other versions.
© by SvC-Design

Materialen Download :
Here
******************************************************************
Materials:
COULEURS VERSION 1 pspimage.png
DECO PERSO 1 203 OCTOBRE 2023 COULEUR SWEETY.png
DECO PERSO 2 203 OCTOBRE 2023 SWEETY.png
SIGNATURE TUTORIELS .pspimage
SELECTION 1 203.PspSelection
SELECTION 2 203.PspSelection
SELECTION 3 203.PspSelection
SELECTION 4 203.PspSelection
SELECTION 4 BIS 203.PspSelection
SELECTION 5 203.PspSelection
8cb70e9be0c6b1e5acca4c90eac17d06.jpg
DECEMBRE 2022 FAONS 17 12 22 SWEETY.png
DECEMBRE 2023 MICKAELLA 09 12 23 SWEETY.png
******************************************************************
Plugin:
Effects - Plug-in – ScreenWords - Block Tile
Effects - Plugin - Graphics Plus - Cross Shadow
Effects – plugin - Simple - Top Left Mirror
Effects – plugin - VanDerLee - Unplugged – X - Auto Ellipse
Effects – plugin - VM Toolbox - Zoom Blur
Effects - plugin - MuRa's Filter Meister - Perspective Tilling
Effects – plugin - Graphics Plus - Quick Tile 1
******************************************************************
color palette
:

******************************************************************
methode
When using other tubes and colors, the mixing mode and / or layer coverage may differ
******************************************************************
General Preparations:
First install your filters for your PSP!
Masks: Save to your mask folder in PSP, unless noted otherwise
Texture & Pattern: Save to your Texture Folder in PSP
Selections: Save to your folder Selections in PSP
Open your tubes in PSP
******************************************************************
We will start - Have fun!
Remember to save your work on a regular basis
******************************************************************
1.
Open a new transparent image of 950/600 px
Selections - select all
Open 8cb70e9be0c6b1e5acca4c90eac17d06.jpg
Edit - copy
Activate your work
Edit - paste into selection
Selections - select none
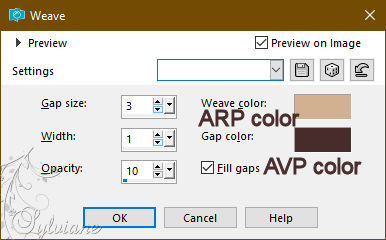
Effects - Image Effects - Seamless Tiling – default
Adjust – blur – motion blur
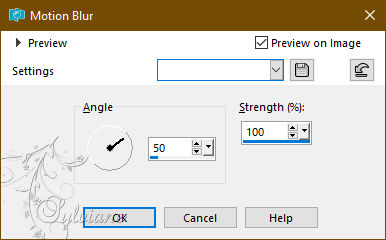
Repeat this effect a second time
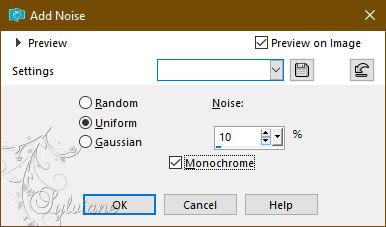
Adjust - Add / Remove Noise - Add Noise
2.
Layers - Duplicate
Effects - Plug-in – ScreenWords - Block Tile:

NOTE: This effect works only no screenshot
Layer Mode: * Screen * OR other of your choice
Coverage between 55 and 60% depending on your landscape
Layers – merge – merge down
3.
Layers - new raster layer
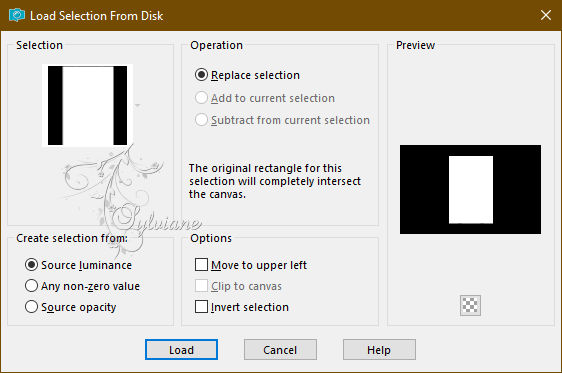
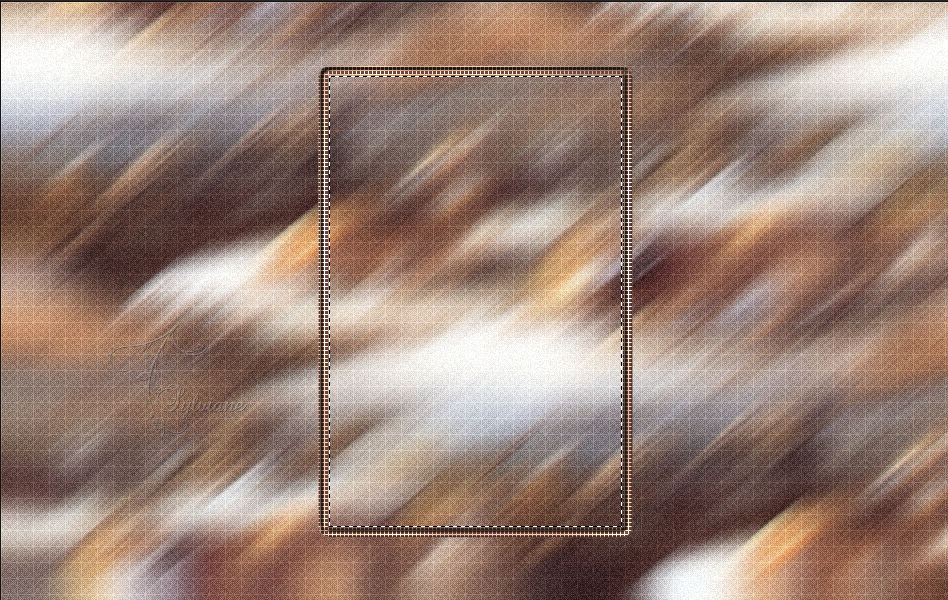
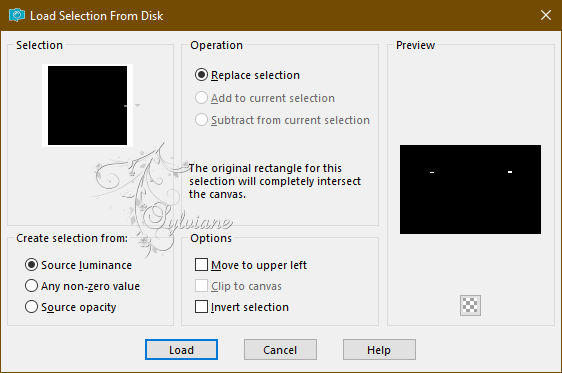
Selections - Load / Save - Load selection from disk - SELECTION 1 203.PspSelection
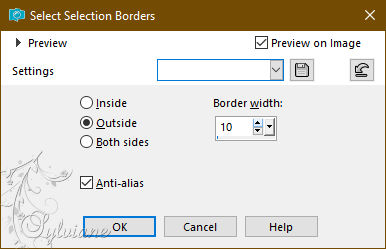
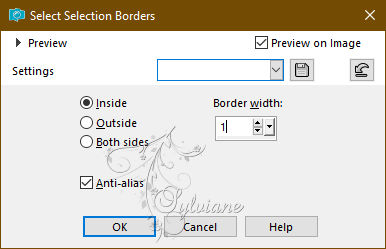
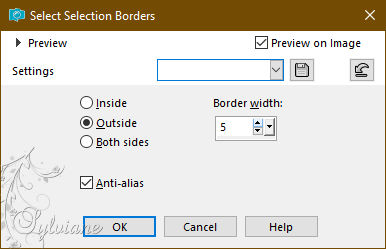
Selections - modify - select selection borders
Fill the selection with the ARP color
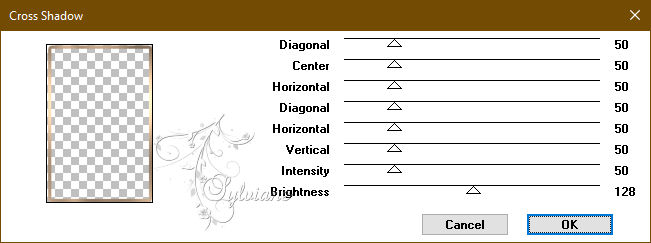
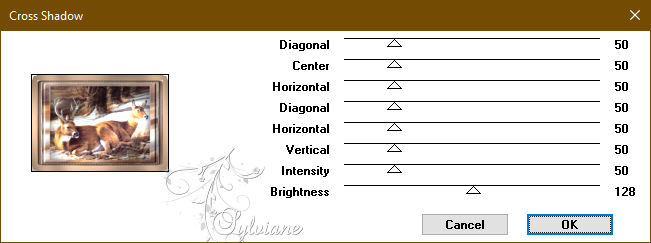
Effects - Plugin - Graphics Plus - Cross Shadow
Effects - Texture Effects – wave
Effects – 3D effects – inner bevel (nr: 7)
Selections - select none
4.
Tools====>magic====>tolerance 0. Click in the frame:
Activate (Raster 1).
Selections – Promote selections to layer
Effects – 3D effects – inner bevel (nr: 7)
Selection - modify - contract -20px
DELETE or DELETE on keyboard .
Layers - new raster layer
Layers - arrange - down
select a piece from your image
Edit - copy
Activate your work
Edit - paste into selection
NOTE: DON'T FORGET TO DESELECT YOUR IMAGE SELECTION
On our work... Keep selection active...
5.
Stil on Raster 3
Selections - Invert
Effects - 3 D effects - Drop shadow
0 / 0 / 60 / 30 - color:#000000
Selections - Invert
Selections - modify - select selection borders
Fill the selection with ARP color (Zoom if necessary)
Selections - select none
6.
We have this:
Activeer raster 2
Layers – merge – merge down (2x)
Edit – copy
edit - paste as a new image
(save it, we will need it again later)
7.
still on top layer
Layers - new raster layer
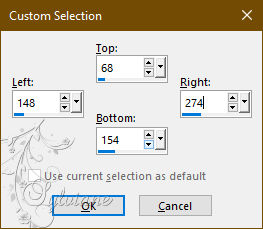
Activate Selection - Custom selection
Paste the image copied in the previous step (the frame) into the selection
Selections - modify - select selection borders
Fill the selection with the ARP color
Effects - Plugin - Graphics Plus - Cross Shadow
Effects - Texture Effects – wave
Effects – 3D effects – inner bevel (nr: 7)
Selections - select none
Effects – plugin - Simple - Top Left Mirror
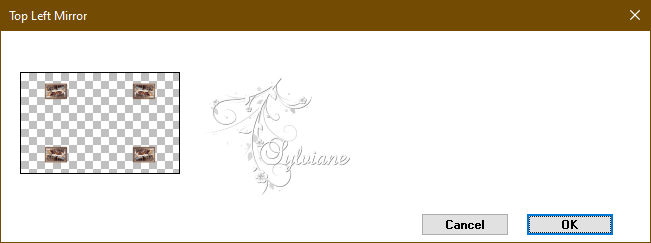
NOTE : This effect works only no screenshot
8.
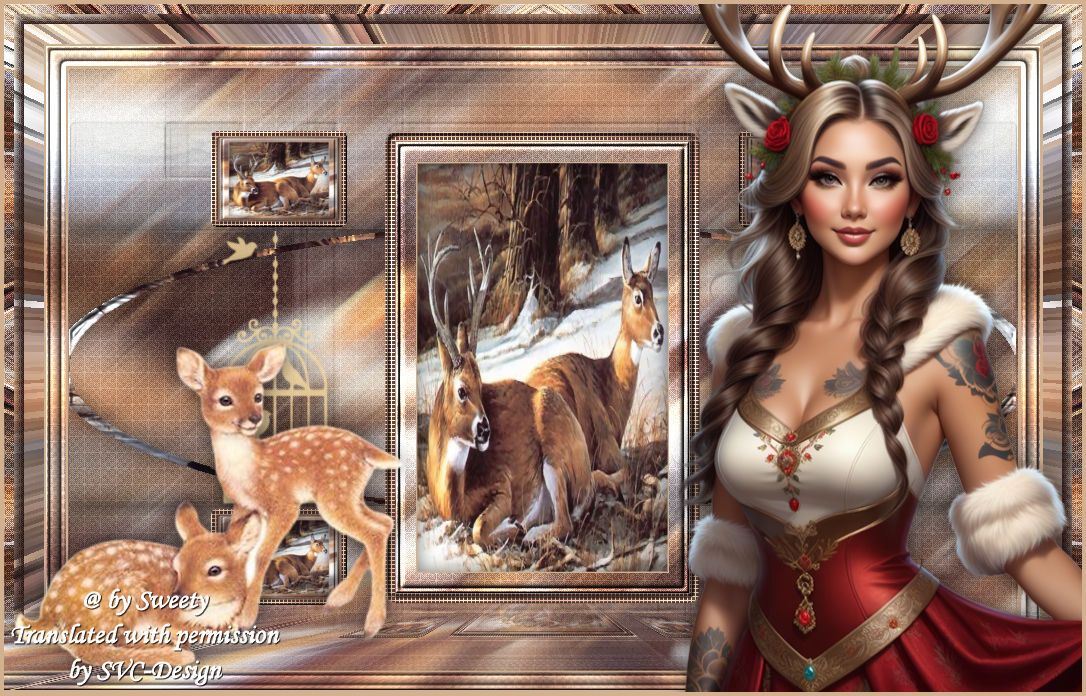
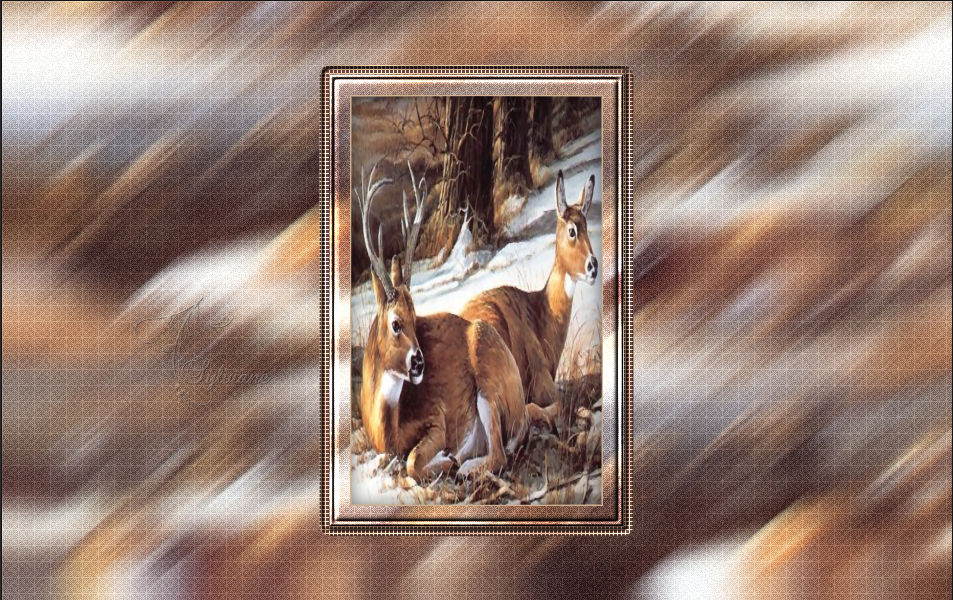
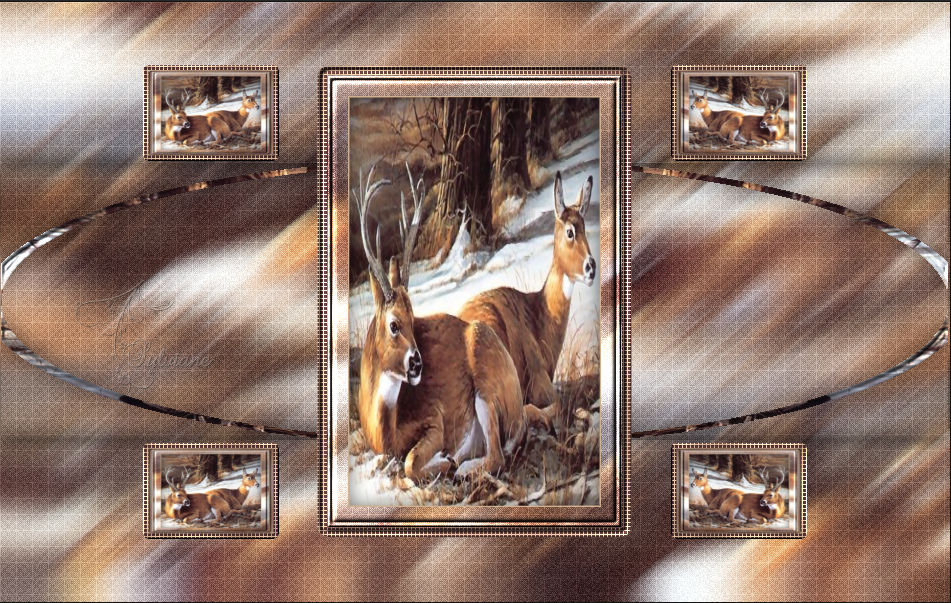
A little overview before going any further:
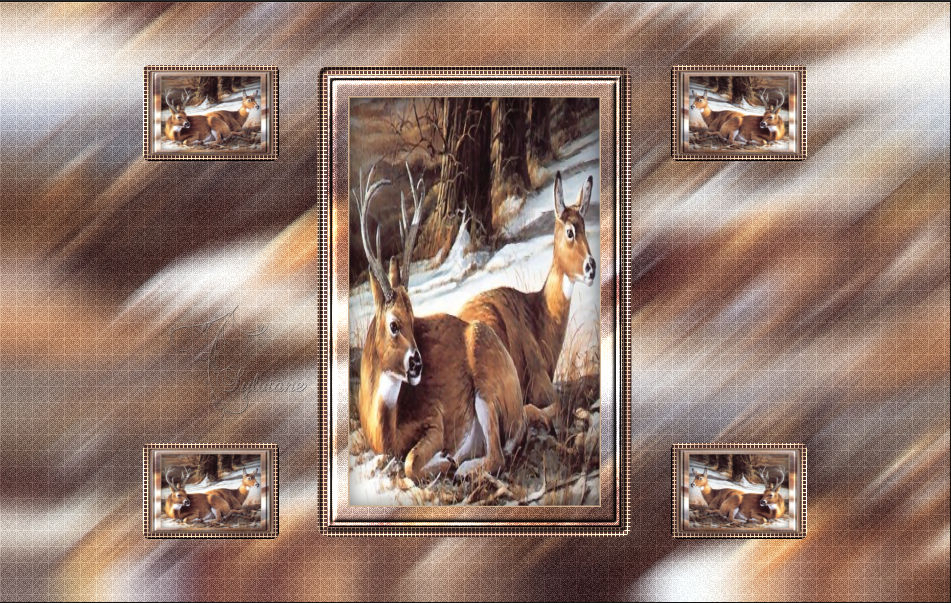
We are at the top of the pile (Raster 2).
Activate *Raster 1*
Selections - Load / Save - Load selection from disk - SELECTION 2 203.PspSelection
Layers - new raster layer
Open 8cb70e9be0c6b1e5acca4c90eac17d06.jpg
Edit - copy
Activate your work
Edit - paste into selection
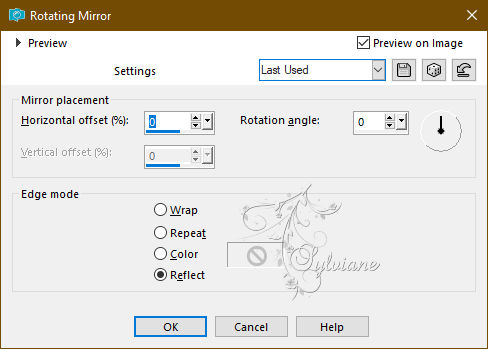
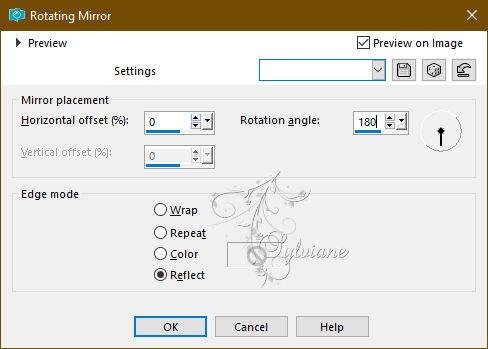
Effects – reflection effects – rotating mirror - default:
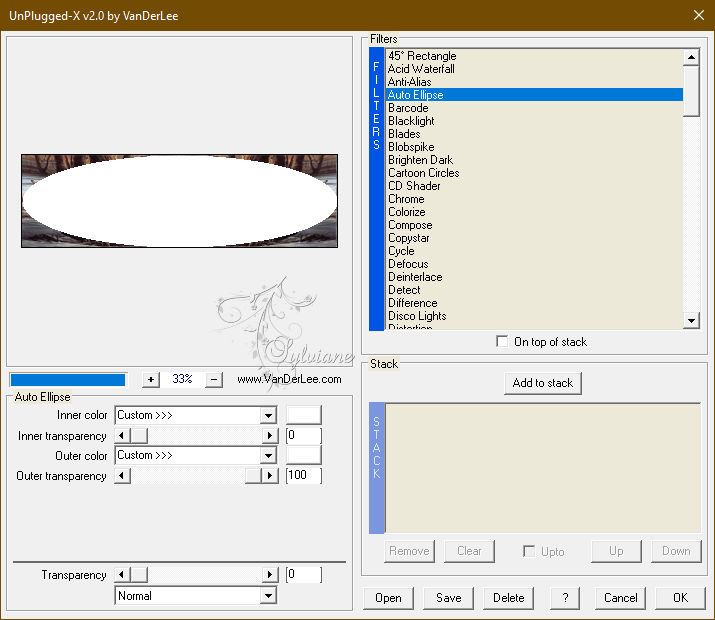
Effects – plugin - VanDerLee - Unplugged – X - Auto Ellipse:
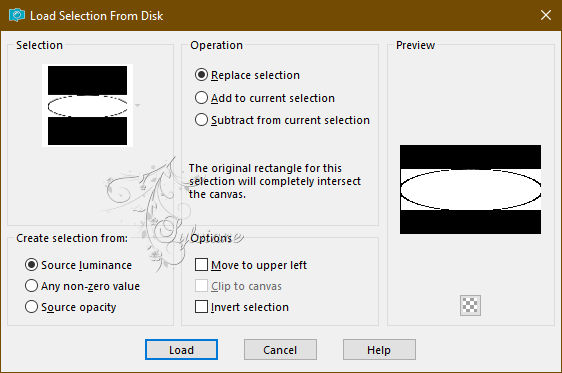
Selections - Load / Save - Load selection from disk - SELECTION 3 203.PspSelection
(It will replace the previous selection)
CLEAR or DELETE on the keyboard
Selections - invert
Effects - 3D Effects - Drop Shadow
0 / 0 / 60 / 30 - color:#000000
Effects – 3D effects – inner bevel (nr: 7)
Selections - select none
9.
Layers - new raster layer
Layers – arrange – move down
Selections - Load / Save - Load selection from disk - SELECTION 3 203.PspSelection
Effects - 3D Effects - Drop Shadow
0 / 0 / 60 / 30 - color:#000000
Selections - select none
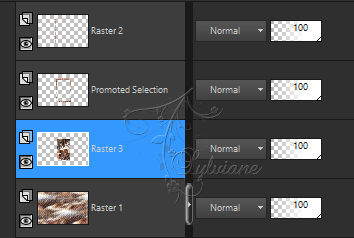
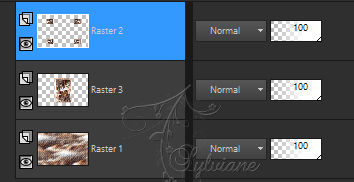
Our layers and tag:
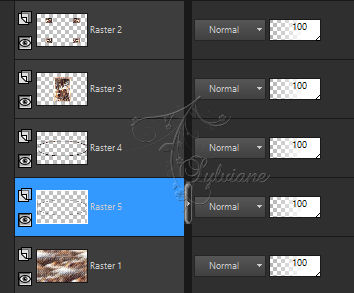
10.
We are stil on raster 5
Activate Raster 2
Layers – merge – merge down
Open DECO PERSO 1 203 OCTOBRE 2023 COULEUR SWEETY.png
Edit - copy
Activate your work
Edit - paste as new layer
(NOTE: it is also in white so you can color it according to your taste)
Don't move it, it's in its place
Effects - 3D Effects - Drop Shadow
0 / 0 / 60 / 30 - color:#000000
Selections - Load / Save - Load selection from disk - SELECTION 4 203.PspSelection
CLEAR or DELETE on the keyboard.
Selections - select none
Selections - Load / Save - Load selection from disk - SELECTION 4 BIS 203.PspSelection
CLEAR or DELETE on the keyboard.
Selections - select none
Blend Mode: 85%
11.
Open DECO PERSO 2 203 OCTOBRE 2023 SWEETY.png
Edit - copy
Activate your work
Edit - paste as new layer
Don't move it, it's in its place
Layers – arrange – move down - 4 TIMES
For my 1st version I set it to *Luminance (H)* and opacity to 50%
Effects - Reflection Effects - Rotating Mirror
Activate Raster 1
Copy/paste as new image (leave on hold we'll need it later)
12.
Image - Add Borders – Symmetric - 2 px - color ARP or AVP.
Selections - select all
Image - Add Borders – Symmetric – 20px - (no matter the color)
Selections - invert
Open your background from point 11
Edit - copy
Activate your work
Edit - paste into selection
Effects – 3D effects – inner bevel (nr:7)
Effects - Reflection Effects - Rotating Mirror
Selections - select none
Image - Add Borders – Symmetric - 2 px - color ARP or AVP.
13.
Selections - select all
Add a border regardless of the color configured as follows:
Selections - invert
Open your background from point 11
Edit - copy
Activate your work
Edit - paste into selection
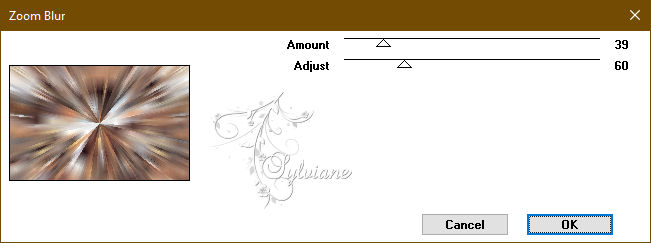
Effects – plugin - VM Toolbox - Zoom Blur - default:
Effects - Reflection Effects - Rotating Mirror
Selections – Promote selections to layer
Selections - invert
Activate to BOTTOM Layer (Background)
Edit - copy (the image is stored in memory)
Selections - select none
14.
Layers - new raster layer
Layers – arrange – bring to top
Selections - select all
Edit - paste into selection
Selections - select none
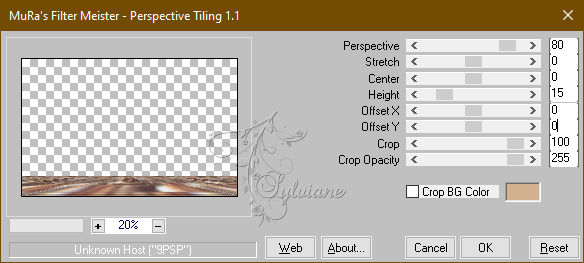
Effects - plugin - MuRa's Filter Meister - Perspective Tilling
Activate magic wand - Tolerance: 0 - feather to 60

Click in the transparent part of the layer... DELETE or DELETE +/- 6 TIMES -
Selections - select none
Reset the progressiveness of the magic wand to 0
15.
Before we make the last point, let's take a look at our layers:
We're at the top of the stack on *Raster 1*...
Activate Promoted Selection
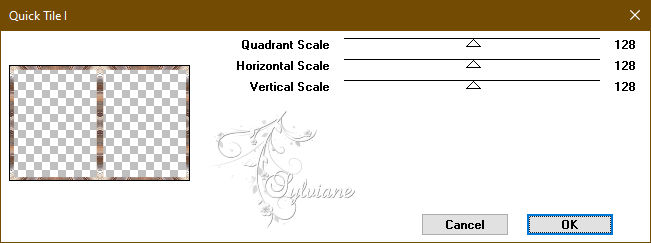
Effects – plugin - Graphics Plus - Quick Tile 1 - default:
Selections - select all
Selection - modify - contract - 20 px
DELETE or DELETE.
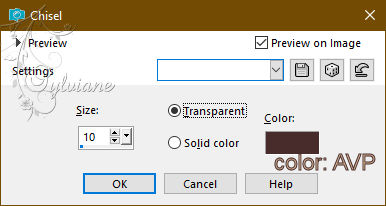
Effects – 3D effects – chisel
Selections - invert
Layers - Duplicate
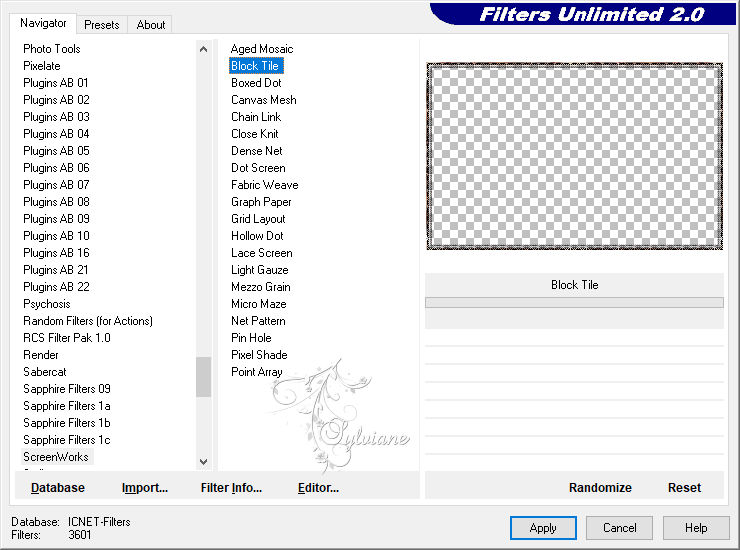
Effects – plugin – unlimited 2.0 - ScreenWoorks - Block Tile
For my 1st version I chose to set the mode of this layer to * Overlay *
And its opacity at 50%
Adjust – scharpness – scharpen
Selections - select none
16.
Open DECEMBRE 2023 MICKAELLA 09 12 23 SWEETY.png
Edit - copy
Activate your work
Edit - paste as new layer
Layers – arrange – bring to top
Image - Mirror – mirror Horizontal
Image - Resize – 89%
No check mark on resize all layers
place it as in the example
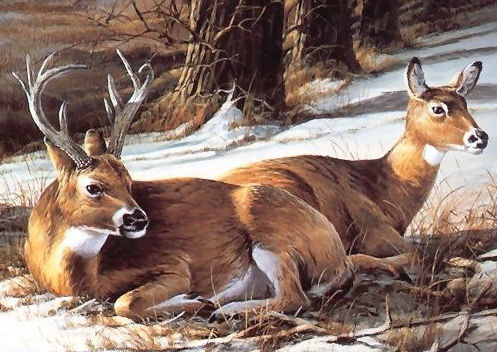
Open DECEMBRE 2022 FAONS 17 12 22 SWEETY.png
Edit - copy
Activate your work
Edit - paste as new layer
place it as in the example
Drop shadow on each element of your choice
17.
Image - Add Borders – Symmetric - 4 px - color ARP or AVP.
Affix your signature and mine if you wish
Layer – merge – merge all (flatten)
Resize to 950 pixels
Save as JPEG
Back
Copyright Translation 2023 by SvC-Design
------------------------------------------------------------------------------
Thanks to all who created