
This lesson is made with PSPX9
But is good with other versions.
© by SvC-Design

Materialen Download :
Here
******************************************************************
Materials:
!!!!.mask.ket01.jpg
20 20.jpg
DECO PERSO 3 199 JUILLET 2023 SWEETY.png
DECO PERSO 1 199 JUILLET 2023 SWEETY.png
DECO PERSO 2 199 JUILLET 2023 SWEETY.png
COULEURS VERSION 1.png
SIGNATURE TUTORIELS .pspimage
SELECTION 1 199 .PspSelection
SELECTION 2 199 .PspSelection
SELECTION 3 199 .PspSelection
SELECTION 4 199 .PspSelection
41c0ed15024270b44a00d56a946130bf.jpg
JUILLET 2023 ODILE 06 07 23 SWEETY.png
JUILLET 2023 ROUGE GORGE 16 07 23 SWEETY.png
JUILLET 2023 VASE FLEURS AUTOMNE 16 07 23 SWEETY.png
******************************************************************
Plugin:
Effects – plugin - MuRa’s Seamless - Emboss At Alpha
Effects – plugin - Nick Software color efex pro 3.0
Effects - plugin - MuRa's Filter Meister - Copies
Effects – plugin – Toadies - What You Are
Effects – plugin - MuRa's Filter Meister - Perspective Tiling
Effects – plugin - VM Toolbox - Zoom Blur
******************************************************************
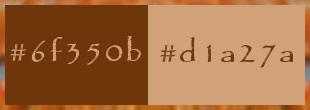
color palette
:
******************************************************************
methode
When using other tubes and colors, the mixing mode and / or layer coverage may differ
******************************************************************
General Preparations:
First install your filters for your PSP!
Masks: Save to your mask folder in PSP, unless noted otherwise
Texture & Pattern: Save to your Texture Folder in PSP
Selections: Save to your folder Selections in PSP
Open your tubes in PSP
******************************************************************
We will start - Have fun!
Remember to save your work on a regular basis
******************************************************************
1.
Open a 950/600 transparent layer.
Selection - Select All
Open 41c0ed15024270b44a00d56a946130bf.jpg
Edit - Copy.
Edit - Paste into selection.
Selection - Select None
Adjust - blur – Motion Blur
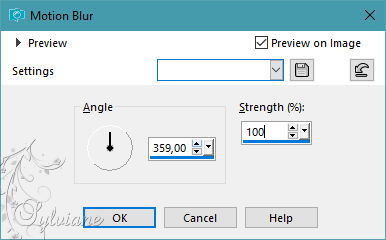
(Do a second time)
effects – art media effects – brush strokes

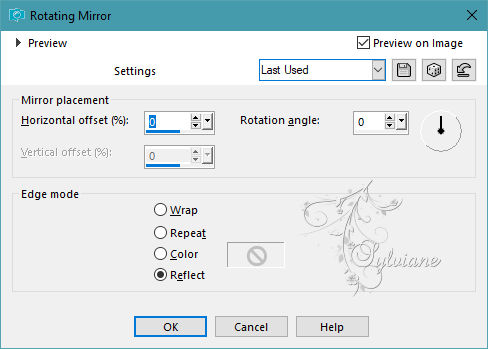
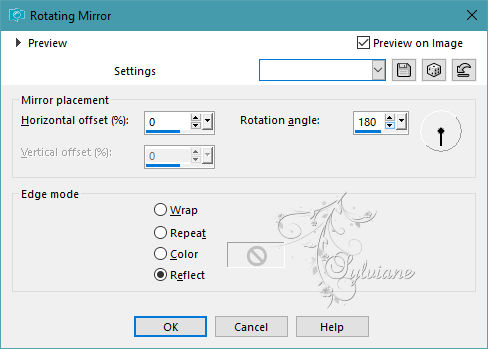
Effects – reflection effects – rotating mirror
=============================================================
2.
Layers - New Raster Layer
Selection - Select All
DECO PERSO 1 199 JUILLET 2023 SWEETY.png
Edit - Copy.
Edit - Paste into selection.
Selection - Select None
Effects – plugin - MuRa’s Seamless - Emboss At Alpha
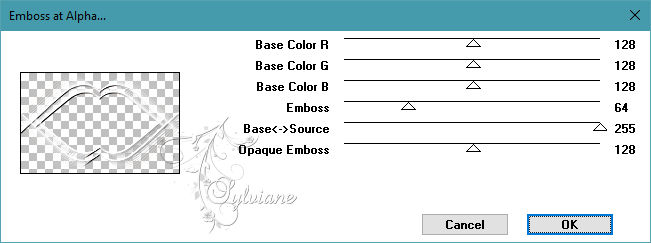
Blendmode: Luminance (legacy)
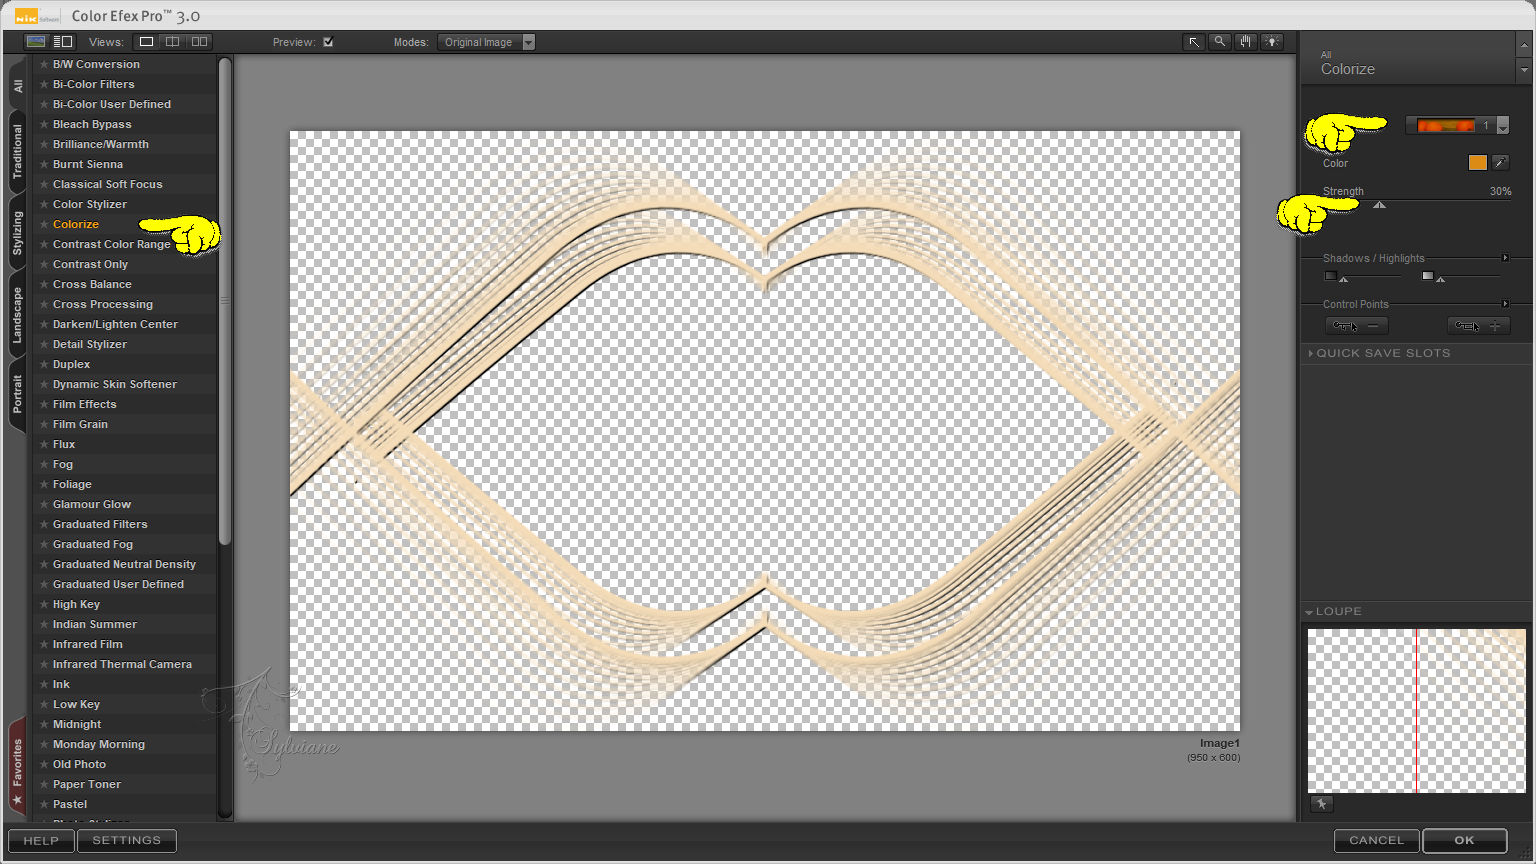
Effects – plugin - Nick Software color efex pro 3.0 :
=============================================================
3.
Layers - New Raster Layer
Layers – arrange – move down
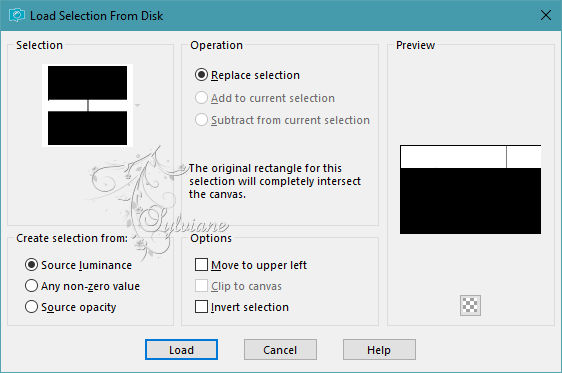
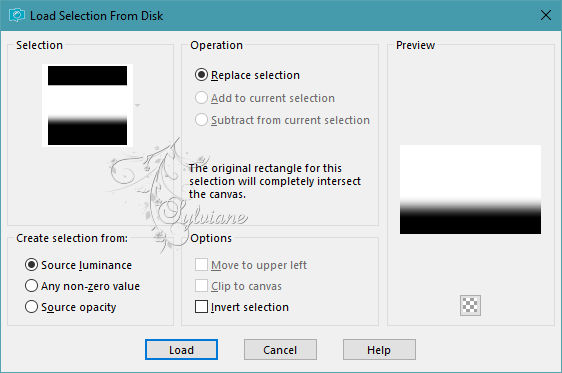
Selections - Load / Save - Load selection from disk - SELECTION 1 199 .PspSelection
Open 41c0ed15024270b44a00d56a946130bf.jpg
Edit - Copy.
Edit - Paste into selection.
Selections - Invert
Effects - 3D effects - Drop shadow
0/0/100/50 – color:#000000
Selection - Select None
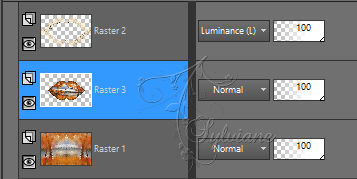
Here we are on * Raster 3 *
=============================================================
4.
Activate Raster 1
Edit - Copy.
Edit – paste as new image (Leave on hold - we'll need it later)
Activate Raster 2
Open DECO PERSO 2 199 JUILLET 2023 SWEETY.png
Edit - Copy.
Edit - Paste as new layer
DON'T MOVE IT, IT'S WHERE IT BELONGS ...
Layers - Merge - Merge visible layers
You can name this layer * FOR SMALL FRAMES *
to help you find your way around
=============================================================
5.
Open a new transparent image of 950/600 px
Selection - Select All
Activate your (FOND) that you put on the sides it at point 4
Edit - Copy.
Edit - Paste into selection.
Selection - Select None
(keep the * FOND * image, we'll need it again)
Activate the (for Small Frames) ) that you put on the sides it at point 4
Edit – Copy
Edit - Paste as new layer
you can get rid of those for small frames you don't need these anymore
result:
=============================================================
6.
We are still Raster 2
Image - Resize - 30%
No check mark for resize all layers
Selection - Select All
Selections – Float
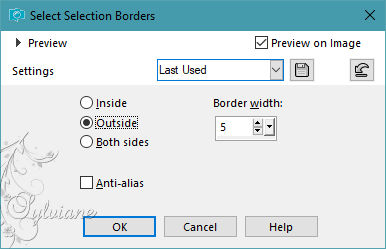
Selections – defloat
Selections – modify – select selection borders
Fill selection with AVP
Selection - Select None
Image - Resize - 80%
No check mark for resize all layers
Activate selection tool (Press K on your keyboard)
And enter the following parameters:
Pos X : 1 – Pos Y : 1
Press M.
=============================================================
7.
We are still Raster 2
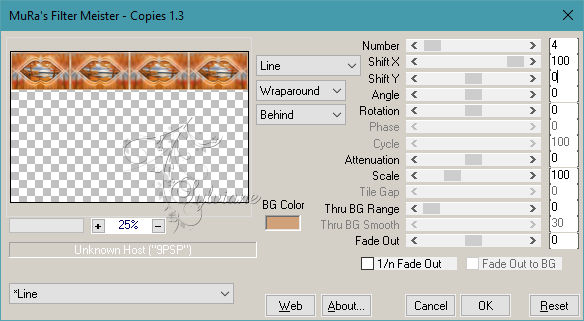
Effects - plugin - MuRa's Filter Meister - Copies
Layers - Duplicate
Effects – plugin – Toadies - What You Are
Layers – arrange – move down
Effects - Edge Effects - Enhance
Activate Raster 2
Edit – Copy
Edit – paste as new image
Rename this layer * SMALL FRAMES * we need this later
We are still Raster 2
Selection - Select All
Image – crop to selection
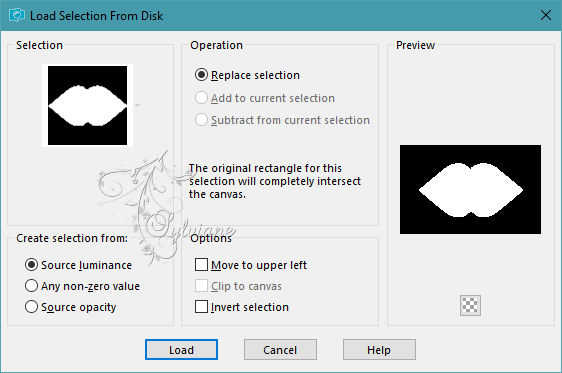
Selections - Load / Save - Load selection from disk - SELECTION 2 199 .PspSelection
Open DECO PERSO 3 199 JUILLET 2023 SWEETY.png
Edit - Copy.
Edit - Paste into selection.
Selection - Select None
=============================================================
8.
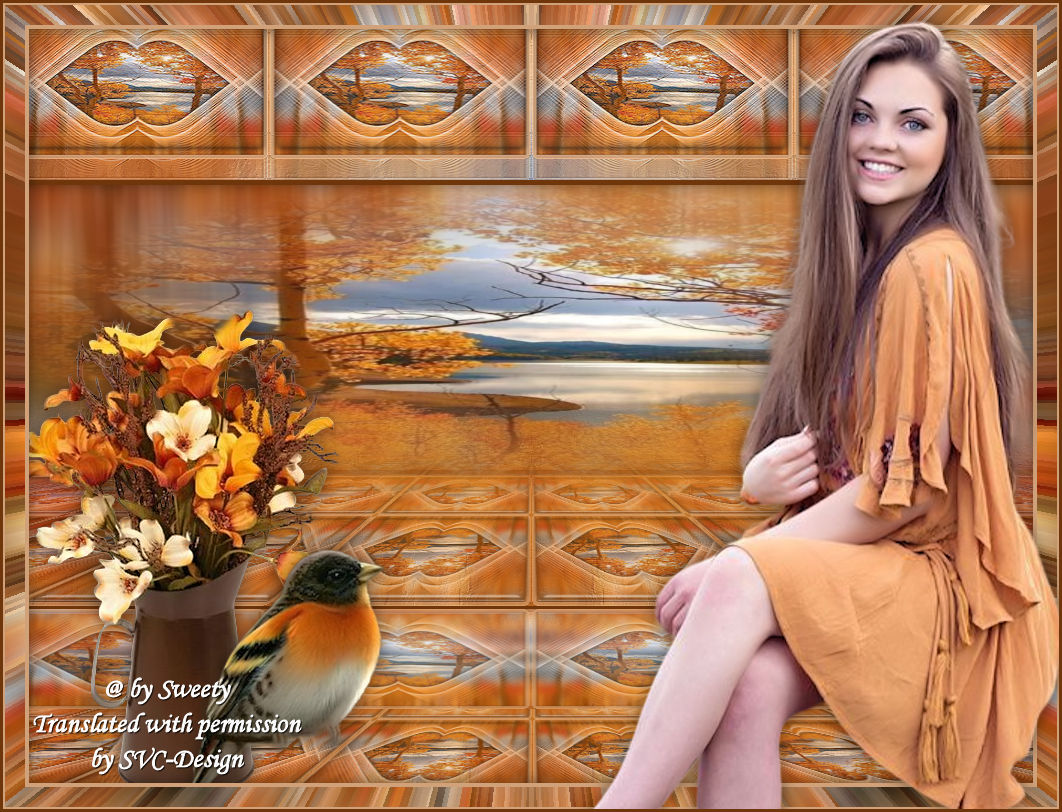
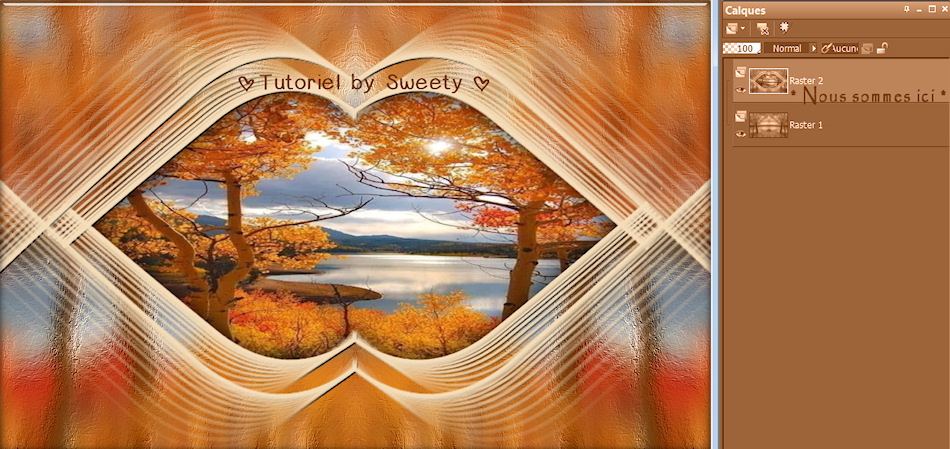
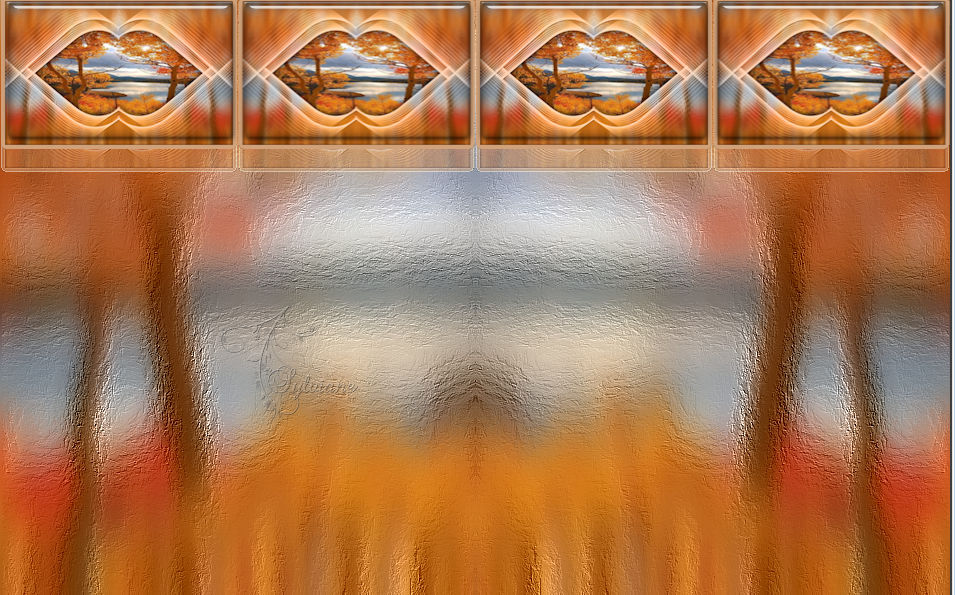
The result is:
Layers - Duplicate
Image - Mirror - Vertical Mirror
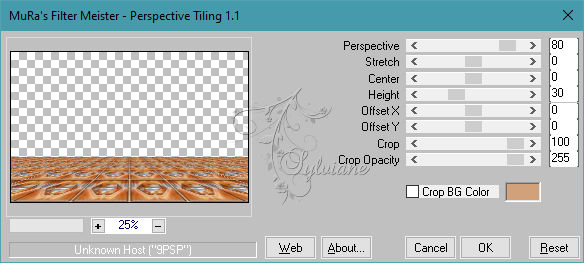
Effects – plugin - MuRa's Filter Meister - Perspective Tiling
Selections - Load / Save - Load selection from disk - SELECTION 3 199 .PspSelection
Erase OR delete with keyboard +/10 times - - - deselect all ...
Selection - Select None
Edit – Copy
Edit – paste as new image
Rename it * SOL * we need this later
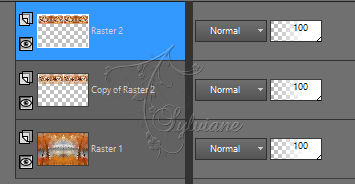
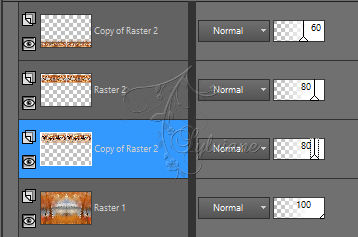
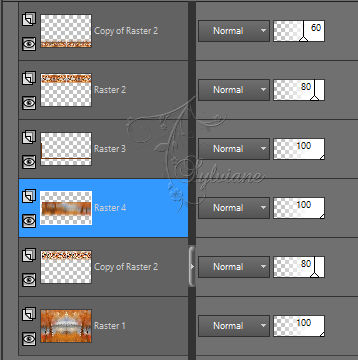
We are still Copy of Raster 2
Opacity of this layer between 50% and 65%, as for my 2nd version.
Activate Raster 2, set the opacity to 80%.
activate 2nd layer at the bottom
set the opacity to 80%.
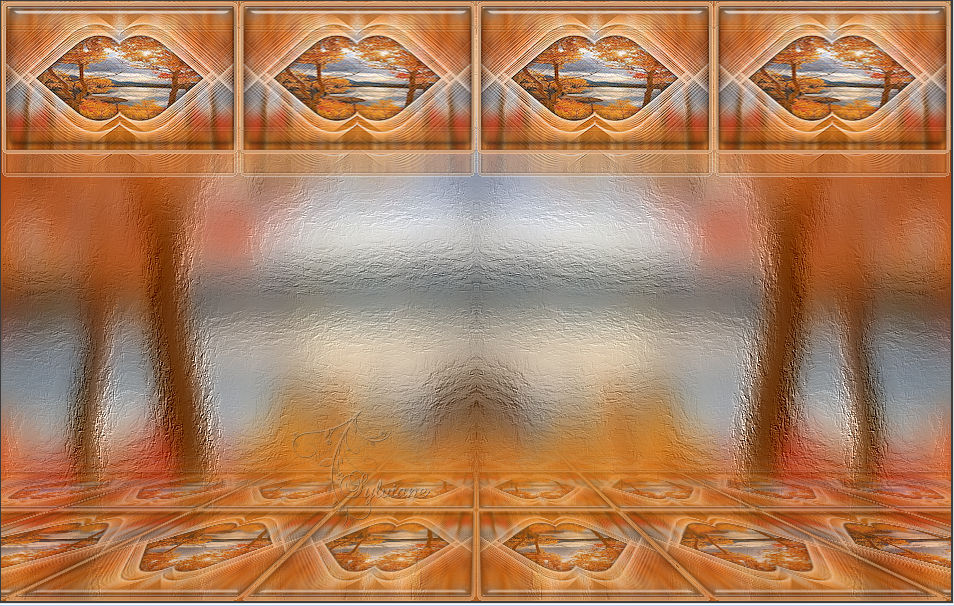
Our result:
=============================================================
9.
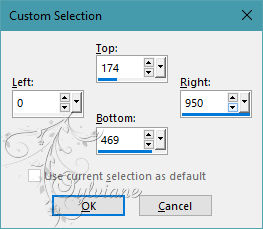
Activate Selection - Custom selection
Layers - New Raster Layer
Fill selection with color AVP
Selection - modify - contract – 5px
Delete OR delete with keyboard
Layers - New Raster Layer
Layers – arrange – move down
Open 41c0ed15024270b44a00d56a946130bf.jpg
Edit - Copy.
Edit - Paste into selection
Adjust - blur – Motion Blur
(do this a second time)
Selections - Invert
Effects - 3D effects - Drop shadow
0/0/50/25 – color:#000000
Selection - Select None
=============================================================
10.
You should have this:
Activate Raster 3
Layers – merge – merge down
Open the mask on the desktop: * !!!!mask.kest01 * -
Layers - New Mask Layer - From Image - !!!!.mask.ket01.jpg

Layers - Duplicate
Layers - Merge - Merge Group
=============================================================
11.
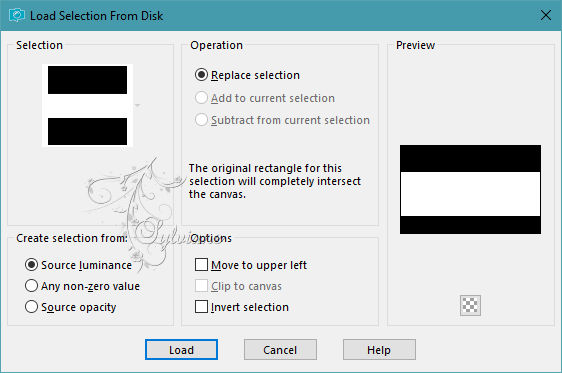
Selections - Load / Save - Load selection from disk - SELECTION 4 199 .PspSelection
Layers - New Raster Layer
put it aside for later
open 41c0ed15024270b44a00d56a946130bf.jpg
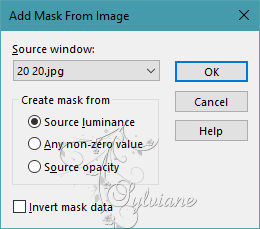
Open the mask on the desktop * masque 20/20 * -
Layers - New Mask Layer - From Image - 20 20.jpg
Layers - Merge - Merge Group
Edit - copy
back to your tag
Edit - Paste into selection
Selection - Select None
=============================================================
12.
Image - Add Borders – symmetric - 3-color - AVP border
Layers – promote background layer
Image - canvas size
Activate Magic wand tolerance and tolenrance at 0
click on transparent part
Layers - New Raster Layer
Activate your background from step 4
Edit - Copy.
Edit - Paste into selection.
Layers - New Raster Layer
Layers - New Raster Layer
Actiavte small Frames from step 7
Edit - Copy.
you can get rid of the small frames you don't need these anymore
Edit - Paste into selection
Layer opacity between 50% and 65%
Selection - Select None
Layers – merge – merge down (2x)
=============================================================
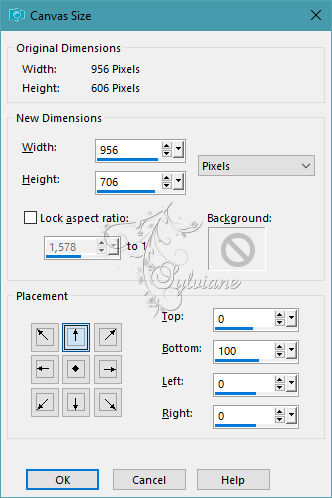
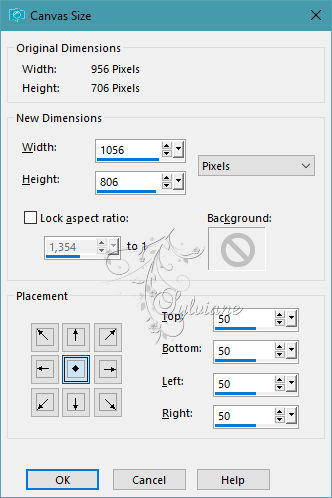
13.
Image - canvas size
Effects - Image Effects – Offset
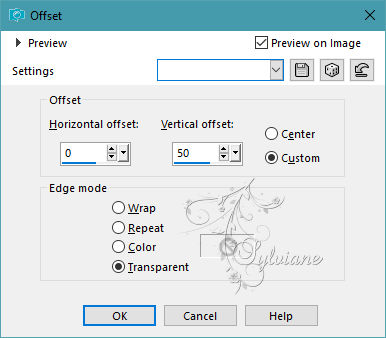
Stretch left and right to edge :

after:

Layers - New Raster Layer
Layers – arrange – send to bottom
Selection - Select All
Activate your background from step 4
Edit - Copy.
Edit - Paste into selection.
Selection - Select None
=============================================================
14.
Open Sol.pspimage (from point 8)
Edit – Copy
Edit - Paste as new layer
You can't see it, that's normal...
Effects - Image Effects – Offset

Stretch left and right to edge:
Before:

after

Reduce opacity to 65%.
=============================================================
15.
activate the top layer
open JUILLET 2023 ODILE 06 07 23 SWEETY.png
Edit – Copy
Edit - Paste as new layer
Image - Mirror – mirror Horizontal
Not resized
place like this in the example
Open JUILLET 2023 VASE FLEURS AUTOMNE 16 07 23 SWEETY.png
Edit – Copy
Edit - Paste as new layer
Not resized
place like this in the example
Open JUILLET 2023 ROUGE GORGE 16 07 23 SWEETY.png
Edit – Copy
Edit - Paste as new layer
Resized at 90% bottom box unchecked
place like this in the example
Shadow cast on each element as desired
=============================================================
16.
Close the eye of the lady's layer.
activate the layer below
Layers - Merge - Merge visible layers
Edit - Copy (Image is saved to memory)
Layers - New Raster Layer
Fill with AVP or ARP color as for 2nd version-...
Selection - Select All
Selection - modify - contract -2px
CLEAR or DELETE with keyboard
Keep selection active
Edit - Paste into selection (it's in memory)
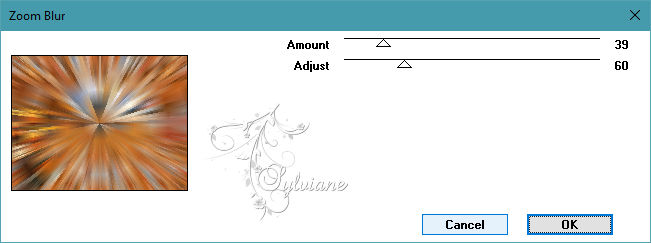
Effects – plugin - VM Toolbox - Zoom Blur
Effects – reflection effects – rotating mirror
Selection - modify - contract -20px
CLEAR or DELETE on keyboard
Keep selection active
fill it with color: 1
Selection - modify - contract – 4px.
CLEAR or DELETE with keyboard
Selections - Invert
Effects - 3D effects - Drop shadow
0 / 0 / 50 / 25 / Black
Selection - Select None
Now open the eye of the lady's layer.
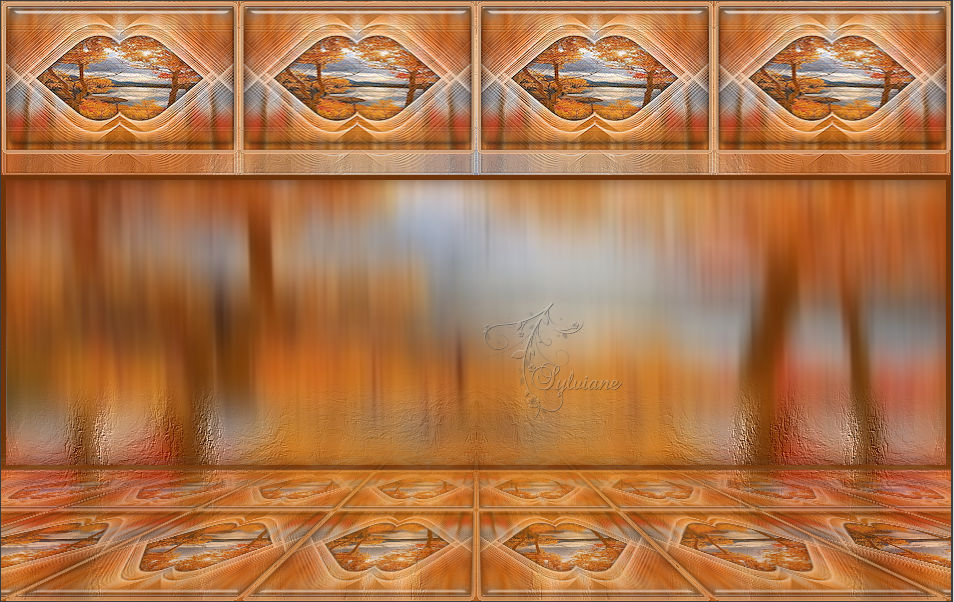
You should have this:

=============================================================
17.
Image - Add Borders – symmetric – 3px -color AVP
Add your signature and mine if you wish
Layer – merge – merge all (flatten)
resize to 950 pixels
Save as JPEG
Back
Copyright Translation 2023 by SvC-Design