

This lesson is made with PSPX9
But is good with other versions.
© by SvC-Design

Materialen Download :
Here
******************************************************************
Materials:
DECO GLITTERATO ETAPE 2 198 MAI 2023 SWEETY.png
DECO PERSO 1 198 MAI 2023 SWEETY.png
DECO PERSO 2 198 MAI 2023 SWEETY.png
PALETTE COULEURS VERSION 1.png
SIGNATURE TUTORIELS .pspimage
SELECTION 1 198 .PspSelection
SELECTION 2 198 .PspSelection
SELECTION 3 198 .PspSelection
b3150d428911a1c1c9d696975b169ec9.jpg
JUIN 2023 BASKET TABLE 03 06 23 SWEETY.png
JUIN 2023 VASE FLEURS 03 06 23 SWEETY.png
MAI 2023 LEXA 09 05 23 SWEETY.png
******************************************************************
Plugin:
Effects – plugin - Unlimited 2.0 - Buttons & Frames - Round Button
Effects – plugin - Toadies - What Are You
Effectes – plugin - MuRas’s Meister - Perspective Tiling
******************************************************************
color palette
:
******************************************************************
methode
When using other tubes and colors, the mixing mode and / or layer coverage may differ
******************************************************************
General Preparations:
First install your filters for your PSP!
Masks: Save to your mask folder in PSP, unless noted otherwise
Texture & Pattern: Save to your Texture Folder in PSP
Selections: Save to your folder Selections in PSP
Open your tubes in PSP
******************************************************************
We will start - Have fun!
Remember to save your work on a regular basis
******************************************************************
Tutoriel 198 engels
foreground color is :AVP
background color is :ARP
1.
Open a transparent 950/600 layer
Selection - Select All
Open b3150d428911a1c1c9d696975b169ec9.jpg
Edit - Copy.
Edit - Paste into selection.
Selection - Select None
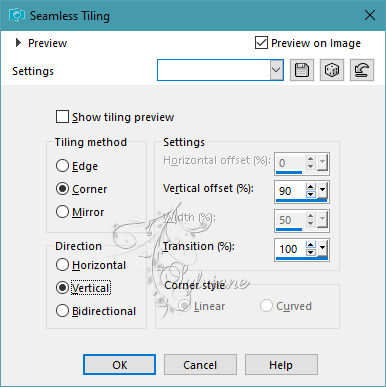
Effects - Image Effects - Seamless Tiling- default
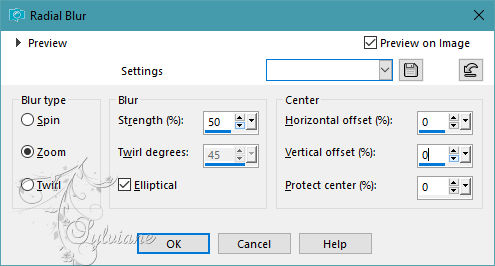
Adjust - blur - radial blur
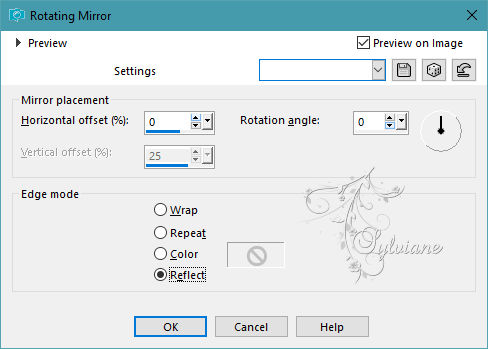
Effects – reflection effects – rotating mirror
=============================================================
2.
Open DECO GLITTERATO ETAPE 2 198 MAI 2023 SWEETY.png
Edit - Copy.
Edit - Paste as new layer
blendmode * Screen * or others to choose from.
Effects – reflection effects – rotating mirror
Activate Raster 1
Edit - Copy.
Layers - Merge - Merge visible layers
Edit - Paste as new layer
Effects - geometric effects – Circle
Resize to 80%
=============================================================
3.
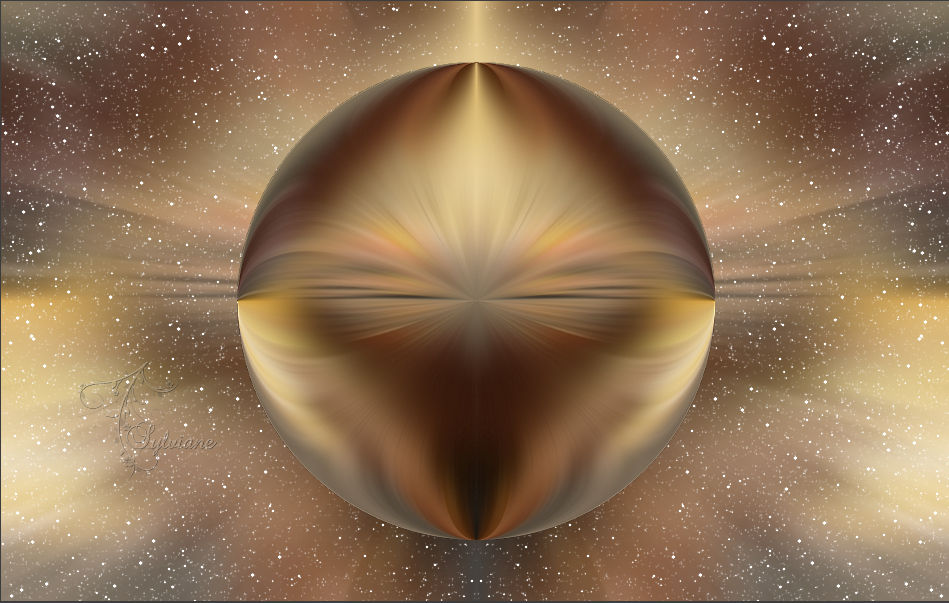
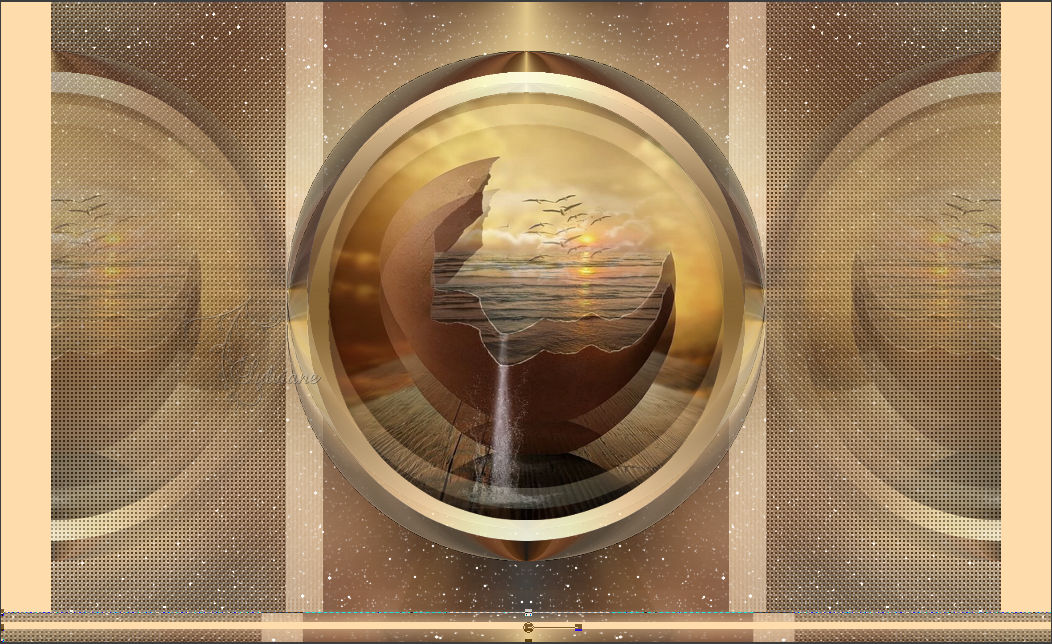
We get this:

Selection - Select All
Selections – float
Selection - modify - contract - 20 px
Layers - New Raster Layer
Fill the selection with the color ARP (Light)
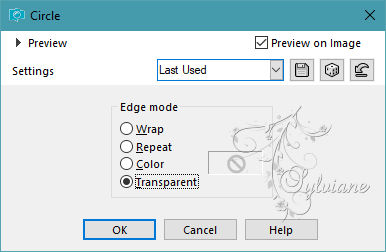
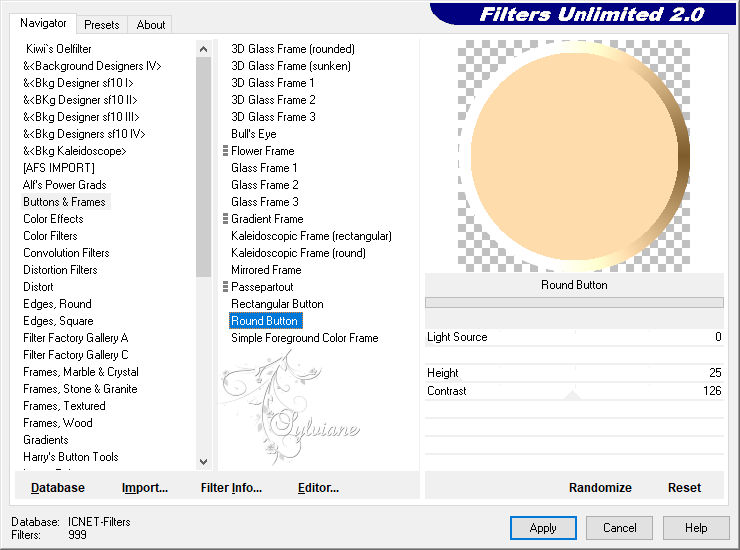
Effects – plugin - Unlimited 2.0 - Buttons & Frames - Round Button
Effects – reflection effects – rotating mirror
Selection - modify - contract - 21px
DELETE on the keyboard
Layers - New Raster Layer
Open b3150d428911a1c1c9d696975b169ec9.jpg
Edit - Copy.
Edit - Paste into selection
Selections - Invert
Effects - 3D effects - Drop shadow
0 / 0 / 50 / 20 - #000000
=============================================================
4.
Result:
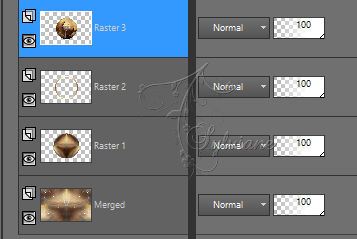
we are now Raster 3
Layers – merge – merge down (2x)
Selection - Select None
Activate Merged
Activate Selection - Custom selection
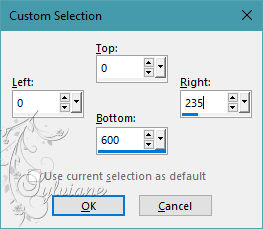
Selections – Promote selections to layer
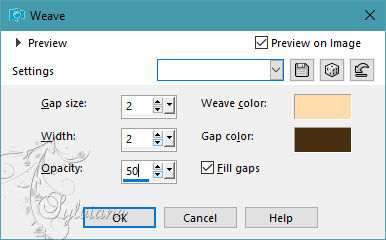
Effects - texture effects - weave
Selection - Select None
Layers - Duplicate
Image - Mirror – mirror Horizontal
Layers – merge – merge down
Effects - 3D effects - Drop shadow
0 / 0 / 50 / 20 - #000000
=============================================================
5.
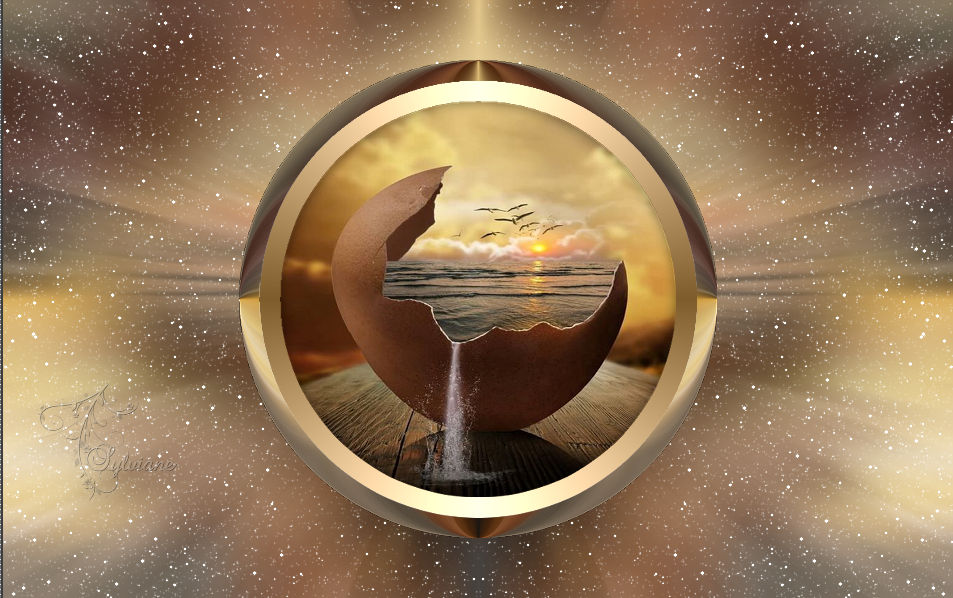
We are here:
Layers - Duplicate
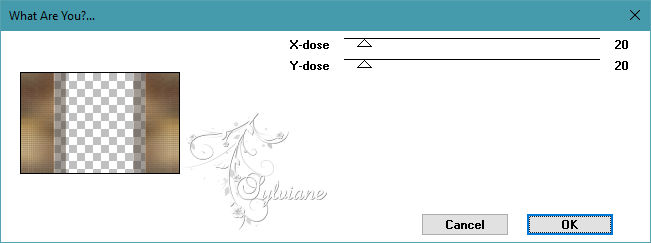
Effects – plugin - Toadies - What Are You
Layers – arrange – move down
Blendmode: Screen
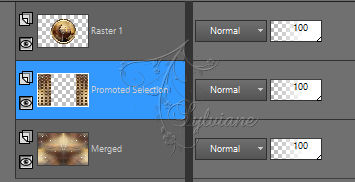
Activate Promoted Selection
opacity to 90%
=============================================================
6.
Go to the layer at the very top of the stack (Raster 1)
Layers - Duplicate
Effects - Image Effects - Seamless Tiling
Layers – arrange – move down
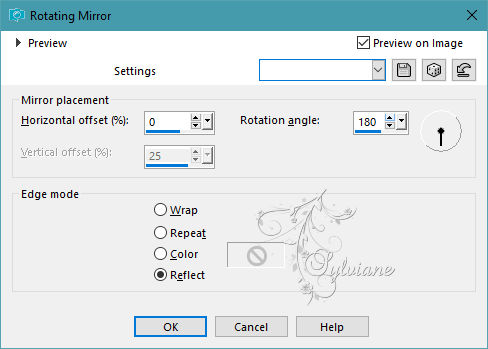
Effects – reflection effects – rotating mirror - configured as follows:
Layer opacity between 40 and 60%
=============================================================
7.
Edit – copy special- copy merged
Edit – paste as new image
(We'll need it later)
Image - Add Borders – ARP (Light) color
Effects - Image Effects - Seamless Tiling
=============================================================
8.
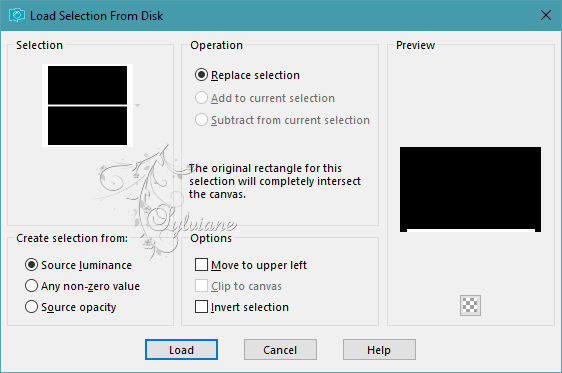
Selections - Load / Save - Load selection from disk - SELECTION 1 198 .PspSelection
Selections – Promote selections to layer
Selection - Select None
Selector tool enabled (K on the keyboard)
Stretch left and right to the edge:
Disable the selector tool (M on the keyboard)
Layers - Duplicate
Image - Mirror - Vertical Mirror
Layers – merge – merge down
Effects - 3D effects - Drop shadow
0 / 0 / 50 / 20 - #000000
=============================================================
9.
Layers - New Raster Layer
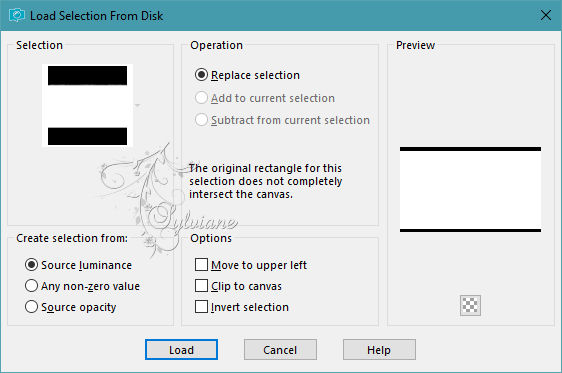
Selections - Load / Save - Load selection from disk - SELECTION 2 198 .PspSelection
Paste the pending image in step 7
Edit - Copy.
Edit - Paste into selection
( Keep this image we will still need in step 11 )
Layers – arrange – move down
Selection - Select None
=============================================================
10.
Selection - Select All
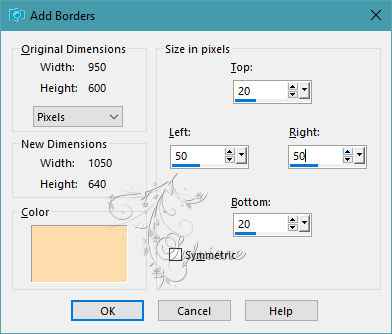
Image - Add Borders – symmetric – 40 px -color AVP or ARP
Selections - Invert
Selections – Promote selections to layer
Effects - texture effects – weave - Idem Step 4 (Still in memory)
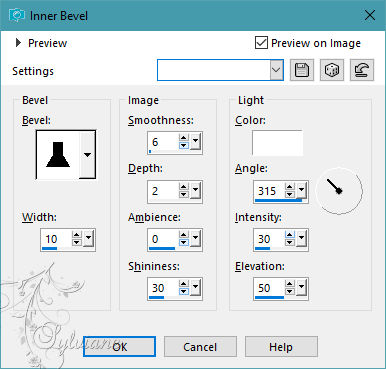
Effects – 3D effects – inner bevel
Selection - Select None
=============================================================
11.
Layers - New Raster Layer
Selection - Select All
Paste the pending image in step 7
Edit - Copy.
Edit - Paste into selection
Selection - Select None
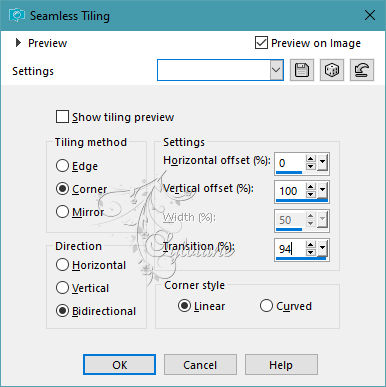
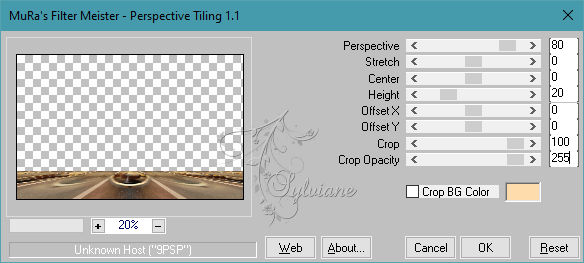
Effectes – plugin - MuRas’s Meister - Perspective Tiling
Selections - Load / Save - Load selection from disk - SELECTION 3 198 .PspSelection

DELETE on keyboard +/- 10 times
Selection - Select None
=============================================================
12.
Open DECO PERSO 1 198 MAI 2023 SWEETY.png
Edit – Copy
Edit - Paste as new layer
Do not move it, it is in its place
Blendmode : Luminance ( legacy)
Activate DECO PERSO 2 198 MAI 2023 SWEETY.png
Edit – Copy
Edit - Paste as new layer
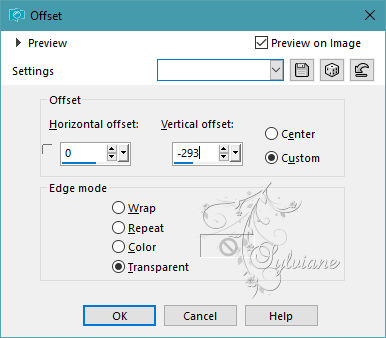
Effects - Image Effects - Offset
Blendmode : Luminance ( legacy)
=============================================================
13.
Open MAI 2023 LEXA 09 05 23 SWEETY.png
Edit – Copy
Edit - Paste as new layer
Resized to 70%.
Image - Mirror – mirror Horizontal
OPTIONAL: Arrange==>move down
Open JUIN 2023 BASKET TABLE 03 06 23 SWEETY.png
Edit – Copy
Edit - Paste as new layer
Resized to 85%.
Arrange==>move down
NOTE: I erased the shape in front of the table
Open JUIN 2023 VASE FLEURS 03 06 23 SWEETY.png
Edit – Copy
Edit - Paste as new layer
Resized to 60%
Drop shadow on each element of your choice
14.
Image - Add Borders – symmetric – 2px – color: ARP
Image - Add Borders – symmetric - 2 px – color:AVP
Add your signature and mine if you wish
Layer – merge – merge all (flatten)
resize to 950 pixels
Save as JPEG
=============================================================
Back
Copyright Translation 2023 by SvC-Design