
This lesson is made with PSPX9
But is good with other versions.
© by SvC-Design

Materialen Download :
Here
******************************************************************
Materials:
FOND 207.png
COULEURS VERSION 1.png
AVRIL 2024 WORDART MOM 24 04 24 SEETY.png
DECO CADRE 207 FEVRIER 2024 SWEETY.png
DECO COEUR ETAPE 12 FEVRIER 2024 SWEETY.png
DECO OMBRE PORTEE ETAPE3 207 FEVRIER 2024 SWEETY.png
DECO PERSO 2 207 FEVRIER 2024 SWEETY.png
DECO PERSO 3 207 FEVRIER 2024 SWEETY.png
DECO PERSO 4 207 FEVRIER 2024 SWEETY.png
SIGNATURE TUTORIELS .pspimage
SELECTION 1 207 SWEETY.PspSelection
SELECTION 2 207 SWEETY.PspSelection
SELECTION 3 207 SWEETY.PspSelection
SELECTION 4 207 SWEETY.PspSelection
SELECTION 5 207 SWEETY.PspSelection
SELECTION 6 207 SWEETY.PspSelection
SELECTION 7 207 SWEETY.PspSelection
AVRIL 2022 PRESENT FLEURI 19 04 22 SWEETY.png
AVRIL 2024 UNE MAMAN 24 04 24 SEETY.png
******************************************************************
Plugin:
effects – plugin - Filters unlimited 2.0 - &<BkgDesignersf10II - Hinzeberg’s Mirror 02
Efffects – plugin - Flaming Pear - Flexify 2
Effects – plugin - MuRa’s Meister - Perspective Tiling
Effects – plugin - G'MIC-QT – Frames – Droste
******************************************************************
color palette
:
******************************************************************
methode
When using other tubes and colors, the mixing mode and / or layer coverage may differ
******************************************************************
General Preparations:
First install your filters for your PSP!
Masks: Save to your mask folder in PSP, unless noted otherwise
Texture & Pattern: Save to your Texture Folder in PSP
Selections: Save to your folder Selections in PSP
Open your tubes in PSP
******************************************************************
We will start - Have fun!
Remember to save your work on a regular basis
******************************************************************
1.
Open layer background 207
Window - duplicate
Minimize the original - we are working on the copy
Color in your tones or stay like me if you wish...
Edit – Copy
edit - paste as a new image (it will be useful later)...
effects – plugin - Filters unlimited 2.0 - &<BkgDesignersf10II - Hinzeberg’s Mirror 02:
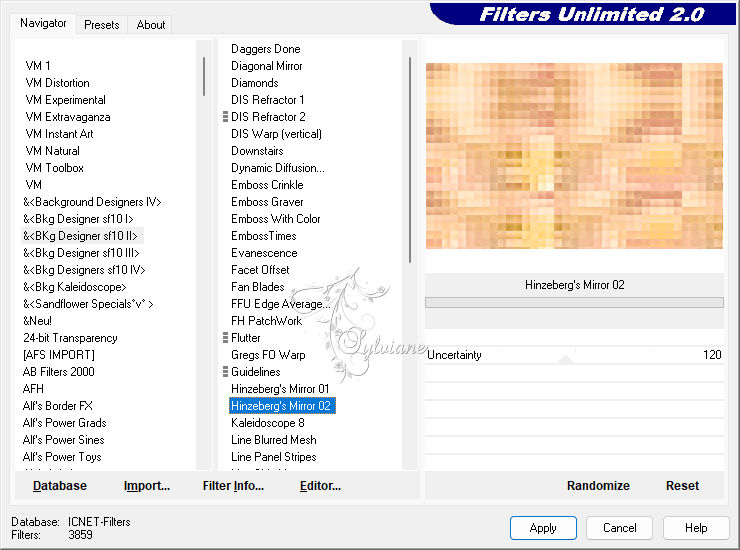
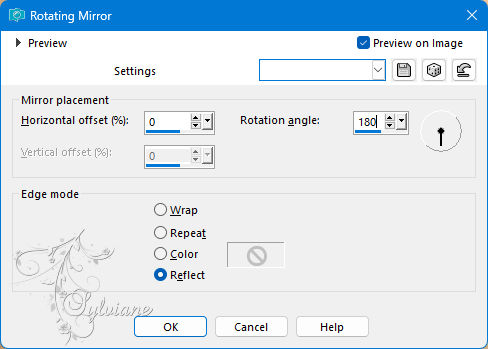
Effects – reflection effects – rotating mirror
Layers – Duplicate
==================================================
2.
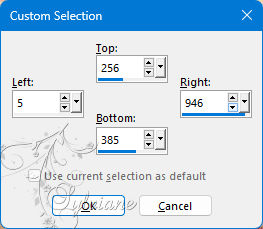
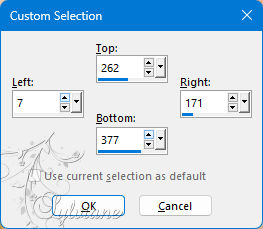
Activate Selection - Custom selection
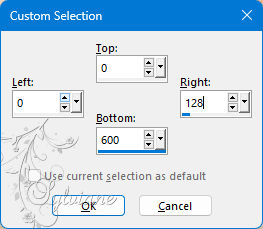
Selections – Promote selections to layer
Selection - Select None
Layers – Duplicate
Effects - 3 D effects - Drop shadow
0/0/60/30 – color:#000000
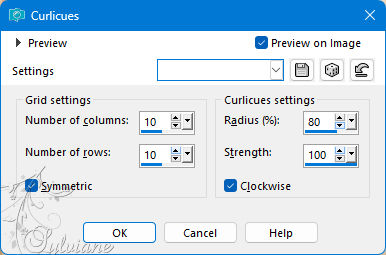
Effects – distortion effects - curlicues
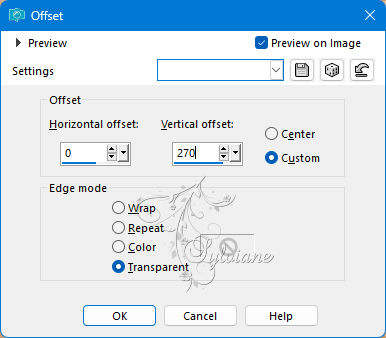
Effects - Image Effects - Offset
Layers – arrange – move down
==================================================
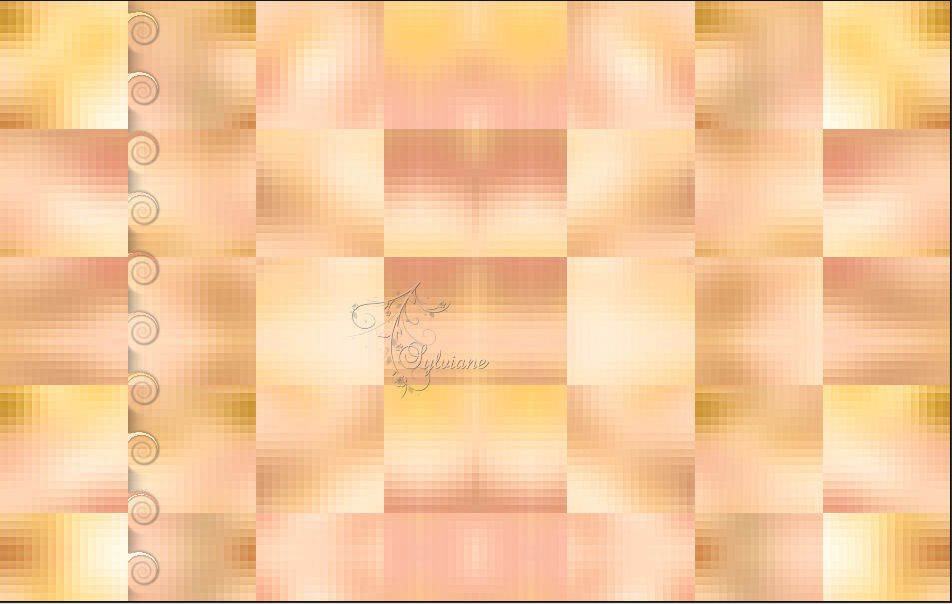
3.
We have this now:

Activate Promoted Selection
Effects - 3 D effects - Drop shadow
0/0/30/15/ Black
Layers – merge – merge down
Effects - 3 D effects - Drop shadow
0/0/30/15 - Black
Effects – reflection effects – rotating mirror
Open DECO OMBRE PORTEE ETAPE3 207 FEVRIER 2024 SWEETY.png
Edit – Copy
Edit - Paste as new layer
DON'T MOVE IT, IT'S IN ITS PLACE.
Layers – arrange – move down
==================================================
4.
Open DECO PERSO 2 207 FEVRIER 2024 SWEETY.png
Edit – Copy
Edit - Paste as new layer
DON'T MOVE IT, IT'S IN ITS PLACE.
Choice of layer mode or color according to your taste
I did color change tool to color the lines
Effects - 3 D effects - Drop shadow
1/1/30/1/ Black
Layers - New Raster Layer
Selection - Select All
Open DECO PERSO 3 207 FEVRIER 2024 SWEETY.png
Edit – Copy
Edit - Paste into selection
Layers – arrange – bring to top
Choice of layer mode or color according to your taste
I did color change tool to color the lines
Selection - Select None
Effects - 3 D effects - Drop shadow
1/1/30/1/ Black
==================================================
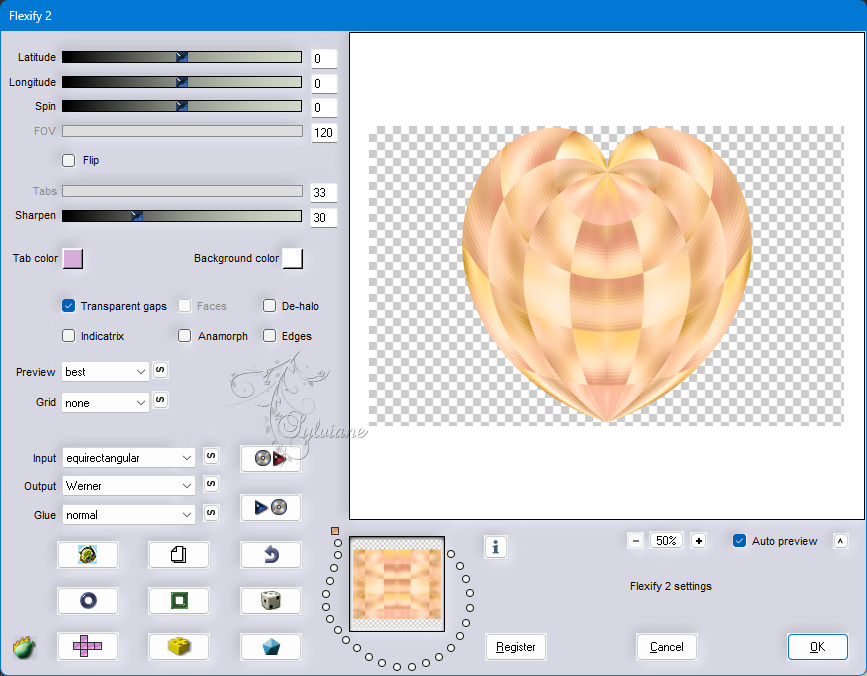
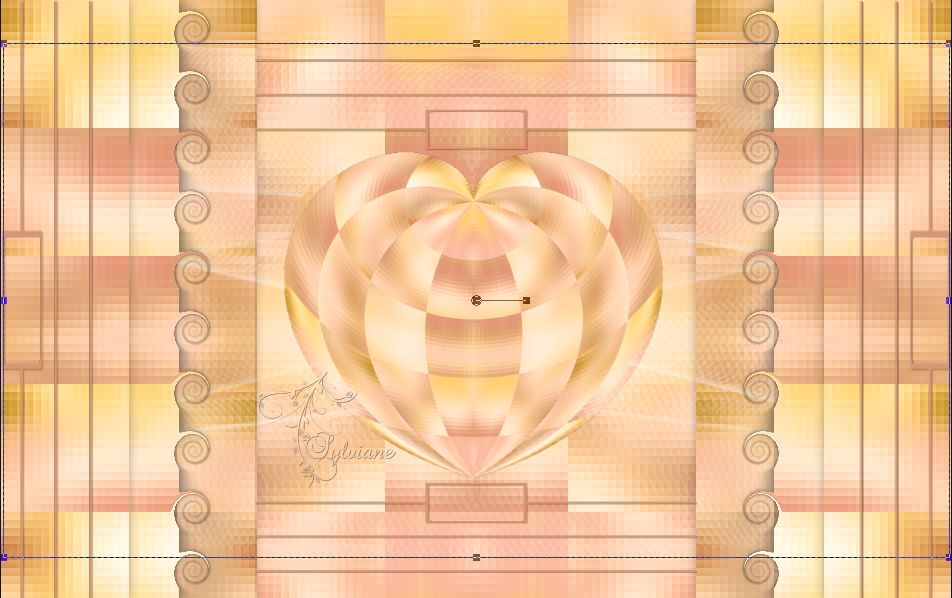
5.
this we have:
Activate Copy of Promoted Selection
Set the mode of this layer to * Luminance (H)* or others of your choice
Activate Copy of Background
Efffects – plugin - Flaming Pear - Flexify 2
Edit – Copy
Edit – cut
Activate Selection - Custom selection
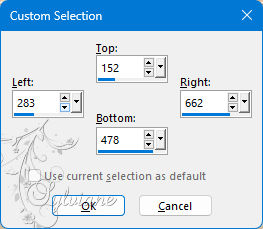
Edit - Paste into selection
Selection - Select None
Edit – Copy
edit - paste as a new image - rename *Heart*
and leave on hold or save as PNG
(We may need it later)
==================================================
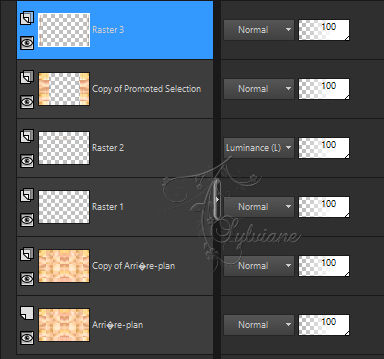
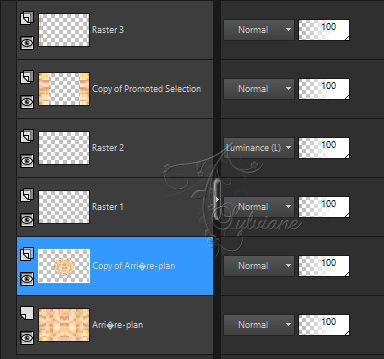
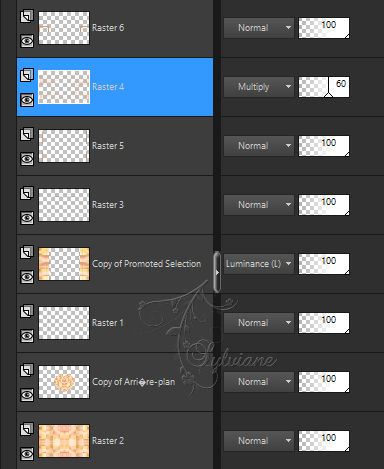
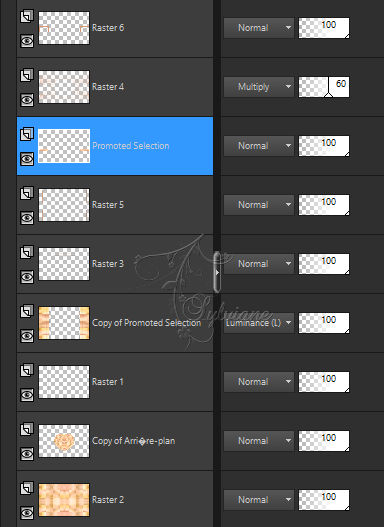
6.
Our layers and our tag:
Open DECO PERSO 4 207 FEVRIER 2024 SWEETY.png
Edit – Copy
Edit - Paste as new layer
(You can't see it entirely, no stress...)
Before
After
Layers – arrange – bring to top
Blendmode : Luminance (legacy) or other of your choice
Selections - Load / Save - Load selection from disk - SELECTION 1 207 SWEETY.PspSelection
ERASE or DELETE on the keyboard.
Selection - Select None
blendmode: Multiply and lowered its opacity to 60%
==================================================
7.
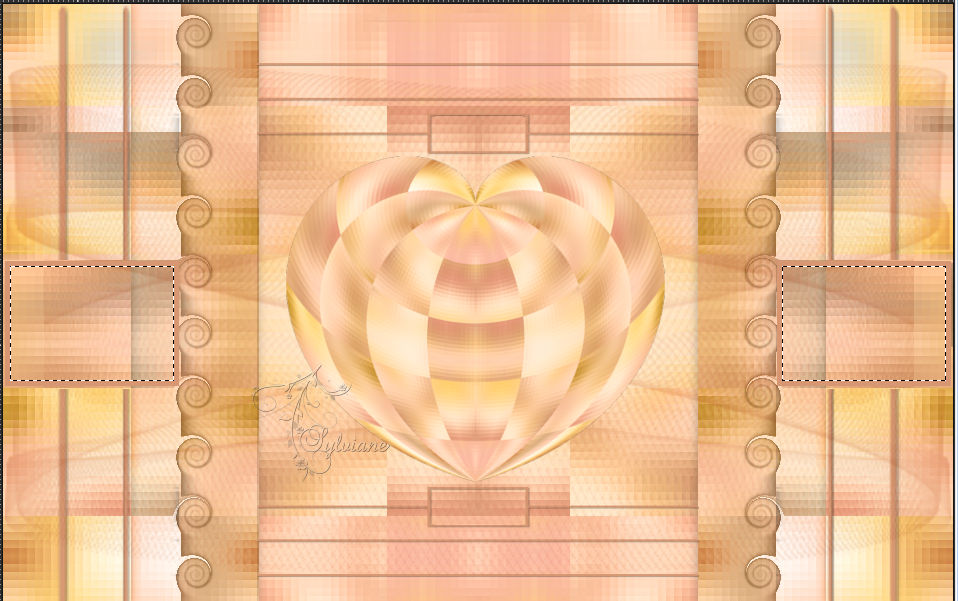
Activate Raster 2
Layers - arrange – up (2x)
(Between Raster 4 and Raster 3)
Layers – merge – merge down
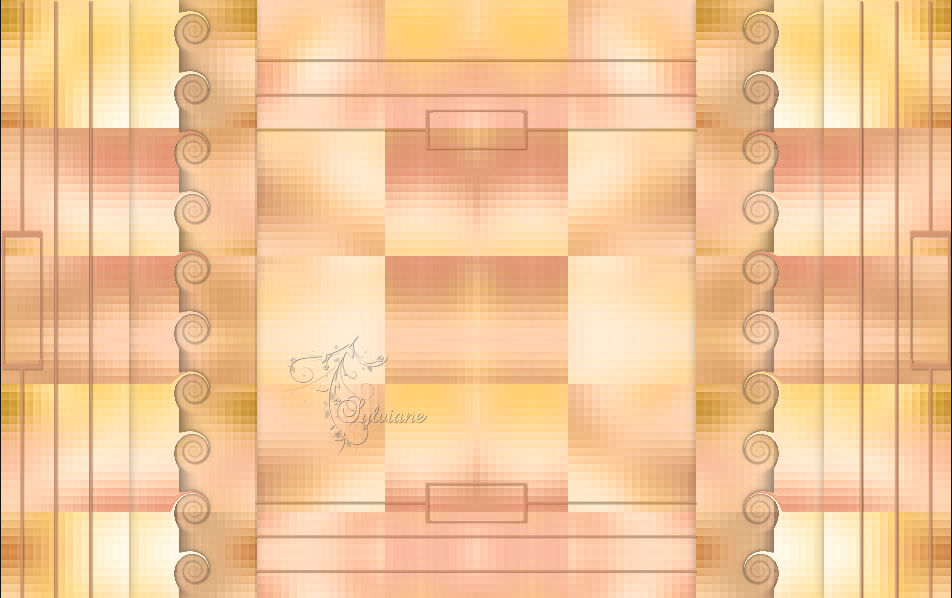
We have this now:

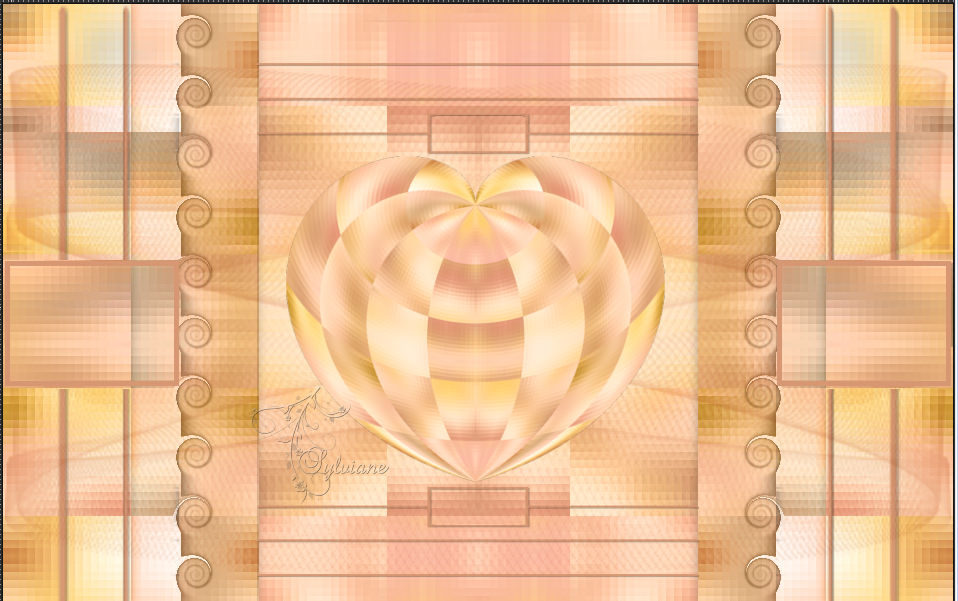
Position yourself on the bottom layer (Background)
Layer – promote background layer
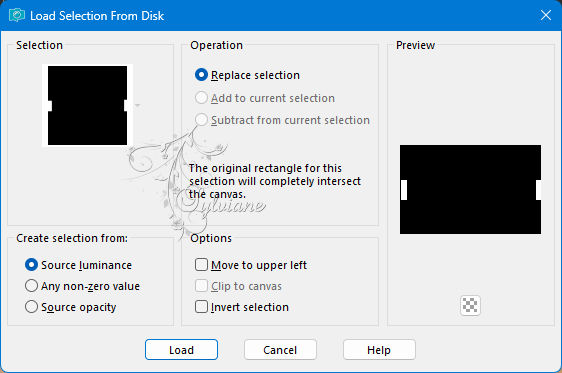
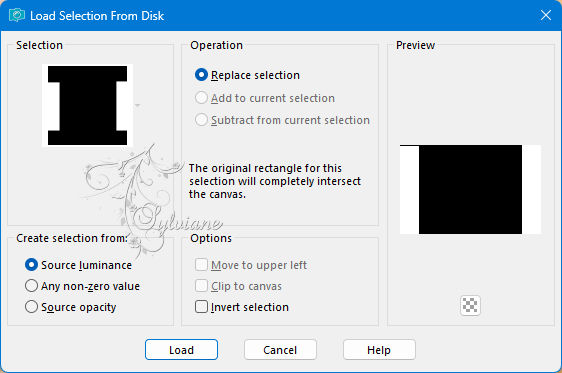
Selections - Load / Save - Load selection from disk - SELECTION 2 207 SWEETY.PspSelection
ERASE or DELETE on keyboard
Selection - Select None
Layers - Duplicate
Image - Mirror - Vertical Mirror
If necessary adjust as on my screenshot:
Before:
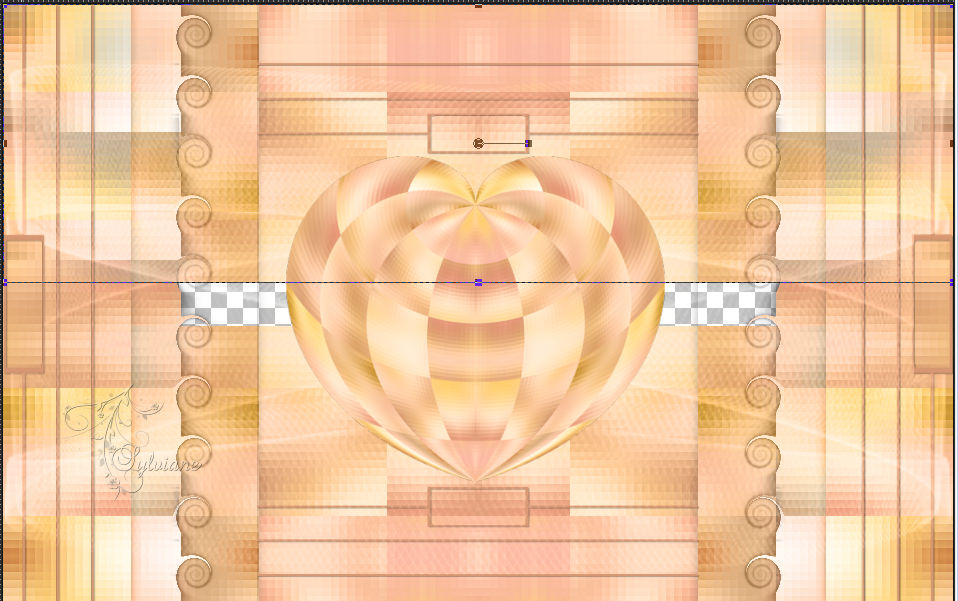
After:
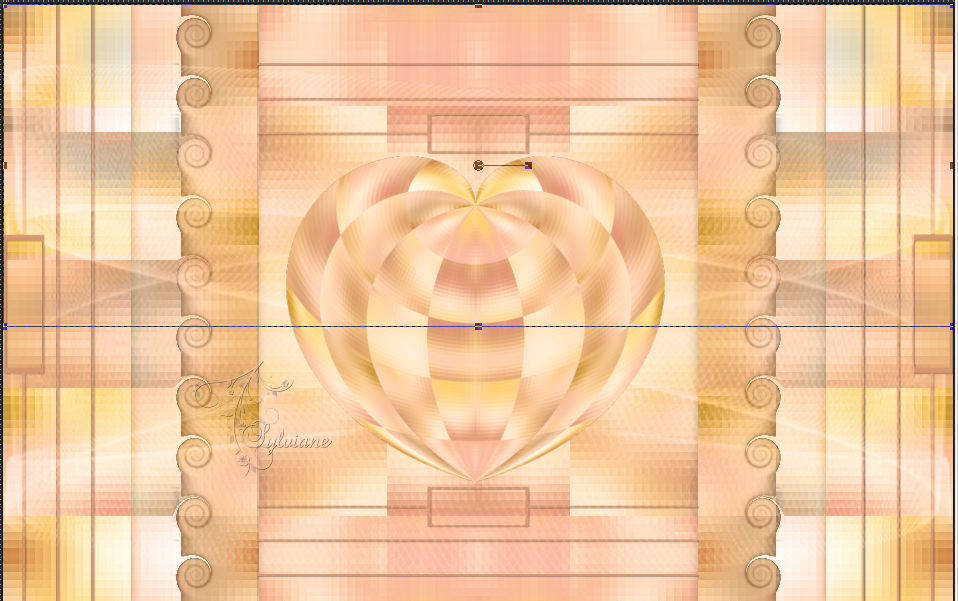
Layers – merge – merge down
==================================================
8.
Activate Raster 3
Selections - Load / Save - Load selection from disk - SELECTION 3 207 SWEETY.PspSelection
Edit – cut(The image is put into memory)
Selection - Select None
Edit - Paste as new layer
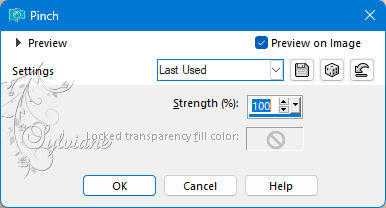
Effects - Distortion effects – pinch
Selections - Load / Save - Load selection from disk - SELECTION 4 207 SWEETY.PspSelection
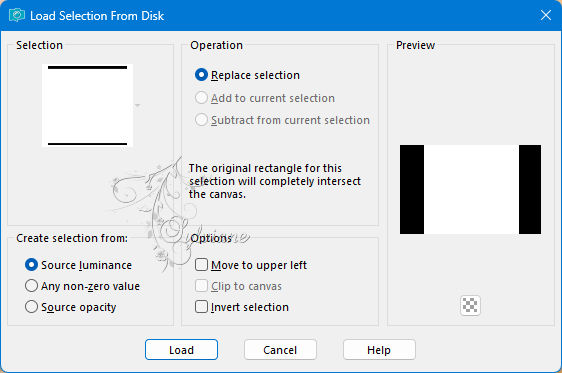
ERASE or DELETE on keyboard
Selection - Select None
Activate Selection - Custom selection
ERASE or DELETE on the keyboard.
Selection - Select None
==================================================
9.
Layers - New Raster Layer
Selections - Load / Save - Load selection from disk - SELECTION 5 207 SWEETY.PspSelection

Fill the selection with the foreground color
Layers – arrange – bring to top
Selection - Select None
Tool====>magic wand====>tolerance AND progressivity to 0

Click in the small rectangles:
Activate Raster 4
ERASE or DELETE on the keyboard
Selection - Select None
==================================================
10.
We have this now:
Activate Selection - Custom selection
Go to the BOTTOM OF THE STACK layer (Raster 2)
Selections – Promote selections to layer
Layers - arrange – up ( 5 times)
(It must be between Raster 4 and Raster 5)
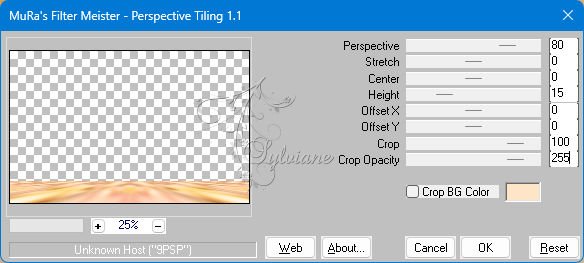
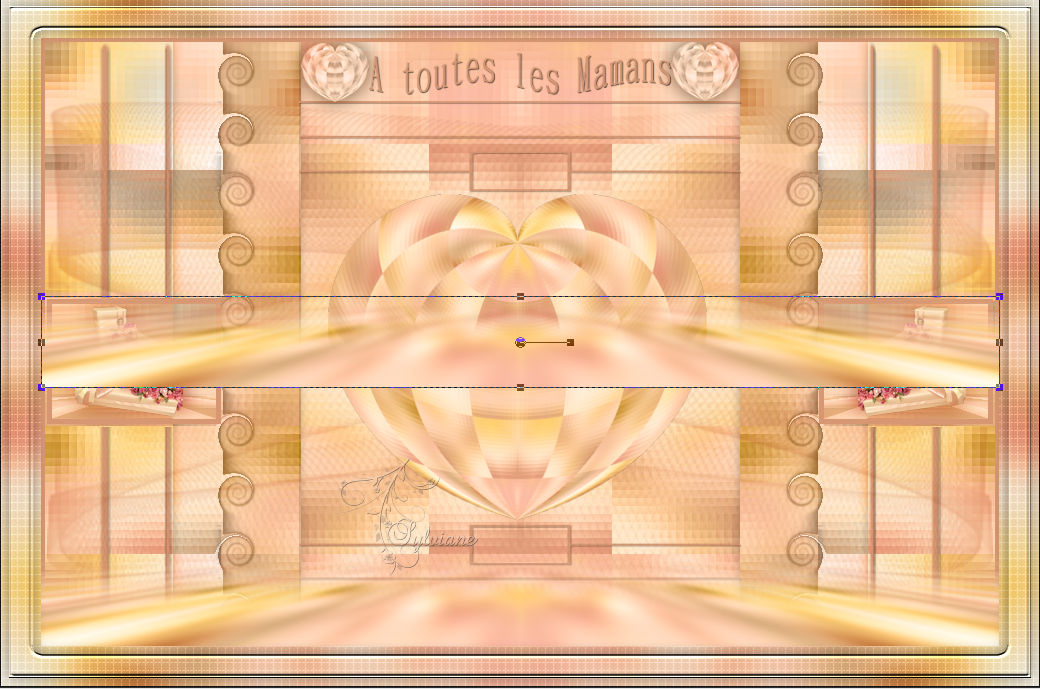
Effects – plugin - MuRa’s Meister - Perspective Tiling

Selection - Select None
Layers - Duplicate
Image - Mirror – mirror Horizontal
Layers – merge – merge down
==================================================
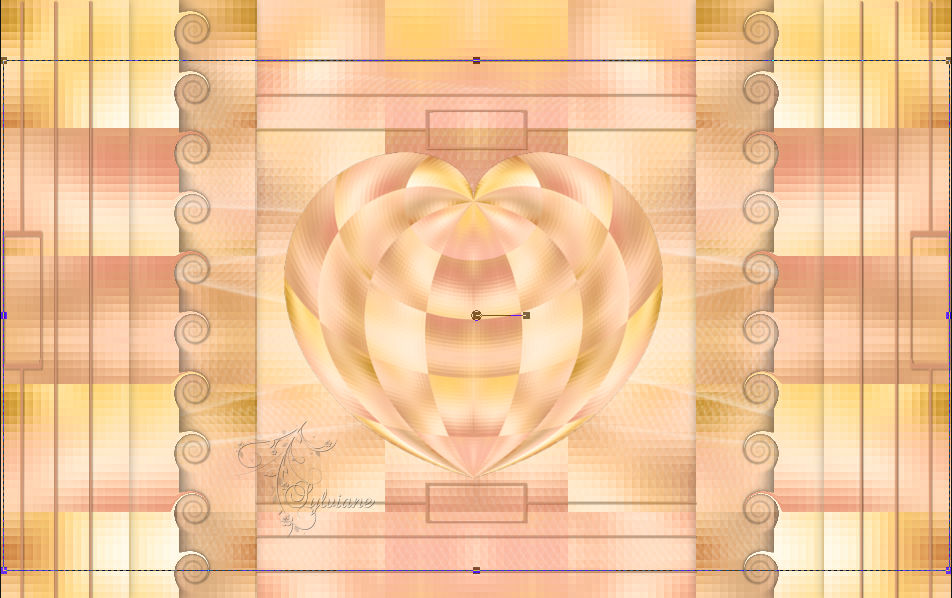
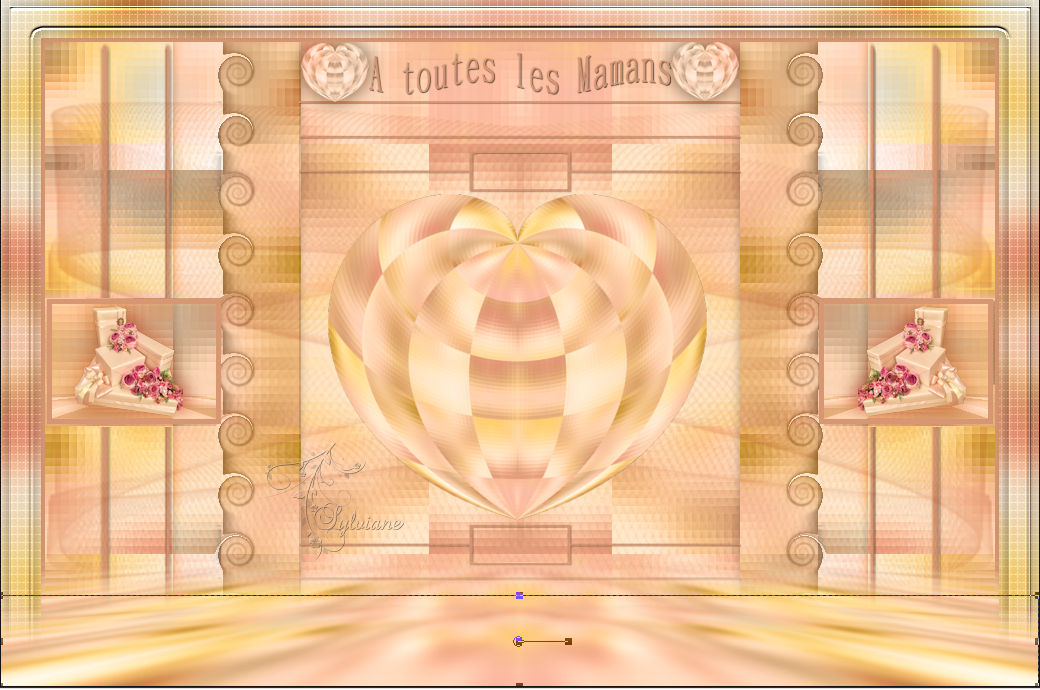
11.
We have this now:
Open AVRIL 2022 PRESENT FLEURI 19 04 22 SWEETY.png
Edit – Copy
Edit - Paste as new layer
Image - Resize - 25%.
No check mark on resize all layers
Place in the small rectangle on the left
Effects – reflection effects – rotating mirror
Layers - Duplicate
Adjust - blur - gaussian blur
Range: 10
Blendmode: Multiply
Layers – arrange – move down
==================================================
12.
Activate the top layer
Open DECO COEUR ETAPE 12 FEVRIER 2024 SWEETY.png
Edit – Copy
Edit - Paste as new layer
Effects - Image Effects - Offset
Effects - 3 D effects - Drop shadow
0 / 0 / 60 / 30 - color: Black
Blendmode: Luminance (H) or Other Choice
Selections - Load / Save - Load selection from disk - SELECTION 6 207 SWEETY.PspSelection

Layers - New Raster Layer
Fill in the selection with a color of your choice
Selection - Select None
Apply a drop shadow of your choice.
Image - Add Borders – Symmetric - 4 px - colors of your choice
Layers - New Raster Layer
Selection - Select All
Open FOND 207.png
Edit – Copy
Edit - Paste into selection( that you previously set aside in step 1)
Selection - Select None
==================================================
13.
On this layer
Effects – plugin - MuRa’s Meister - Perspective Tiling
Tool====>Magic Wand====>tolerance: 0 / Progressiveness: 50

DELETE or DELETE +/- five times
Selection - Select None
Edit – Copy
edit - paste as a new image and leave on hold
Selection - Select All
Image - Add Borders – Symmetric – 40px (Regardless of the color).
Selections – Invert
Open FOND 207.png
Edit – Copy
Edit - Paste into selection( that you previously set aside in step 1)
Layers - New Raster Layer
Open DECO CADRE 207 FEVRIER 2024 SWEETY.png
Edit – Copy
Edit - Paste into selection
Blendmode: Luminance (H) or other mode of your choice. opacity :55%
Layers – merge – merge down and KEEP SELECTION ACTIVE...
==================================================
14.
The ALWAYS ACTIVE selection...
Selection - modify - contract – 8px
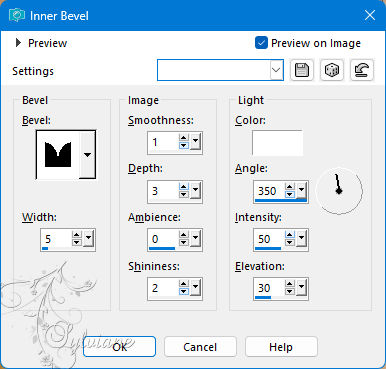
Effects – 3D effects – inner bevel (nr 7)
Selections – Promote selections to layer
Selection - Select None
Effects - 3 D effects - Drop shadow
0 / 0 /40 / 20 / Black or Dark Color
Open the floor (in step 13)
Edit – Copy
Edit - Paste as new layer
Before:
After:
==================================================
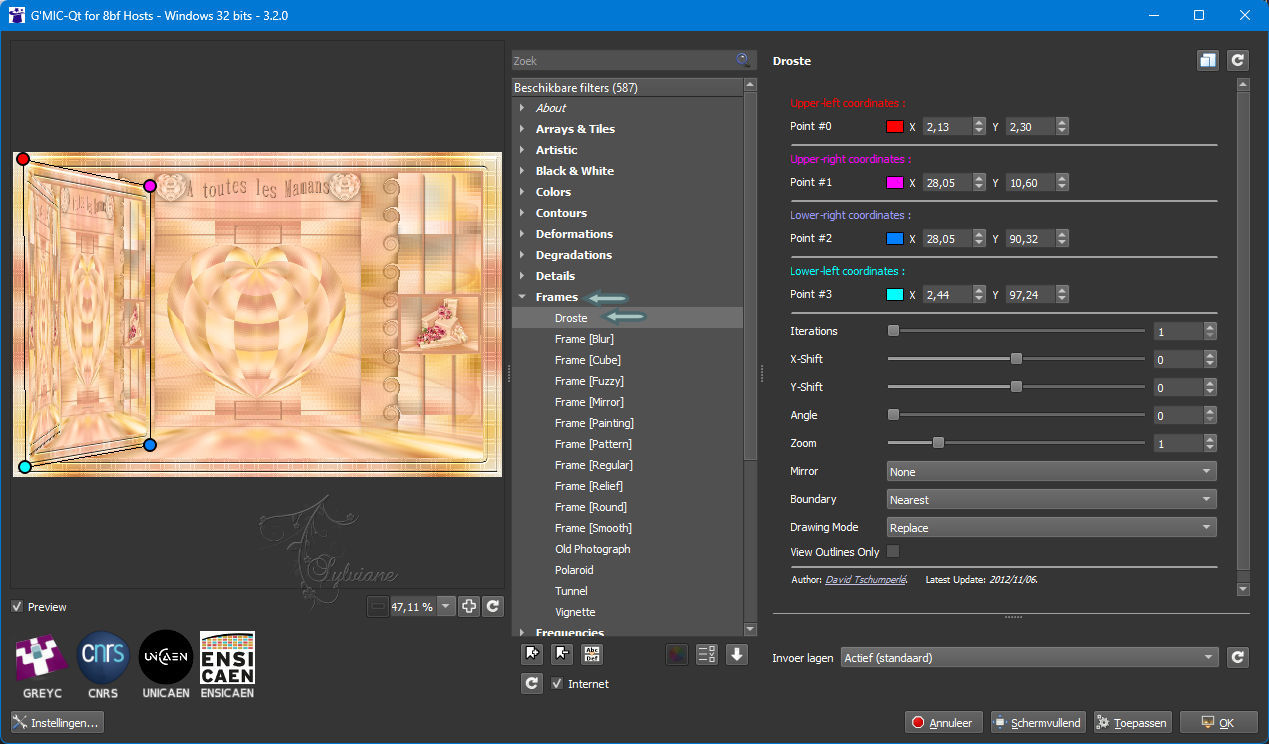
15.
On the layer at the very bottom of the stack (Background).
Layers - Duplicate
Effects – plugin - G'MIC-QT – Frames – Droste - configured as follows:
(Click *Apply* and then click * OK *:
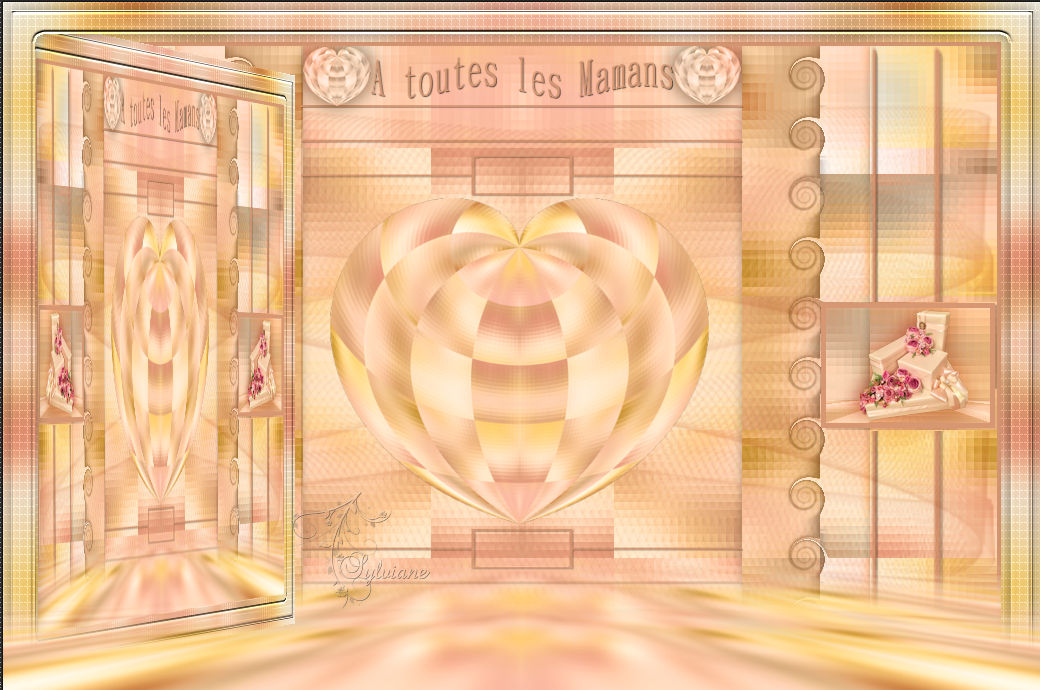
We have this now:
==================================================
16.
Open AVRIL 2024 UNE MAMAN 24 04 24 SEETY.png
Edit – Copy
Edit - Paste as new layer
Layers – arrange – bring to top
Image - Resize -45%
No check mark on resize all layers
Place on the left.
Adjust – brightness and contrast – brightness/contrast
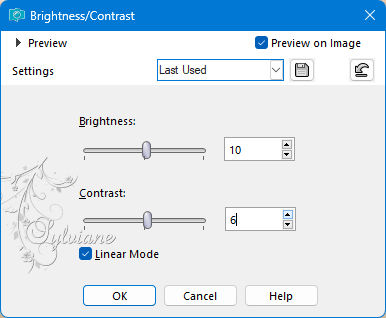
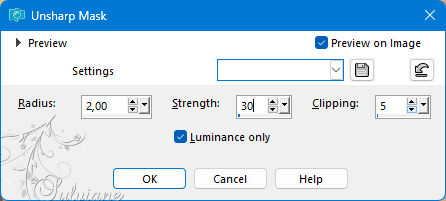
Adjust - sharpness - unsharp mask
Open AVRIL 2024 WORDART MOM 24 04 24 SEETY.png
Edit – Copy
Edit - Paste as new layer
Image - Resize -65%
No check mark on resize all layers
Place opposite the mom
Layers - Duplicate
Layers – arrange – move down
Adjust - blur - gaussian blur
Rang: 30.
Blendmode: Lighten
Cast shadow of your choice on each element
==================================================
17.
Layers - New Raster Layer
fill with AVP or ARP
Selection - Select All
Selection - modify - contract -10px
ERASE or DELETE on the keyboard –
Selection INVERT.
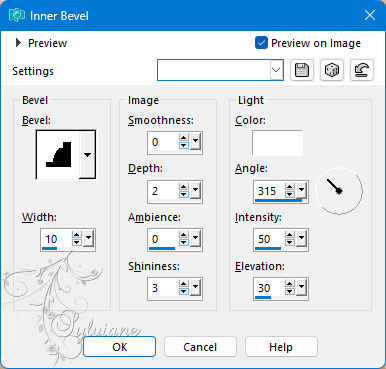
Effects – 3D effects – inner bevel (Bevel 4)
Selection - Select None
Layers - New Raster Layer
Selections - Load / Save - Load selection from disk - SELECTION 7 207 SWEETY.PspSelection

Fill the selection with a color of your choice in harmony with the rest -
Selection - Select None
Layers - Duplicate
Blenmode: Multiply
Opacity: 55%
==================================================
18.
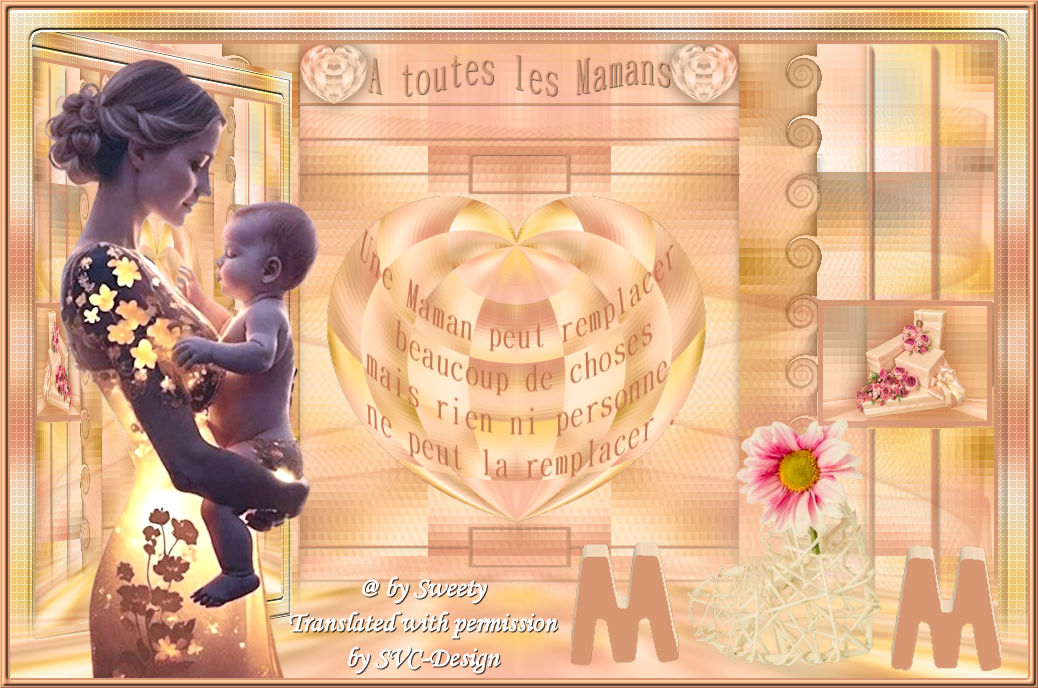
Put your signature and mine if you wish
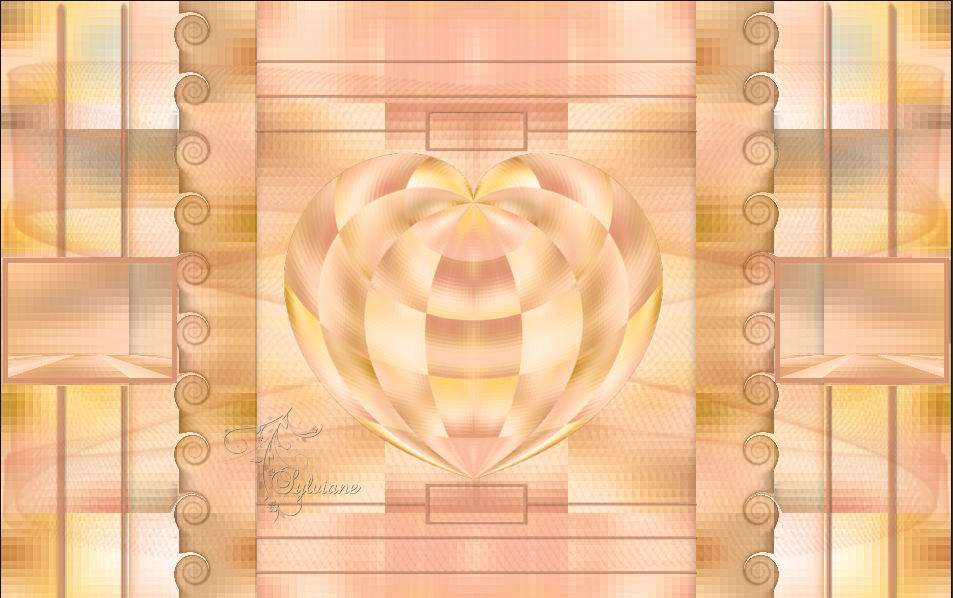
Layer – merge – merge all (flatten)
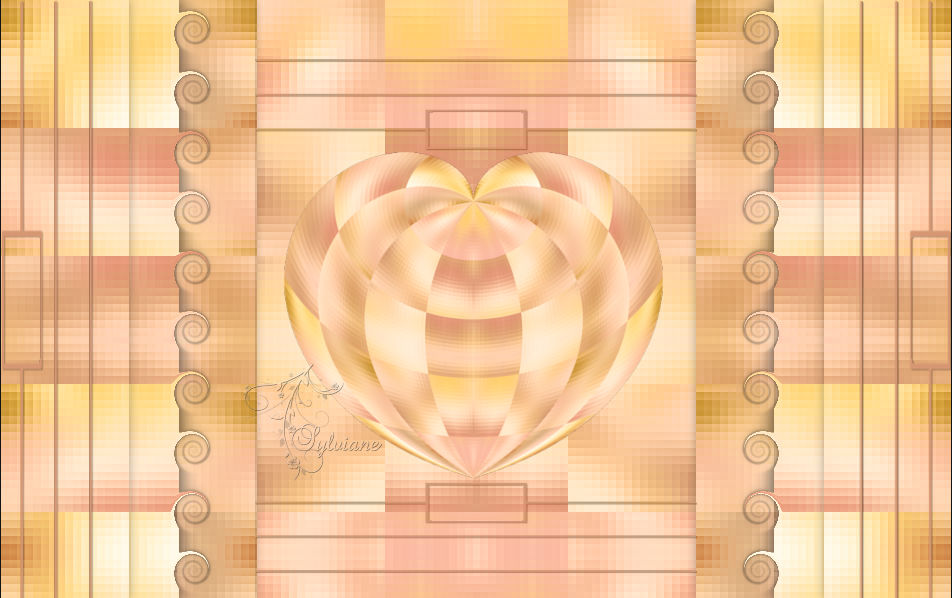
Resize to 950 pixels
Save as JPEG
Back
Copyright Translation 2024 by SvC-Design
------------------------------------------------------------------------------
Thanks to all who created