
This lesson is made with PSPX9
But is good with other versions.
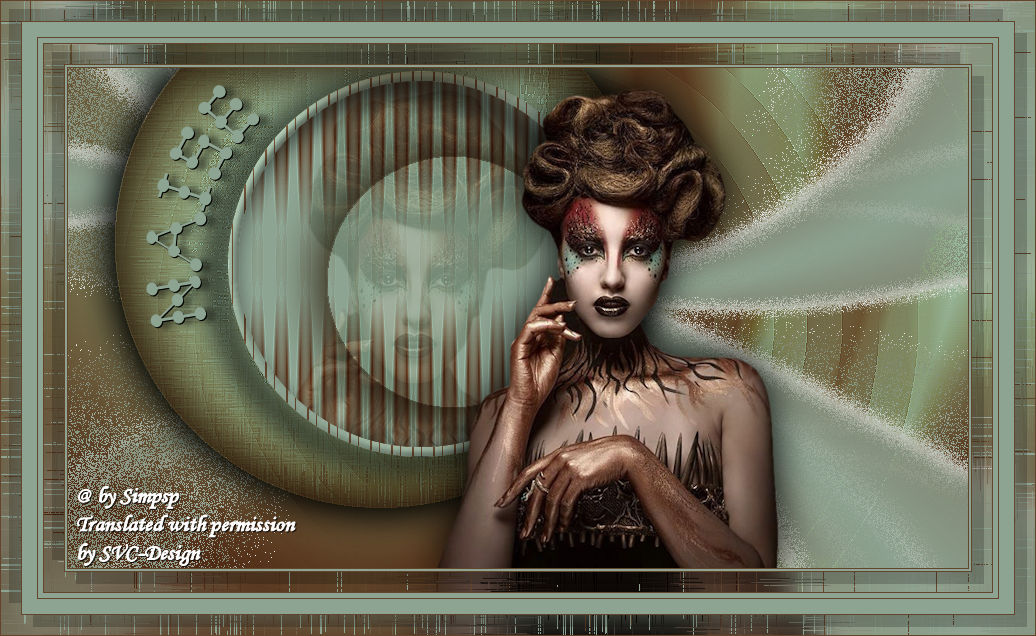
© by SvC-Design
Materialen Download :
Here
******************************************************************
Materials:
AlphaChannelNaiseBySoxikibem.pspimage
508MulherByPqnaAlice.png
TituloBySoxikibem.png
******************************************************************
Plugin:
Plugins - Backgroundmaniac - Medieval Impression
Plugins - Backgroundmaniac - Coarsed Embroidery
Plugins - Flaming Pear - Flexify 2
Plugins - Filters Unlimited 2.0 - Bkg Designer sf 10 I > Blur'em
Plugins - AP [Paint] - Paint Patchy
Plugins - Filters Unlimited 2.0 - Bkg Designer sf10 II > Evanescence
******************************************************************
color palette
:
******************************************************************
methode
When using other tubes and colors, the mixing mode and / or layer coverage may differ
******************************************************************
General Preparations:
First install your filters for your PSP!
Masks: Save to your mask folder in PSP, unless noted otherwise
Texture & Pattern: Save to your Texture Folder in PSP
Selections: Save to your folder Selections in PSP
Open your tubes in PSP
******************************************************************
We will start - Have fun!
Remember to save your work on a regular basis
******************************************************************
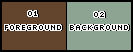
1.
Choice 2 colors for work.
Foreground: #63452e
Background: #8ea492
2.
Open AlphaChannelNaiseBySoxikibem.pspimage
Window – duplicate
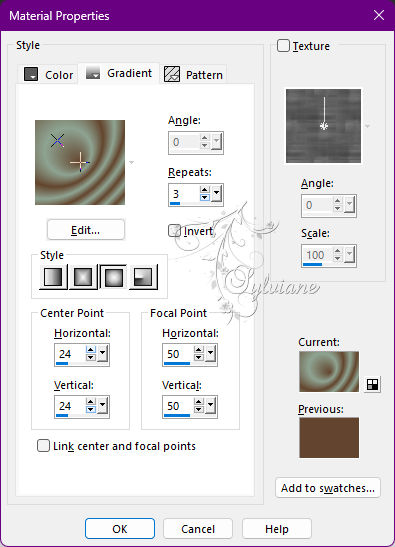
Minimize the original - we work on the copy
Paint transparency with a formed Sunburst gradient by the chosen colors:
3.
Selection – Load/Save Selection – Load Selection from Alpha Channel - Selection #1.
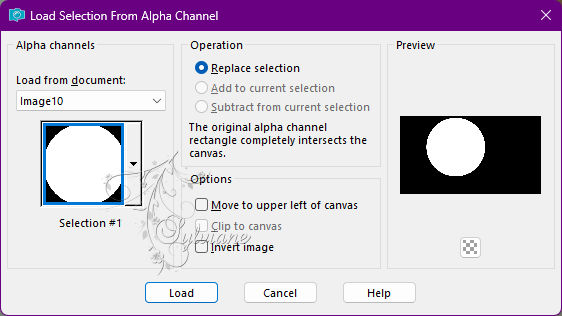
Selections - Promote Selection to Layer.
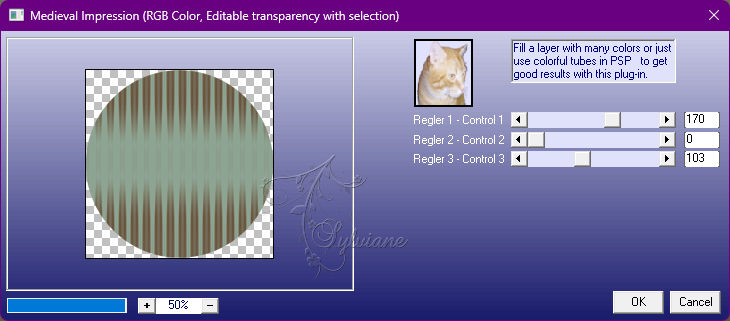
Plugins - Backgroundmaniac - Medieval Impression:
Effects - Edge Effects - Enhance.
4.
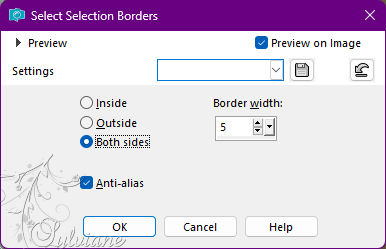
Selections - Modify - Select Selection Borders:
5.
Layers - New Raster Layer.
Paint with the color of the Foreground.
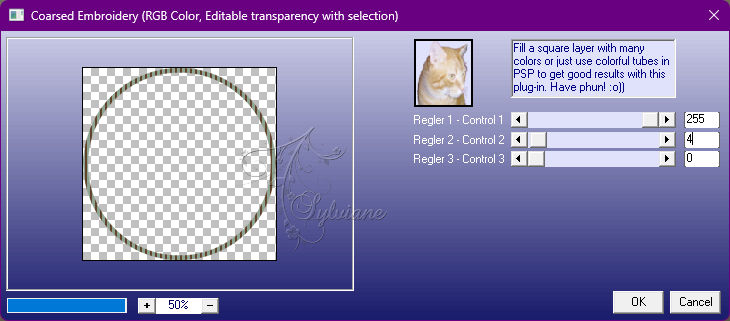
Plugins - Backgroundmaniac - Coarsed Embroidery:
6.
Effects - 3D Effects - Drop Shadow:
10/ -15/ 100/ 40 - Color: #000000 and Shadow on new layer marked.

Layers - Duplicate.
Layers - Merge - Merge Down.
7.
Activate Layer Raster 2.
Effects - 3D Effects - Inner Bevel:
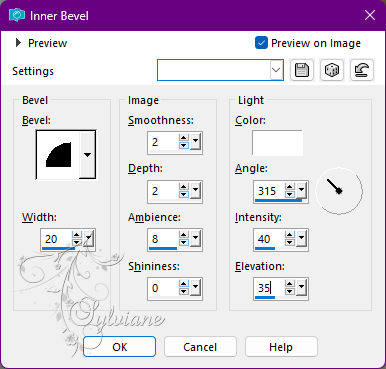
Selections - Select None.
8.
Activate layer promoted selection.
Selection – Load/Save Selection – Load Selection from Alpha Channel - Selection #1.
Open The Character Tube.
Edit - Copy
Edit - Paste As New Layer.
With the Move Tool position a part of the tube within the selection.
Selections - Invert.
Press the Deleted keyboard key once.
Selections - Select None.
Blend Mode: Soft Light
Opacity 45%.
9.
Activate the Raster layer 1.
Selection – Load/Save Selection – Load Selection from Alpha Channel - Selection #2.
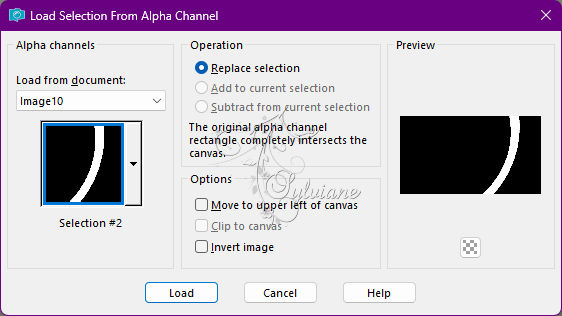
Selections - Promote Selection to layer.
Selections - Select None.
10.
Layers - Duplicate.
Image - Mirror - Mirror Vertical.
Layers - Merge - Merge Down.
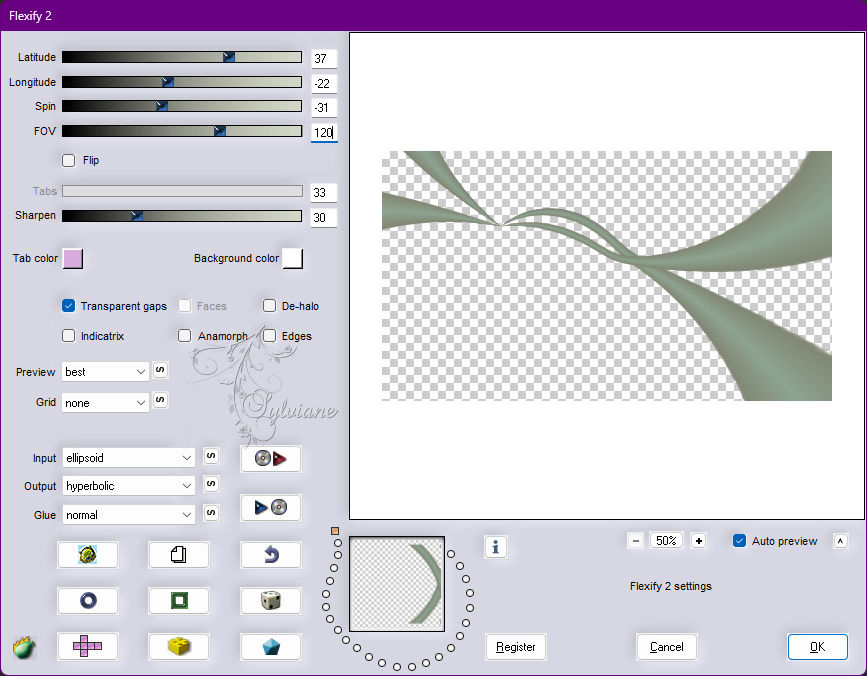
Plugins - Flaming Pear - Flexify 2:
11.
Plugins - Filters Unlimited 2.0 - Bkg Designer sf 10 I > Blur'em
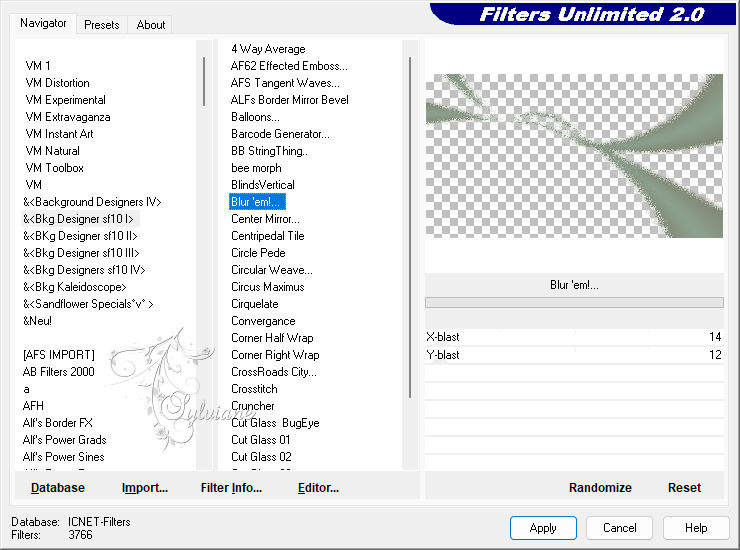
Blend Mode: Lighten.
Note the detail of the effect in the print below:
NOTE: If the applied effect does not have the clear, white
as of print, change the color from background to color white before applying
the effect and thus you will be able to achieve the same result.
12.
Layers - Duplicate.
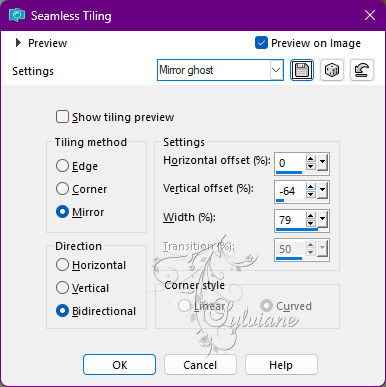
Effects - Image Effects - Seamless Tiling: Mirror ghost.
Layers - Arrange - Move Down.
Blend Mode: Dissolve.
13.
Selection – Load/Save Selection – Load Selection from Alpha Channel - Selection #3.

Press the Delete key on the keyboard once.
Activate Layer Promoted Selection1.
Press the Delete key on the keyboard once.
Keep the selection...
14.
Activate Layer Raster 1.
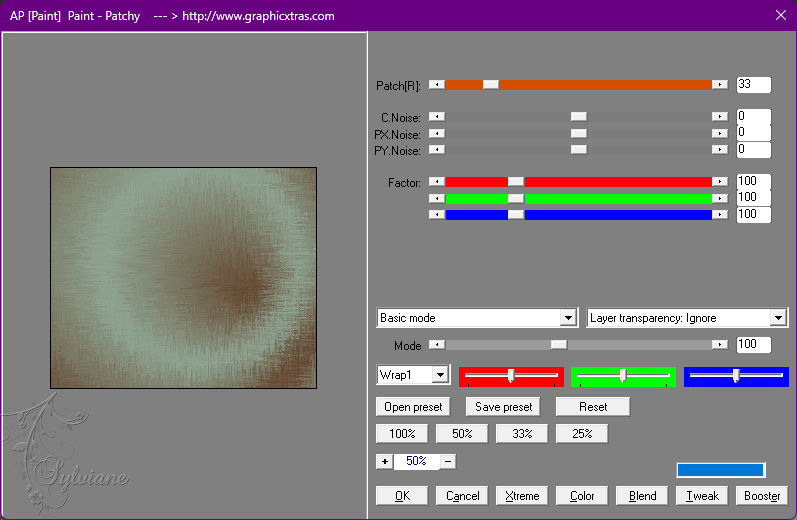
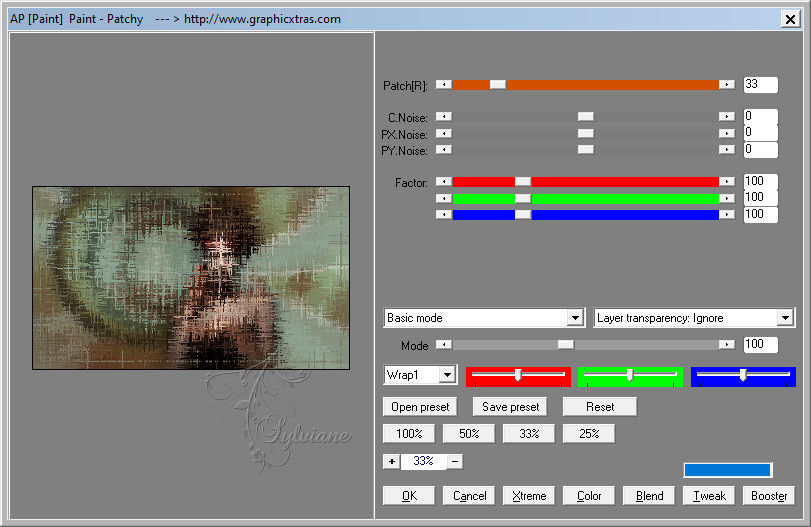
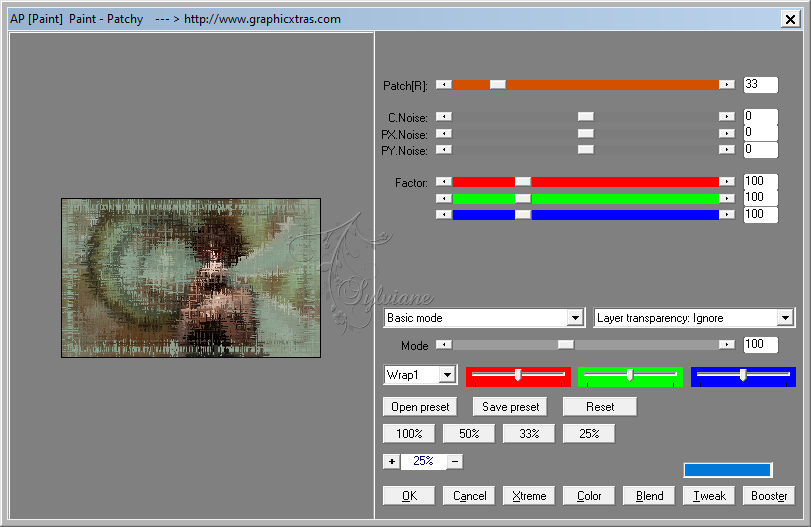
Plugins - AP [Paint] - Paint Patchy:
Adjust - Sharpness - Sharpen More.
Keep the selection...
15.
Activate the Top layer (Raster2).
Layers - New Raster Layer.
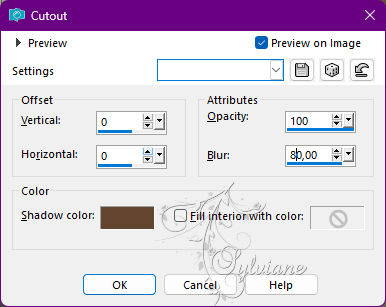
Effects - 3D Effects - Cutout:
Shadow color: Foreground color
Blend Mode: Multiply.
Selections - Select None.
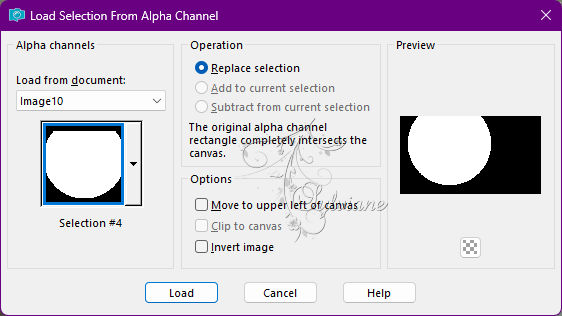
16.
Selection – Load/Save Selection – Load Selection from Alpha Channel - Selection #4.
Effects - 3D Effects - Drop Shadow:
0/ 0/ 100/ 60 - Color: Foreground Color, Shadow on new layer cleared.
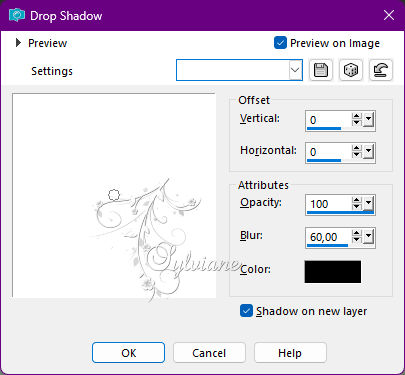
Edit - Repeat Drop Shadow.
Selections - Select None.
17.
Activate Layer Raster 1.
Layers - Duplicate.
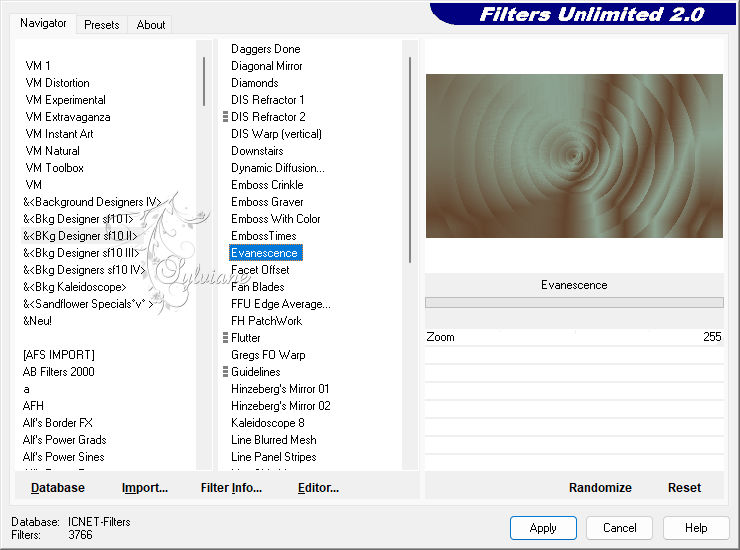
Plugins - Filters Unlimited 2.0 - Bkg Designer sf10 II > Evanescence: 255.
Blend Mode: Overlay.
Effects - Edge Effects - Enhance.
18.
Activate the Layer from the top.
Open the character tube.
Edit - Copy
Edit - Paste As New Layer.
Position at your choice.
Apply Drop Shadow or effect as you like.
19.
Open TituloBySoxikibem.png
Edit - Copy
Edit - Paste as New Layer.
Activate selection tool (Press K on your keyboard)
And enter the following parameters:
Pos X : 78 – Pos Y : 10
Press M.
20.
Edit - Copy special - Copy merged
Image – Add Borders –symmetric - 1px - Color: Foreground color
Image – Add Borders –symmetric - 2px - Color: Background Color
Image – Add Borders –symmetric - 1px - Color: Foreground color.
21.
Selections - Select All.
Image – Add Borders –symmetric - 20px with any color.
Selections - Invert.
Edit - Paste Into Selections.
Adjust - Blur - Gaussian Blur: 15.
22.
Plugins - AP [Paint] - Paint Patchy:
23.
Selections - Invert.
Effects - 3D Effects - Drop Shadow:
12/12/ 20/ 0 - Color: #000000 (black).
Effects - 3D Effects - Drop Shadow:
-12/ -12 /20/ 0 - Color: #000000 (black).
Selections - Select None.
24.
Image – Add Borders –symmetric - 1px - Color: Foreground color
Image – Add Borders –symmetric - 5px - Color: Background Color
Image – Add Borders –symmetric - 1px - Color: Foreground color.
Image – Add Borders –symmetric - 15px - Color: Background Color
Image – Add Borders –symmetric - 1px - Color: Foreground color.
25.
Selections - Select All.
Image – Add Borders –symmetric - 20px with any color.
Selections - Invert.
Edit - Paste Into Selections.
26.
Adjust - Blur - Gaussian Blur: 15.
Plugins - AP [Paint] - Paint Patchy:
27.
Selections - Invert.
Effects - 3D Effects - Drop Shadow:
12/ 12/ 20/ 0 - Color: #000000 (black)
Effects - 3D Effects - Drop Shadow:
-12/ -12/ 20 / 0 - Color: #000000 (black)
Selections - Select None.
28.
Image – Add Borders –symmetric - 1px - Color: Foreground color.
29.
Apply your watermark or signature
Layer – merge – merge all (flatten)
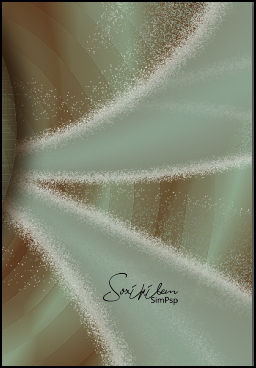
Save as JPEG
Back
Copyright Translation 2022 by SvC-Design