
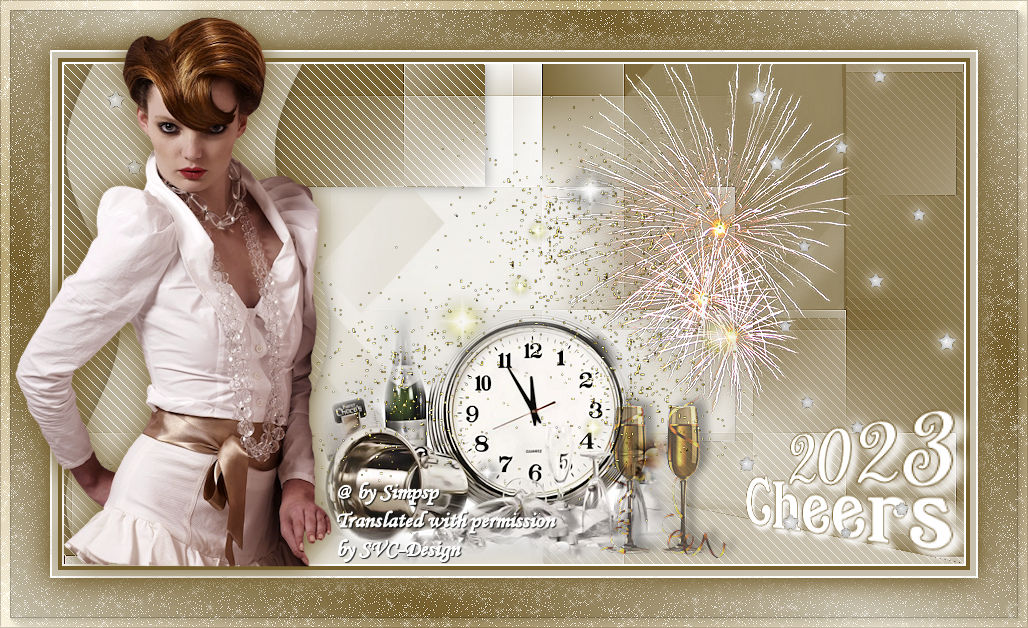
This lesson is made with PSPX9
But is good with other versions.
© by SvC-Design
Materialen Download :
Here
******************************************************************
Materials:
Deco_cheers2023_estrelas_byCidaBen.pspimage
poudredoretoile_newyear_linette.png
BuenaParkJF.ttf
Mirielle.ttf
NarahsMasks_1721.jpg
selection1_cheers2023CBen.PspSelection
selection2_cheers2023CBen.PspSelection
selection3_cheers2023CBen.PspSelection
titulo_cheers2023_ByCidaBen.pspimage
12930422302_divers_nikita.png
13508436274_noel_nikita.png
Eva_CibiBijoux.pspimage
ltdstudio_NewYear2020_Deco.pspimage
******************************************************************
Plugin:
Plugins - I.C.Net Software - Filters Unlimited 2.0 - Toadies > Weaver.
Plugins - AP 01 [Innovations] - Lines - SilverLining
Plugins - Simple - Zoom Out and Flip
Plugins - MuRa's Meister - Perspective Tiling
Plugins - Alien Skin Xenofex 2 - Constellation
Plugins - AAA Frames - Foto frame
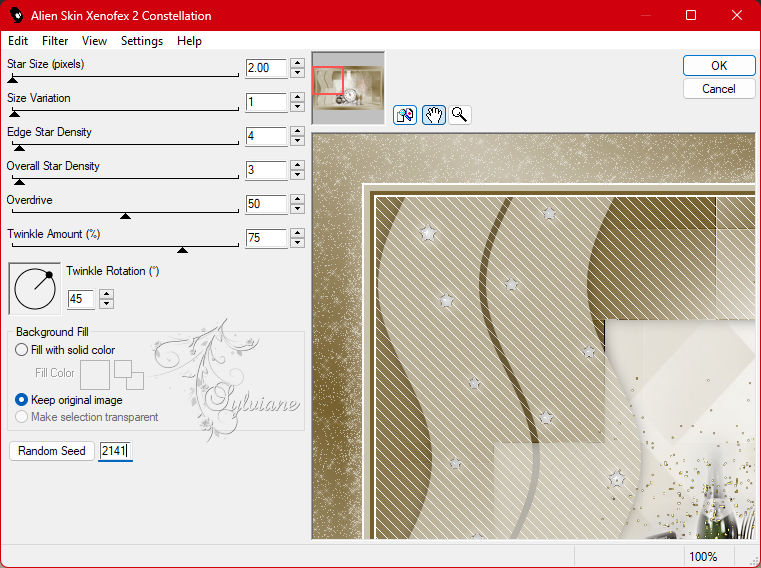
******************************************************************
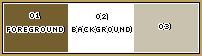
color palette
:
******************************************************************
methode
When using other tubes and colors, the mixing mode and / or layer coverage may differ
******************************************************************
General Preparations:
First install your filters for your PSP!
Masks: Save to your mask folder in PSP, unless noted otherwise
Texture & Pattern: Save to your Texture Folder in PSP
Selections: Save to your folder Selections in PSP
Open your tubes in PSP
******************************************************************
We will start - Have fun!
Remember to save your work on a regular basis
******************************************************************
1.
Choose three colors to work with.
Foreground: #765f2e.
Background: #ffffff.
Color 3 Extra: #c9c2af
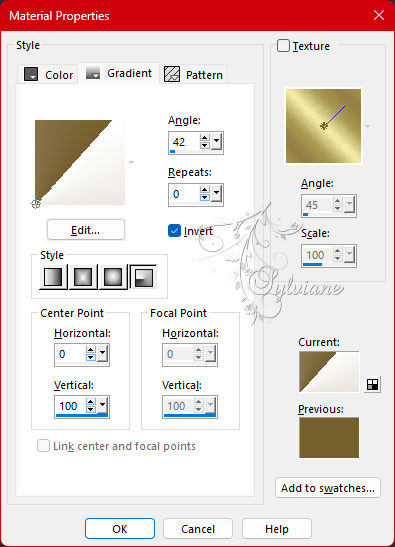
2.
Open a new transparent image of 900 X 500 px
Paint transparency with gradient: Radial > Angle: 42 > Repeats: 0.
Invert Pronounced.
Center Point > H 0 > V 100
Formado by colors foreground and background.
3.
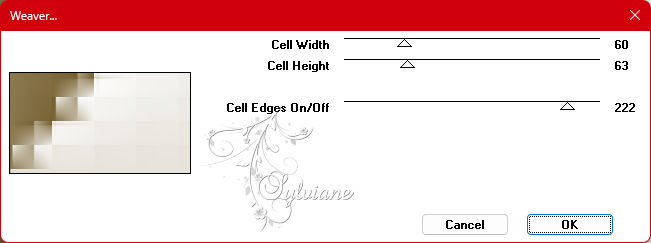
Plugins - I.C.Net Software - Filters Unlimited 2.0 - Toadies > Weaver.
Effects - Edge Effects - Enhance.
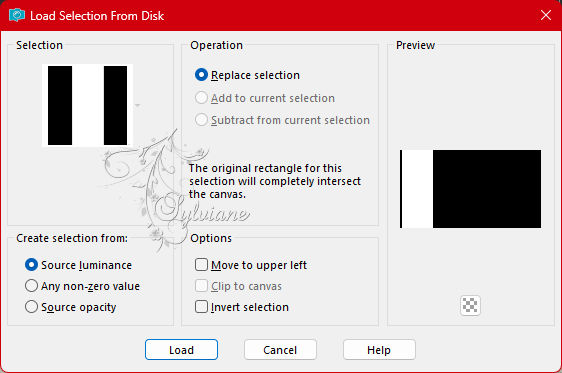
4.
Selections - Load/Save Selection - Load Selection From Disk - selection1_cheers2023CBen.
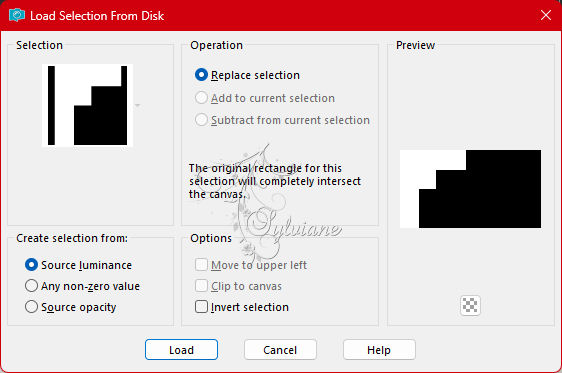
Selections - Promote Selection to Layer.
Selections - Select None.
5.
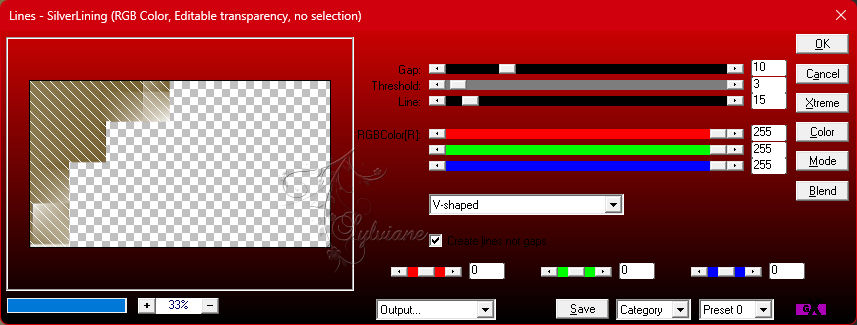
Plugins - AP 01 [Innovations] - Lines - SilverLining:
6.
Effects - 3D Effects - Drop Shadow
0/0/40/20 - Color (#000,0000)
7.
Layers - Duplicate.
Image - Mirror - Mirror Horizontal.
Image - Mirror - Mirror Vertical.
Opacity: 30%
8.
Selections - Load/Save Selection - Load Selection From Disk - selection3_cheers2023CBen.
Layers - New Raster Layer.
Paint with Color 3 Extra: #c9c2af.
9
Layers - New Mask Layer - From Image: NarahsMasks_1721.
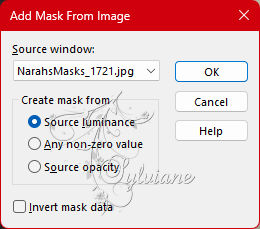
Layers - Merge - Merge Group.
Layers - Duplicate
Selections - Select None.
Layers - Merge - Merge Down.
10.
Open 12930422302_divers_nikita.png
Edit - Copy
Edit - Paste A Activate selection tool (Press K on your keyboard)
And enter the following parameters:
Pos X : 263 – Pos Y : -100
Press M.
Adjust - Sharpness - Sharpen.
Effects - 3D Effects - Drop Shadow
0/0/40/20 - Color: Foreground (#765f2e).
11.
Open 13508436274_noel_nikita.png
Edit - Copy
Edit - Paste As New Layer.
Image - Resize - 60% > all layers cleared.
Activate selection tool (Press K on your keyboard)
And enter the following parameters:
Pos X : 239 – Pos Y : 227
Press M.
Adjust - Sharpness - Sharpen.
12.
Open tdstudio_NewYear2020_Deco.pspimage
Edit - Copy
Edit - Paste As New Layer.
Image - Resize > 60% > all layers cleared.
If you are using the material tube:
Activate selection tool (Press K on your keyboard)
And enter the following parameters:
Pos X : 533 – Pos Y : 310
Press M.
Blend mode: Multiply
Opacity: 65.
Note in version2 I used blende mode: Luminance(L).
Adjust - Sharpness - Sharpen More.
13.
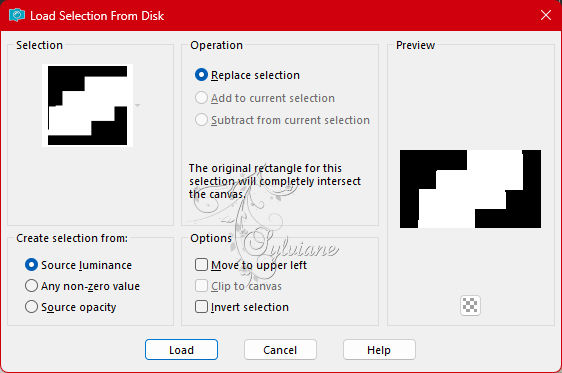
Selections - Load/Save Selection - Load Selection From Disk - selection2_cheers2023CBen.
Layer - New Raster Layer.
Paint with Color 3 Extra: #c9c2af.
Selections - Select None.
14.
Plugins - Simple - Zoom Out and Flip.
15.
Effects - Distortion Effects - Wave.
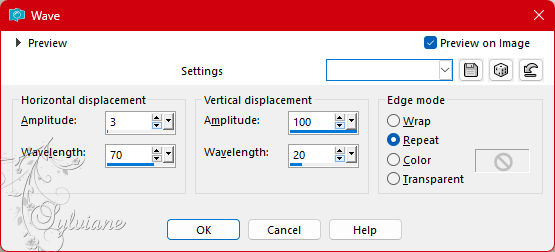
Activate selection tool (Press K on your keyboard)
And enter the following parameters:
Pos X : 2 – Pos Y : 0
Press M.
16.
Plugins - AP 01 [Innovations] - Lines - SilverLining:
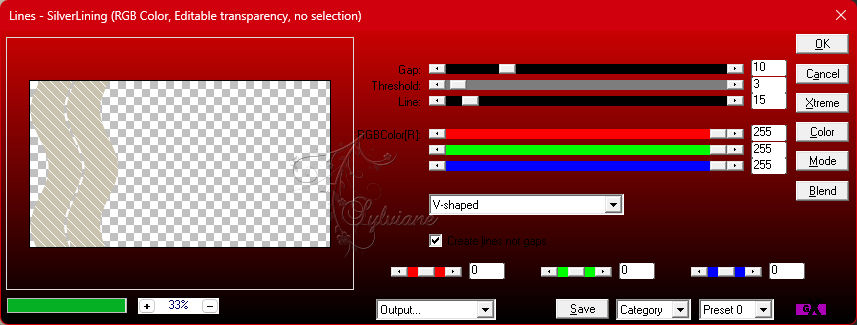
Opacity: 75%.
Effects - 3D Effects - Drop Shadow
0/0/40/20 - Color #000000
17.
Open poudredoretoile_newyear_linette.png
Edit - Copy
Edit - Paste As New Layer.
Adjust - Sharpness - Sharpen.
18.
Check the layers:
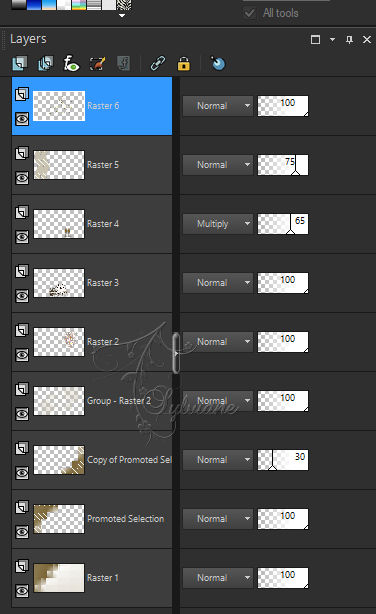
19.
Activate Raster 1.
Layers - Duplicate
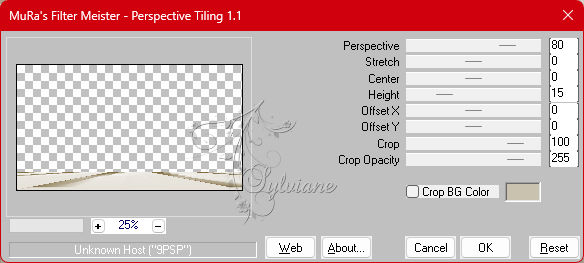
Plugins - MuRa's Meister - Perspective Tiling
20.
With the Magic Wand: Tolerance 0, Feather 50 tool,
click the transparent top of this effect to select:
Press the Delete key on the keyboard 5 times.
Selections - Select None.
21.
Activate Raster 1
Image - Mirror - Mirror Horizontal.
22.
Activate Raster 5
Open Deco_cheers2023_estrelas_byCidaBen.pspimage
Edit - Copy
Edit - Paste As New Layer.
Activate selection tool (Press K on your keyboard)
And enter the following parameters:
Pos X 33 – Pos Y : 10
Press M.
Effects - 3D Effects - Drop Shadow:
0/0/100/20 - Color Background (#ffffff).
Adjust - Sharpness - Sharpen.
23.
Turn on Top Layers.
24.
Open The Character Tube.
Edit - Copy
Edit - Paste As New Layer.
Position to the left of the job.
Resize if necessary.
Adjust - Sharpness - Sharpen.
Apply Drop Shadow or effect you want.
NOTE: If you prefer to add your tube after the edges at the end of the tutorial.
25.
Image – Add Borders –symmetric - 2px - Color: Color Background #FFFFFF
Image – Add Borders –symmetric - 4 px - Color: Foreground #765f2e
Image – Add Borders –symmetric - 6 px - Color: Extra Color #c9c2af
Image – Add Borders –symmetric - 2px - Color: Color Background #FFFFFF
Selections - Select All.
26.
Image – Add Borders –symmetric - 50 px with any color.
Selections - Invert.
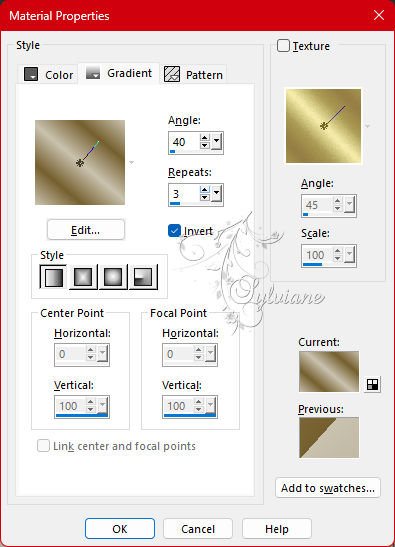
Paint with linear gradient, Angle 40, Repeats 3, Invert marked.
Formed by the > Foreground: (#765f2e) and Color 3 Extra: (#c9c2af)
27.
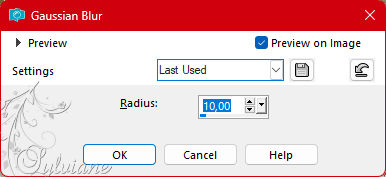
Adjust - Blur - Gaussian Blur - Radius: 10.
28.
Plugins - Alien Skin Xenofex 2 - Constellation:
Adjust - Sharpness - Sharpen
29.
Selections - Invert.
Effects - 3D Effects - Drop Shadow:
0/0/100/40 - Color: Foreground (#765f2e).
Edit - Repeat Drop Shadow.
Selections - Selec None.
30.
Open titulo_cheers2023_ByCidaBen.pspimage
Edit - Copy
Edit - Paste As New Layer.
Activate selection tool (Press K on your keyboard)
And enter the following parameters:
Pos X : 745 – Pos Y : 405
Press M.
Apply the effect you want.
Adjust - Sharpness - Sharpen
31.
Open Deco_cheers2023_estrelas_byCidaBen.pspimage
Edit - Copy
Edit - Paste As New Layer.
Activate selection tool (Press K on your keyboard)
And enter the following parameters:
Pos X : 739 – Pos Y : 70
Press M.
Effects - 3D Effects - Drop Shadow
0/0/100/20 - Color Background (#ffffff).
Adjust - Sharpness - Sharpen
32.
Layers - Merge - Merge All (Flatten).
33.
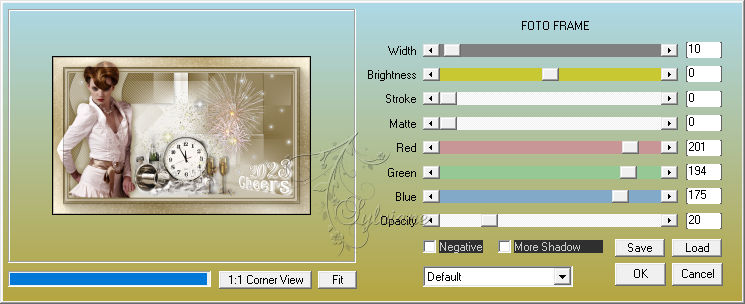
Plugins - AAA Frames - Foto frame
34.
Apply your watermark or signature
Layer – merge – merge all (flatten)
Save as JPEG
Back
Copyright Translation 2023 by SvC-Design